
Category: Organization
Articles in the Organization category
I have a clean and organized studio. Well, as long as you don’t open up the Wardrobe it’s all nice and clean and organized. A bit at a time. I’ve got a bit of the wardrobe done, but it won’t be finished until I can move bits of unfinished presents out of there. Finishing them would be a start.
But look at the rest of the room! :)
I’ve been finishing up a few major project and haven’t had any time to clean, so this makes me so happy. I have a desk again. I have an ironing board that isn’t masquerading as a spare table. I have a bed that isn’t masquerading as a table. I have a floor that isn’t masquerading as a table. I’m happy.
I haven’t posted any photos of my studio since I rearranged, so here they are! I like this arrangement soooo much better. You can see the original layout here.
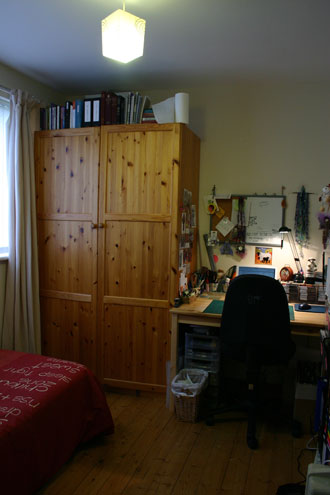
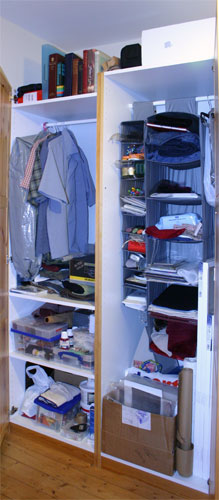
This wall is where the shelf used to be. The day I discovered the wardrobe came apart into two moveable pieces (rather than one non-moveable piece) was the day it found it’s new home. I pretty much keep the same stuff in my wardrobe as I’ve always done but I’ve taken out all the small stuff. I mainly keep fabric, yarn and big stuff in here now.
I also moved my reference books from the top shelf to the top of the wardrobe. I think I’m liking this. I debated moving them onto the bookshelf in the lounge, but decided that I really wanted them in my studio. I don’t like being separated from my books. My alterable books also live here. I don’t use my books that much, so they really didn’t need to be right next to my desk, but I still need them close at hand if they are needed. I think this is a good compromise.
Next to the wardrobe is the desk. I’ve tacked inspirational photos on the side of the wardrobe and moved the pinboard above my desk (the desk used to be under the window, so this never used to be an option). My pen jars and tool caddy is there. I’ve also installed a wooden CD holder to hold CDs full of unmounted stamps. On that I’ve got my favourite ink pads, my clock, light and a few sheep. :)
The shelf is on the back wall, again at a 90 degree angle to my desk. This set up works so well for me. I keep my verticle paper holders there, as well as my foam stamp files, photos, binders for stickers and rub-ons,
ribbon, and other assorted essentials on this shelf. My towers of small embellishments live on the space on the other side of the paper storage that you can’t see. Adhesives, heat guns and a few other items also live here.
I really had to sort out my magazines. The only magazines that now live this shelf are my stamping, fabric and mixed media mags which I could never part with and use constantly for techniques and inspiration.
I’ve been loving the take away containers as storage devices. I use them to store chipboard, flowers, threads, beads, art supplies and all manner of great junk to use in my art. Scrapbooking containers are on the middle shelves, while all the others are on the top shelf sorted into meaningful piles. I’m really liking this. They use to live in the wardrobe, but unless they had a shelf they kinda got lost. I also like have my thread sorted into reasonable groups rather than tossed in 6 random non-thread boxes.
My ironing board now lives permanently set up along the wall next to the shelf. I’ve also set it to a low height so I can just wheel my chair from the desk to the ironing board and back again without having to get up. I hate ironing… I have to make it fun somehow. ;)
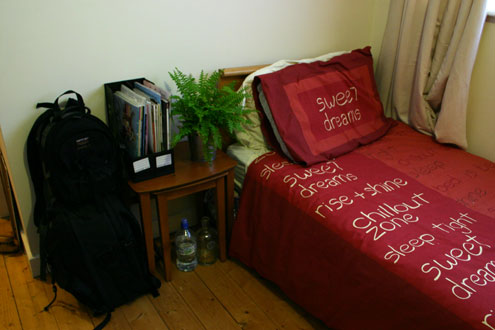
Finally the bed area, which actually looks like somebody might be able to comfortably sleep in it. Complete with side table and plant. My current magazines live in the magazine rack on that table. My photo bags live beside it.
I still have the wardrobe to sort out, which actually shouldn’t take too long since most of it was sorted the last time I organized. I also have a rack full of magazines in the corridor to sort through. I really need to flip through them, pull out what I really want and discard the rest. They take up too much space so anything that pre-dates 2006 is going to be taken apart and filed.
Hope you enjoyed the tour. :)
I picked this up at poundland the other week. I love this thing. I found it in the gardening section on offer for only 50p as part of their end of season sale, and it is perfect for holding my tools that I’m constantly using.
The pot on the left holds my pliers, cutters and my hole punches. The pot in the centre holds all my ‘play’ brushes (for painting in altered books, glueing, etc.—I keep my artist brushes in a brush roll). The right pot is for my scissors, knives and gluestick. I love this system because it is so easy to put stuff away.
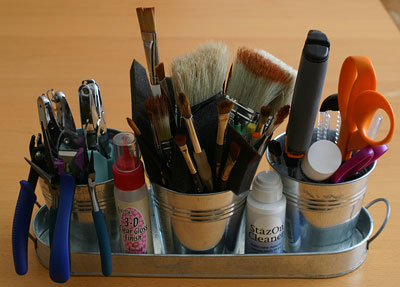
Obviously, this photo wasn’t taken with the organizer on my desk, as my desk is never that tidy! ;)
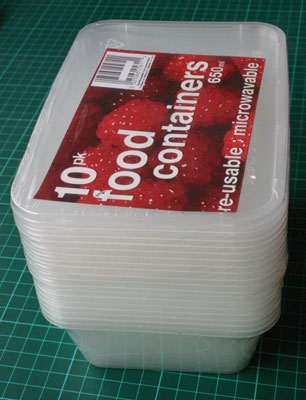
Cheap. Plastic. My new favourite storage device…. the humble takeaway container. We’ve been using these things for our freezables for eons, but I thought they could be quite useful for storing a lot of my random small stuff. I several stacks of 10 from the local poundland and got to work sorting. I think I have about 30 or 40 in use at the moment, storing everything from chipboard to flowers, from wire to rafia, from postage stamps to pens.
I’ve labelled all my containers as to their contents, although for the most part you can see through them fairly easily. I really like the fact that they stack, they are large enough to store enough small stuff but small enough to fit into various locations. They are just so handy and (the best bit) affordable. :)
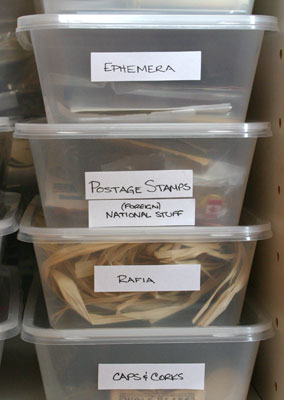
For the most part I’ve tried to separate my scrapping stuff into individual containers. I’m using these containers for most of my chipboard embellishments, and each set gets their own container. Once I start running out of a given set I will probably start amalgamating them. I did the same thing for my flowers and pens. When it comes to the components I use for my altered art and assemblage pieces, I tried to group like-minded things such as ‘caps and corks’, ‘postage stamps’ and ‘plastic things’... I might have to work on that last one.
I really think the labelling bit is important. It’s just making everything so much easier to find and organize.
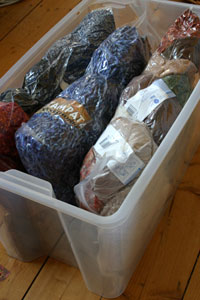
I’ve need a better way to store my yarn for a while. It’s not that the way I was storing it was bad or anything, I had the balls stored in 2 clear plastic tubs. The problem was that I had them in the corner behind my desk where they were hard to get to and they often became a resting spot for other things, making it even harder to pull anything out of them. To add to that, I always kept my unfinished knitting projects in plastic carrier bags that were piled haphazardly around the yarn containers.
I pulled everything out of the corner, and sorted my yarns into A3 griplock bags in some sort of colour theme, as well a bag of my most loved yarns. I then squeezed all the air out of the bags, so they take up nearly half the space (as you can see in the photo). I’m not using the container anymore, since I figured it was more valuable for other things, instead I’ve piled them on the floor of my wardrobe where I have easy access to them. I’ve also taken all my knitting projects out of their plastic carrier bags and put them into the A3 griplock bags so I can see, at a glance, what is in them. They now live on top of the yarn bags.
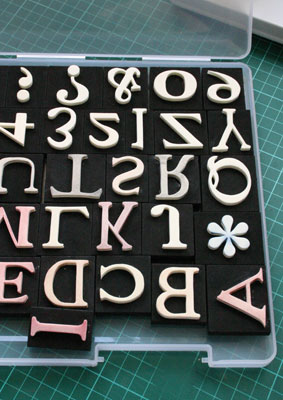
This is a method I’ve been using for several years… since foam stamps became popular with scrapbookers. It’s the easiest and most convenient method I’ve found.
First thing, get rid of the box the foam stamps came in… they are just not a good design when it comes to storage because you end up spending more time trying to get all the stamps back in the package than it’s worth.
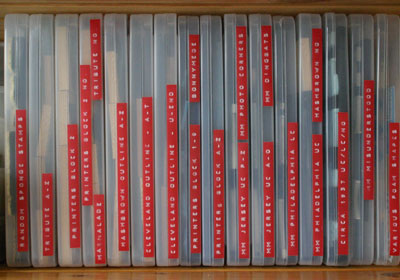
Next, you need to get yourself some document boxes. Rumour has it that Target carries these boxes in America. In the UK, check out the Tiger Brand A4 Slim box. If you google it you’ll come up with lots of stockists, but Stationery Box and Staples both carry them. They are the perfect size as you can lay a single layer of foam stamps inside without them slipping around.
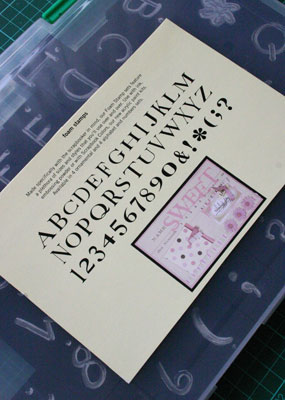
When I get a set, I usually like to mark the letter on the back of the stamp with a paint pen, this way I know if I have the stamp upside down or right side up without thinking too much. For those letters that have an upside down/backward equal (think b,d,p,q) I’ll also put a dot above the letter to indicate the top.
I also like to cut the sample lettering off the package and tape that to the back of the document box for reference. Then it’s just a matter of putting them on the shelves. I prefer laying them on their spines, and I run a strip of Dymo tape with the name of the stamp on the outside edge.
What I love about this is how easy it is to get my stamps out, but even better, how easy they are to put away. The latter is important because if it’s difficult to put away, it will become a pile in my studio!!
Well, I’m at it again—organizing that is. I’ll be posting my progress as I go, as I’ve found it really helpful to link back to them! :)
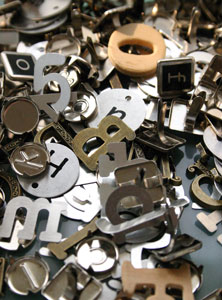
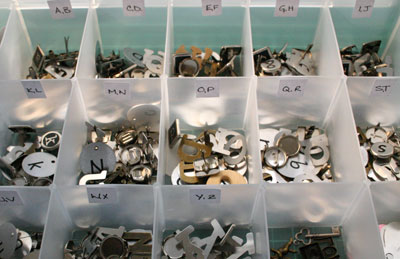
I used to have all my alphas sorted by letter, then someone suggested to just dump them into a single container. Since I was using two floss boxes and I was really desperate for another box, I dumped one of the boxes into a container. This method just didn’t work for me. I actually took that container and hid it at the very back of my shelf where it was nigh impossible to reach so I wouldn’t use them because it annoyed me that much.
As a solution, I decided to re-organize them by letter again. To save space I’ve put 2 letters in each ducket, which at least is workable. I’d love one of those multi-drawer hardware organizers so each letter has it’s own drawer and I could add larger chipboard letters to the mix as well. However, I think that idea will have to wait a while as I really don’t have the space to accommodate such a unit.
I had a couple of spare duckets so I’ve used for various other metal things, including words and charms. Here’s the result:
This is the first time I’ve ever posted photos of my studio. It’s not a big space, and since we live in a letted flat I don’t have many decorating options… but it is my own space. What I do have is a huge south-facing window which means I get as much light in my studio as one can get in NorthEast England. I love my window. :)
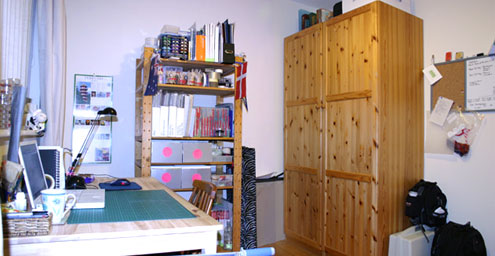
This is the overall view of the room, taken from the furthest corner of the room (while sitting on the bed). I’m slowly getting my studio the way I want it, but unfortunately it does take time, and we only moved into this flat a couple months ago.
You can see my desk, my shelving (which is mostly scrapbooking supplies), and my wardrobe (which is mostly for other stuff). Next to the wardrobe I have a combo White Board/Cork Board where I keep track of upcoming deadlines and other important stuff. I try to keep all my creative stuff in this room, so I’ve made spaces for things like my trombone, camera bags, sewing machine, books and magazines.
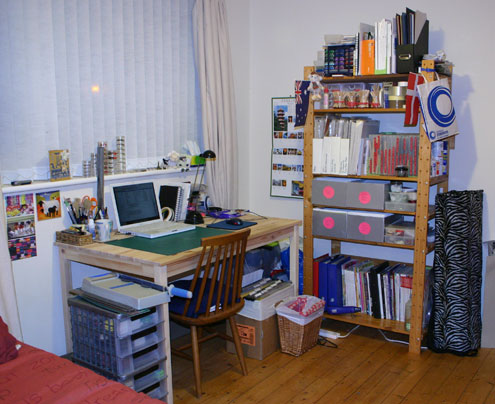
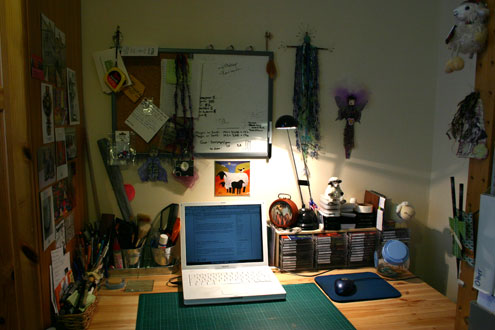
A bit better view of my work area. I’ve got a multi drawer rolling cart which holds important stuff like adhesives, some of my rubber stamps, ink pads, embossing powders, chipboard and other embellishments.
Under my desk is my box of cardstock. I use hanging file folders, sorted by colour. This box used to live on the shelf, but it was just too far to reach, so it now lives under the desk next to the bin… which is something I always have to be careful about so that the rubbish goes into the bin and the cardstock goes into the files.
In the corner behind the desk and shelving unit are a couple of large plastic storage bins. This area is mainly for my collection of yarns, knitting and crochet needles and in knitting projects which are in progress. I don’t need access to this stuff much, so it was a good use of space that otherwise would have been wasted.
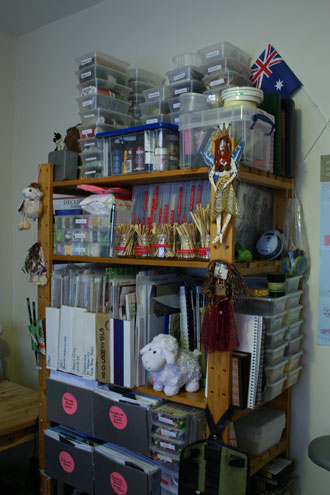
My bookshelf. I couldn’t live without this next to my desk. The top shelf holds my big ink caddy (I don’t use it that often, but when I need certain colours, it’s brilliant), a few idea notebooks, some magazines and clippings for use in my gluebooks, chipboard remnants, and my collection of A4 paper and card.
Second shelf is mostly rubber stamps, behind which is my backup supply of adhesives, blades and other staples.
Third Shelf contains the two most used items. First, patterned paper which is stored in homemade vertical storage holders divided up by manufacturer. Since writing the article on my paper holders, I’ve started putting each line/manufacturer into grip-lock bags within the boxes. It’s great because now if I want some Chatterbox paper, I simply grab the appropriate folder out of the holder. I love it. The rest of the shelf holds my collection of foam stamps, which I use all the time. On the very end of this shelf I keep all other adhesives, such as PVA, Modge Podge, Spray Mount, Fixative, etc. I don’t use them as often as other adhesives, but they are in easy reach if I need them.
The forth and fifth shelves hold my boxes of photos, and my floss boxes which hold bits and pieces including ribbon, flowers, hardward, etc.
The bottom shelf holds all my books and mags. The big binders on the inside hold my sticker and rub-ons, and then my collection of books and magazines on scrapbooking, textiles, and photography. Most of my books are actually in storage…. I really miss them. My heat gun also lives on this shelf. I’ve found out that if I keep it plugged in and within easy reach I’m more likely to use it.
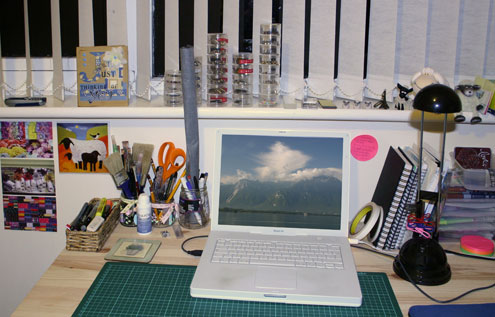
My desk. It’s just a cheap desk we bought at Ikea, but it’s perfect for me. I have an A2 cutting mat I use as a worksurface, and keep all my necessities on the table. My laptop is now centred on the desk. I used to have it on the end of the table, but it kept causing me neck pains, so I moved it. I have to be careful not to get my supplies on the computer, but since I often read websites while I’m working I’ve found this to be the best place for it. Fortunately it is a laptop, and can be easily moved if I’m doing something extremely messy.
I keep my pens in my a small wicker basket, while my brushes, scissors, knives, pencils and regular ballpoint pens stand in little glass jars. I also keep my double sided tape, current idea notebooks, my dymo, Sakura pens, stapler and post-it note pad within easy reach.
My little embellishments such as brads live in stacking storage containers on the window sill, along with a small herd of sheep.
This is the wardrobe—all the other stuff lives here. On the left-side we have some of Joey’s off-season wardrobe, a shelf of textile-related supplies, and the bottom shelf is mostly art supplies. The right side is mostly for altered art. It’s actually quite a mish-mash of stuff, including art supplies, fabric, clothing that is going to be ripped apart for use in assorted projects, canvases and layouts which are waiting for albums. It really is organized, and it realling does make sense… even if the only person it makes sense to is me. I store all my altered books in-progress on top of the wardrobe, along a few camera bag attachments, as well as a few other pieces of junk which I actually do need to keep. It’s all within easy reach, but this way they are not in my way.
There’s also an A1 project bag tucked between the wardrobe and the wall that stores my watercolour paper, large sheets of cardstock and large sheets of chipboard.
And that’s my studio. Hope you’ve enjoyed the tour.
I’ve been doing a lot of scrapping lately. I’ve been doing a lot of thinking about scrapping lately. Although, apparently I haven’t been doing a lot of writing about scrapping lately. ;) I guess I was too busy scrapping… most of which are DT layouts. I’m loving these products, and can’t wait to share them with everyone!
But in my thinking about scrapping, I’ve been thinking about albums. And album organization. I only have a few actual albums. 4 to be precise. However, this is a large step from the zero I had last year. All the layouts that can be in albums are in albums, and the rest are simply seeking a home. And like most scrappers, those layouts live in piles. Piles and piles and piles of layouts.
I was not happy with the situation. Here are my precious layouts—layouts I’ve spent hours on— getting crushed, warped and bent out of shape by my lumpy-bumpy embellishments. So last night I did something about it.
I grabbed my pile of recent layouts (from the last year), and divided them into piles based on appropriate albums. I then bagged them in large grip-lock bags, and stood them up in a box. (Tip: the box isn’t full with layouts, and I was afraid of the laytous bending and warping, so I placed one of my altered books in there to fill the space. It seems to keep the layouts nice and upright.) Now after I finish my layouts, they either go into their albums, or go into this file of layouts waiting for albums.
By organizing my layouts in such a manner, I’m able to keep the layouts in the best condition possible. Free from warping. Free from dust and sunlight (if you put a lid on the box). And grouped into their appropriate themes. I also know which group is most deserving of an album, based on how full these bags are. And when I get around to ordering more alubms, it will be quick and easy to simply slide the layouts into their appropriate places, rather than my old trick of sorting through every single layout to find the layouts I wanted for the new albums.
While I was organizing my layouts, I also put name-tags on the 4 albums already on the shelf. I simply used some Making Memories vellum tags, and wrote the name of the album on it with my journalling pen. I got the idea from Carrie Owen’s scrap space. She uses them id for her in-progress albums, and I thought it was jus such a great idea.
I’m so happy with my new system. I just thought I’d share. :)
Depending on the number of photos you have, sorting them can be quite time consuming. However, scrapping your memories becomes much easier if your photographs are already sorted.
My suggestion is to sort your photos in small chunks of time—say 10 to 20 minutes. Where you begin to sort will depend on how far you’ve come in organizing your photos. So here’s a step-by-step list to get you started.
- 1. Put all your photographs in one spot. Collect them from all the various rooms and boxes, and simply put them in one spot. By having all your photos together, it will be easier to organize.
- 2. Now sort your photos by their decade. Get a photo box for each decade, and sort your photos into their appropriate boxes.
- 3. Create some sort of divider system, using one divider per year, and sort your photos into their respective places. Just do one box at a time. Once the photos are sorted by year, proceed to organize them by event, if relevant.
- 4. Add in any relevant information, like the 5Ws or journalling notes, either on the backs of the photos with a photo safe pen, or on index cards that can be keep alongside the photos.
- 5. As you get your photos back from the developers, make note of any important details and file your photos immediately! It’ll save you a lot of time in the long run. Also remember to file photos that you pulled for scrapping but didn’t end up using.
Once your photos are organized, you’ll need to find a system of storing them that works for YOU. I’ve mentioned a couple methods in a previous article that you might find interesting, including using envelopes or photo albums.
The key is to take 15 minutes a day to organize your photos, and organize them in small steps. The task will seem much less daunting if you approach it using baby-steps. It’s also amazing how much you can get accomplished over a short period of time.
The floor is not a storage device.
The floor is not a storage device.
Maybe if I keep repeating this to myself, it will eventually come true. I know that this mess does not help my creativity. I know I need to tidy it up. I also know that it didn’t take much to create this mess, because a couple days ago the floor was clean. I will clean the floor as soon as I finish my current layout.
Until then, I’ll just keep repeating to myself… the floor is not a storage device.