
Category: Altered Items
Articles in the Altered Items category
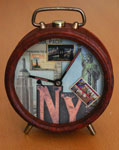
I love getting really cool papers in the post, and when I received the Tim Holtz papers by Design Originals as part of my sponsor package for Scrap That Moment I frantically searched through my alterables closet. (Yes, I have a closet full of stuff to alter… and no, I don’t have a problem with that. My husband does, but I don’t.) The result—a retro alarm clock.
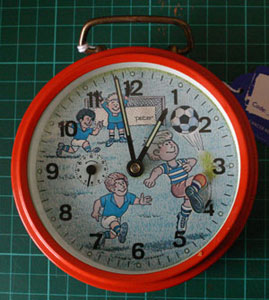
I found this little clock in one of the charity shops a few months ago. I went out specifically looking for clocks for an assemblage challenge project, but things got out of hand and I never was able to start, let alone finish, the project for the challenge. I really liked the clock for several reasons—it had a simple shape, it worked, and I love how the footballer’s leg kicked back and forth with the ticking of the seconds. It was the movable leg that sold the clock for me…. although at £1.49, it wasn’t much of a sell.
What you’ll need to make your own clock (or similar altered object):
- A clock
- Some Decorative paper or cardstock and embellishments (I used the Tim Holtz papers and Doo-Dads by Design Originals )
- An ink pad for distressing (I used Tim Holtz Distress Inks by Ranger in ‘Old Paper’)
- Your favourite paper adhesive (I used double sided tape)
- Tissue paper (preferably bleedproof, but it’s not necessary)
- Modge Podge (or PVA glue)
- A marker—optional. (I used Sakura Permapaque)
- A paintbrush, scissors and a sharp knife
First things, first. You will need to disassemble your clock. You will also need to remember how you disassembled your clock so you can reassemble the piece when it’s done. For most clocks, it will simply be a matter of removing the bits that wind the clock up, taking off the feet and popping the back off. If for any reason your clock is more complicated, take a few digital photos while you take it apart so you remember how it goes back together. Keep all your small bits in a grip-lock bag or a small box to avoid losing them, and only take off the bits that are necessary in order to remove the face of the clock from the exterior body.
Once the main body of the clock was removed from the rim, I removed the movable foot piece and the small alarm hand, both of which just popped off. The main hands of the clock were well engineered into the piece, so I left them alone.
And now the fun bit—decorating. :)
I placed the clock piece face down on the decorative paper I was using as a background, traced around it, marked the centre and cut a hole for the hand movement. I also then cut a line from the edge of the background paper to the centre to allow me to get the background paper on the face without removing the hands of the clock. Mark and make holes for the smaller hands, if applicable.

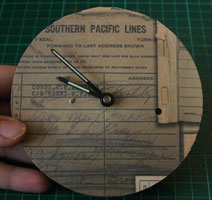
If your design has an obvious up or down, be sure the top of the design rests at the 12 o’clock position, and glue the piece into place. Once glued down, the cut line is hard to see, however try to place the cut where it will be hidden by other papers or embellishments. This may require a bit of extra pre-planning if you aren’t adding many extra bits to your clock. (Note: the background paper I used is called ‘Railroad’)
Choose your elements that will go on the face, in this case I took postcards off the ‘New York’ paper, the letters N and Y from the ‘Print Blocks’ paper and Doo-Dads off the ‘Postage’ sheet. Cut them out to size, ink the edges with distress ink and glue them to the clock face. Be aware that on most alarm clocks the outer 1/4-inch will be covered up by the interior rim, so make sure that everything fits within the viewable space. You can always place the rim over the face to double check that everything is in the right position before firming everything into place. Once glued down, you’ll be able to trim off the excess around the edges with a pair of scissors.
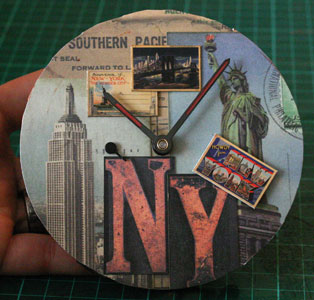
I reattached both the hand for the alarm (on the left side), and the little footballer’s leg (on the right-hand side). I then covered the leg up with a postcard Doo-Dad, sticking it into place with a bit of double-sided tape, ensuring it had enough room to move without hitting the rim of the clock.
As a final touch to the face, I used a brown marker to fill in the glow in the dark strips on the clock hands. Call me strange, but I didn’t feel as if the glowing green was all that harmonious with the vintage feel of the rest of the clock, but if your clock will be used in a bedroom you may wish to keep this glow in the dark feature.
And now the messy bit—decorating the body of the clock.
For this exercise, be sure you are working on a surface that is easy to wipe up, as the Modge Podge will get all over your work surface, and if you can’t find bleedproof tissue the colour of the tissue will also get all over your work surface. If all else fails, lie a large bin bag across your table to protect it.
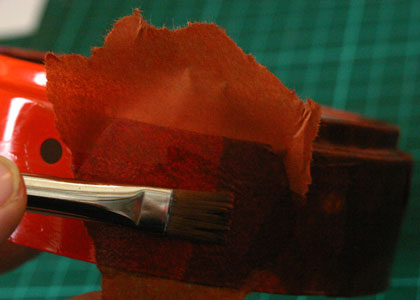
To begin, tear your tissue into small pieces, about 1 to 2-inches square(ish). These pieces don’t have to be precise, they just need to be a workable size with no cut edges. Paint a bit of the Modge Podge onto the body, cover it with a piece of tissue, and paint more Modge Podge over the top to glue it down. On the edges of the piece, simply fold the tissue over the edge and glue it to the inside (this will help keep the tissue in place while it dries). Continue glueing down bits of tissue in this manner until you’ve covered the entire piece with a couple layers of tissue. You’ll need to do this to the body, the interior rim, the back, and the footplate (if your clock has a footplate… mine did). Don’t worry about avoiding the holes for the feet and such, just tissue right over them, then poke through the holes with a pencil. You can always use a little Modge Podge on the back side to seal them into place.
Once your pieces are dry, you’ll need to cut away any tissue on the interior of the body and the interior rim of the back piece where they slip into to one another. This is usually a pretty tight fit on most clocks, so it won’t accomodate the extra tissue. On the body, run a sharp knife around the inside to cut away the excess tissue. On the back piece, score a line under the lip of the back and you should be able to peel the tissue away quite easily.
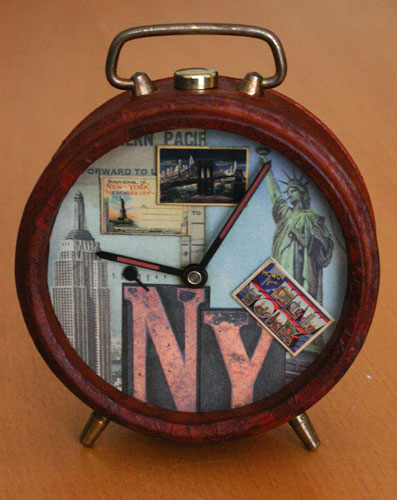
Now it’s time to reassemble your clock. Be sure to clean the glass of the clock before putting it back together to ensure you don’t have any tissue, glue or fingerprints trapped inside. Once all the bits are back on the clock, wind the piece up and enjoy your work.
![]()
When I got this tin (with the Maya Road chipboard in it), I was not sure if I was more excited about the tin or the chipboard—and that’s saying a lot since I love chipboard. I couldn’t wait to evict the chipboard and start altering the tin. I admit it, I have a serious magpie complex.
I wanted to create a tin where I could keep our momentos from the holiday we took on the continent a few years ago. You know the stuff that just doesn’t fit well in a scrapbook. The stuff that simply makes a page too heavy. The stuff you have a million of and can use in several projects. That’s what this tin was about.
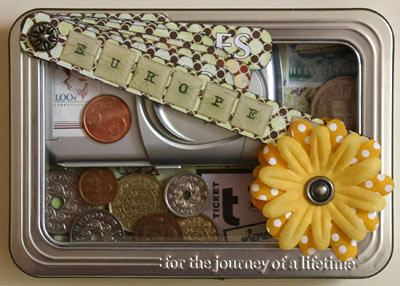
This is the whole thing put together, with all the papers and items in place…. but I’m getting ahead of myself.
To decorate the tin I taped a piece of ribbon around the outer rim of the lid for decoration. I could have papered the whole thing or painted the tin, but I was worried about the lid being to tight to close or the paint scraping away or chipping. Besides, I really like the look of the dull shine of the metal, and I knew it would work well with the items inside the tin.
I didn’t actually poke a hole through the lid for the flowers, but rather pushed the brad through the flowers, bent back the prongs and used double sided tape to adhere it to the lid. Nice and simple, and that flower has no intention of moving.
Although I loved the slogan at the bottom of the tin (for the journey of a lifetime) and found it very appropriate for my theme, I didn’t want the ‘Maya Road’ showing itself in the top corner. My solution to create tags, one for each of the cities we visited and a title tag and glue the bottom tag over the ‘Maya Road’. With the exception of that bottom tag, all the other tags move freely.
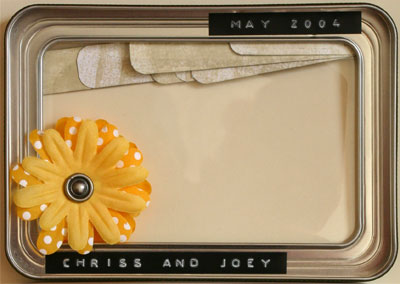
I coloured the back of the tags with dye ink, although using patterned paper would also have been appropriate. I placed another flower on the interior to cover up the brad back showing through the lid, and used Dymo tape to cover over the embossed name and slogan on the lid. If you have the patience, you might want to cut a piece of patterned paper to fit in that area, but quite frankly that would put me through the roof if I couldn’t get it exactly right. I thought the Dymo solution was far less stressful. :)
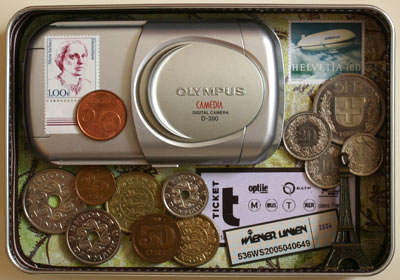
The tin interior was fun to do. First, I lined the bottom with patterned paper, and then lined the sides with ribbon which was equal to the depth of the tin. From there, it’s just a matter of filling the tin! I used the front off my camera which broke while we were on holiday, a few unused leftover postage stamps, some coins, an Eiffel Tower keyfob, and a few various ticket stubs.
I used foam tape to adhere the camera and to pop-up some of the coins to create depth. The keyfob is glued to the ribbon with super strong adhesive to keep it in place, and I matted the tickets to make them stand out a little bit more. If you don’t have a lot of room (and they aren’t your only ticket stubs) you can always cut your tickets down to include only the important bits.
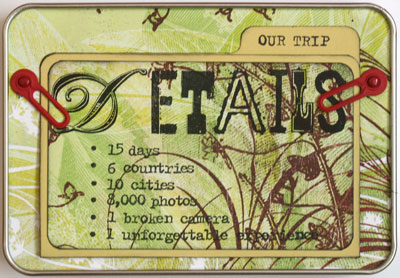
I wanted to include some journalling with the tin, so I decided to create a file folder to write a few brief thoughts. I decided on the size and shape of my file folder, cut my liner piece and attached the photo turns before I adhered the liner to the tin.
I decorated the file folder with the same patterned paper and used stamps to title the folder and emphasize the names of the cities inside the folder.
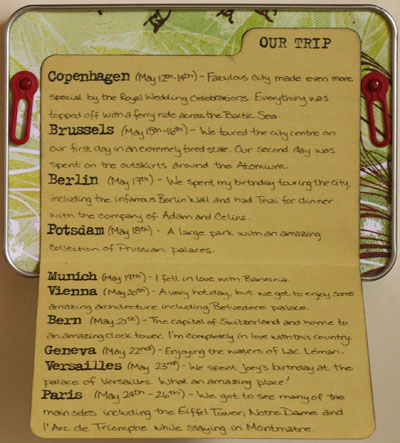
And this is the finished piece:

Supplies:
Maya Road Chipboard Tin
Basic Grey papers
Doodlebug flower
EK Success epoxy letters
DCWV letter stickers
WorldWin Cardstock
Tim Holtz Distress Ink pads
Making Memories and Bazzill brads
7 gypsies photo turn
Ma Vinci and Technique Tuesday stamps
Ribbon and Dymo
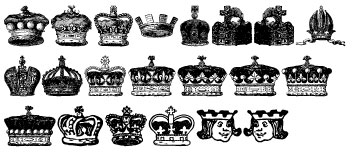
I just had to share these with you. They are great little dingbats that are perfect for altered arts, ATCs, making backgrounds or anything that needs a touch of ephemera when you don’t have quite the right rubber stamps. As when I usually do dingbats, I’ve tried to show the (nearly) complete set in the sample images. :)
Crowns and Coronets:
Dead Letter Office:
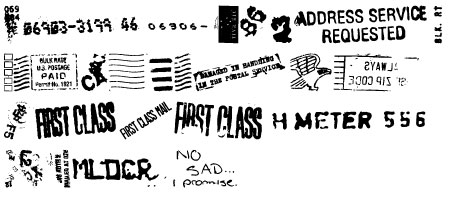
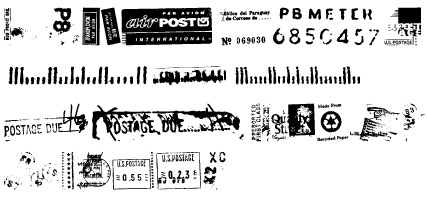
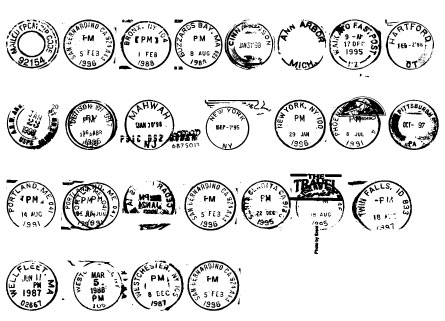
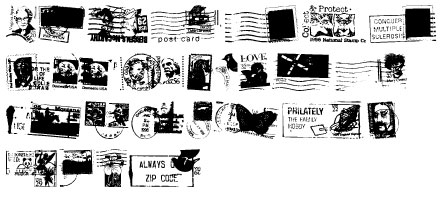
PostageStamps:
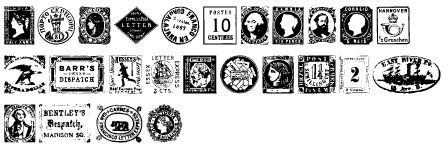
Réclame:
We had another sponsor reveal today on Scrap That Moment and this time it was Mermaid Tears, who makes some fab flowers as well as some interesting metal embellishments, gems and a series of paper dolls. For my sponsor layout I did Feeding the Birds which uses a couple of photos I took outside of Notre Dame Cathedral (Paris) while we were watching this lovely older gent feeding the sparrows.
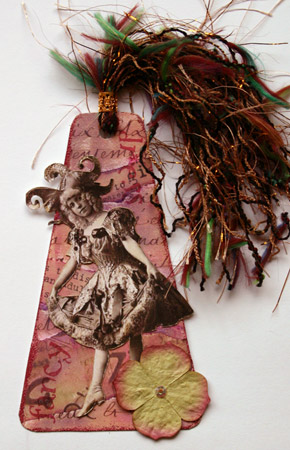
I also did up this tag. I’m not much of a tag person, and I rarely use vintage images because of the lack of a printer, however I’m quite chuffed with the way this turned out. I think I may just do a few more of these. I may even create some sort of book out of them. For now, I’ll add it to the ever-increasing project pile and do them now and again when I get the chance.
I used a BasicGrey tag as a template for my tag, which I cut out of regular cardstock. I then layered up several different 7Gypsies patterned papers, inked it over with Tim Holtz Distress Inks in Old Paper, then chalked over the entire thing with several colours of Craf-T chalks. A bit of cranberry coloured embossing powder was added to the edges, and the words were stamped in cranberry ink using Ma Vinci stamps. Then it was just a matter of cutting the image, and adding the image, flower, yarn and tube to finish the whole thing off.

This is the coolest site that I just NEED to pass along. In fact it’s several sites. :)
Creative Collage is run by Kelly Angard. In her blog she offers up some great tips and techniques that can be used in scrapbooking, cardmaking, ATCs and altered books… in fact altered anything for that matter. Each Tuesday she posts a new technique to the site dealing with the art of collage, with a modern twist. While you are there, check out the archives. Lots of great ideas hiding in there!
If you like Creative Collage be sure to check out Kelly’s other site, The Crafty-Girl™. Lots of inspiration of altered books here, among other crafts!!
Speaking of altered books, there are a couple great Yahoo! sites dedicated to this subject my favourite of which is AlteredBooks. This group has two other sister sites, names AlteredBookScans (which is used to library the many, many fab AB scans of the main list, and AlteredBookArchives which houses the archives. Lots of tip, ideas, and techniques in these groups, not to mention about 8600 members strong.
Hopefully some of these sites will give you some ideas and inspirations for your own creations. I’ll be adding each of these sites to the side bar links as well, for easy reference. The AB spread shown as part of this article is one I did ages ago (or at least it seems like it) when I was experimenting with glazing techniques. Must do some more soon. Maybe it should be a New Year’s resolution. :)
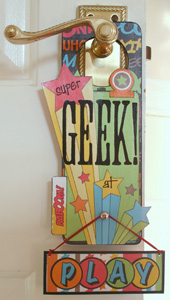
Although I’d seen them in various online galleries, I had never really thought much about door hangers. I have no children. The flat belongs solely to my husband and myself, and whatever areas he has coveted I’m am slowly taking over. :) So, really there was no need to announce any of our rooms with a hanger.
But then I received Kaboom! line by SEI. After doing my Smurf Sighting! layout (which quite frankly couldn’t have been more perfect for the photo—it was even smurf blue!!!), I pondered what else could be done with this fabulous paper. A Super Geek! door hanger seemed the perfect thing.
Amy Stultz wrote a lovely article for ScrapJazz.com all about Altered Door Hangers complete with not only instructions, but also a template. My hanger doesn’t use the template, however the dimensions are fairly similar. Once the hanger was complete, I simply cut a slit for the brad using my scalpel, put the brad in and hung the little sign off the brad.
The sign is actually double-sided and hung using 3mm ribbon. One side says ‘play’ while the other says ‘work’. Knowing my husband, the sign will never be flipped over, not because he’s lazy or wouldn’t bother, but simply because even when he’s working he’s secretly playing. Ah, the life of a computer programmer. :)
I must say, however, that the doorknob hanger was a fun, fast and easy project. So fun, in fact, I may just have to do a few more.
If you are interested to see other projects that the Scrap That Moment Design Team did using SEI’s papers (Kaboom!, Fruit Stand, and Spring lines) check it out in our SEI Sponsor Gallery.