
Category: Fabric Journals
Articles in the Fabric Journals category
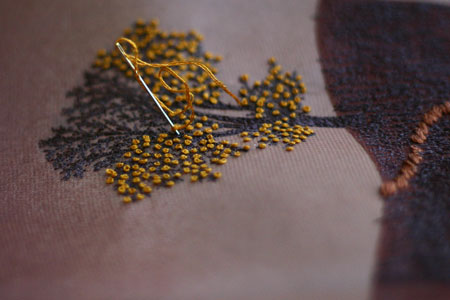
I’ve been relishing in the fact that Joey is now home on weekends, and took the opportunity of a spare baby-minder at home to pull out the sewing machine and do some stitching. The free-motion embroidery is now done and the hand embroidery has begun. What you are seeing is the first wave of colour for the tree.
This is my second attempt at this page. I… um… melted the first attempt. We just won’t go there….
I finally remembered to take a photo of this (ironic since I’m taking daily photos).
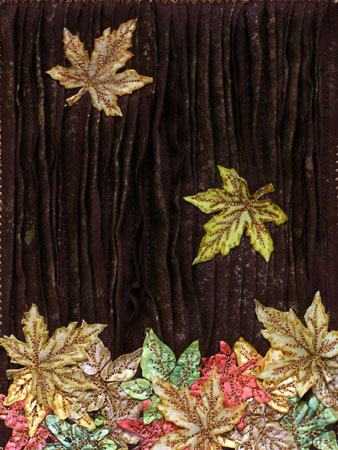
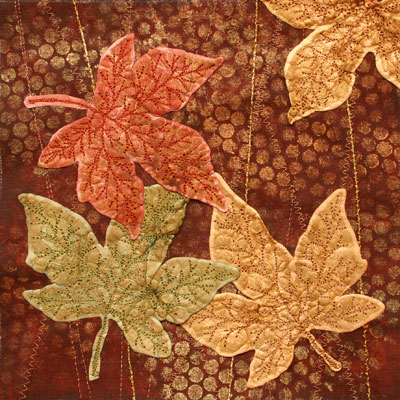
This is my first page for a friend’s fabric book the theme of which is autumn. I had a lot of fun with it. The background is a brown poly-cooton sheeting that I sewed to a felt and Timtex backing randomly pleating as I went. The fabric was then sponged with fabric paints and some of the pleats were cut open. The tyvek leaves I posted about the other day were sewn on using free-motion embroidery to look like fallen leaves. The falling leaves were made by stamping onto Timtex with Staz-on, painting in colour with highly diluted fabric paints and stitched on with free-motion embroidery.
I’m quite happy with how this page turned out. The second page requires a gazillion french knots, so it may take a wee bit longer to get that finished.
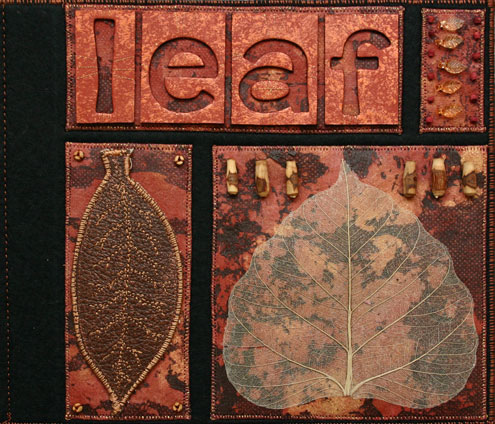
I wanted to have some fun with the opening page of my tree book, so I divided everything up into quadrants (that and the baby wipes I was using were only so big and it took several to cover the area of the background so this prevented having to seam the baby wipes). The base fabric (black) is felt, while the background fabric for each of the rectangles was made of the coloured baby wipes left over from when I painted the Tyvek leaf page. I simply adhered the baby wipes to the felt using bondaweb then on top of that I fused some dye dryer sheets which self-adhere with iron heat.
The title is made using some chipboard letters (Scenic Route) out of my scrap supply stash which were sponged with acrylic paint, lightly adhered with some double-sided tape to keep them in place while I stitched them down with some gold thread.
The leaf is one of my left-overs from sign-in tags which I simply sewed on by machine, while the skeleton leaf is adhered with bondaweb (still hoping that the leaf makes it through the RR intact, although I have spares if needed). I also added a few acrylic and wooden beads that I felt worked with the theme and with the design.
The ATC was done in the same manner as I did the leaf page as I wanted to be able to give each of the participants a ‘piece’ of the book to remember. I had far too much fun stitching all those leaves. :)
Just as a note, I fused the background fabric to Pelmet Vilene using Bondaweb and cut out pieces that were slightly larger than ATC size before doing the FME to create a more stable base. Once the stitching was finished, I cut the ATCs down to the correct dimensions.
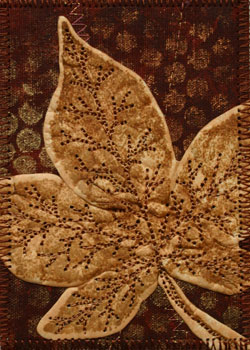
This was one of the page I made for my Tree Book and will end up being the second page of the book. The base fabric is a cheap brown poly/cotton piece of sheeting which was painted using acrylic paint sponged on with baby wipes (a technique I love since I then get to use the coloured and dried baby wipes as a fabric, too) first in an Indian Red that was simply sponged on, then in copper and gold which was sponged through some punchinella to create an interesting background. I then couched on a few metallic threads to tie the whole background piece together.
The leaves are made of Tyvek which I first coloured with dye ink, stamped with Staz-On, heated (with an iron on wool and using a piece of parchment to protect the iron) from the reverse to shrink and add texture and finally coloured with a bit more dye ink to enhance the textural qualities. I used free motion embroidery to stitch the leaves down following the leaf veins of the stamped image as a rough guide. I really like how the FME turned out and plan to experiment further with stitching Tyvek in the future.
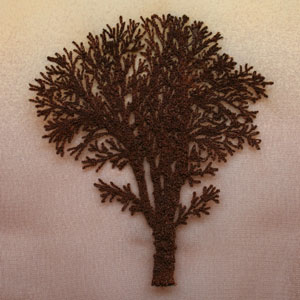
This is the centrepiece for the cover I created for my 2007 round robin fabric book (theme of trees). When I designed the book I knew I wouldn’t be actually constructing the cover until the book returned home, but I thought I could at least get the main image done and dusted.
I used a commercially available tree stamp (from Creative Expressions) to stamp on some water soluable stabalizer to use as a stitching guide then FME’d over the top of the stamped image onto some ombre chiffon. I really tried to layer the stiching to build up the image and I ended up using the bobbin side of the piece as the top because it had a better textural effect. I’m really happy with the way this turned out. :)
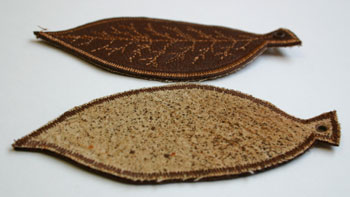
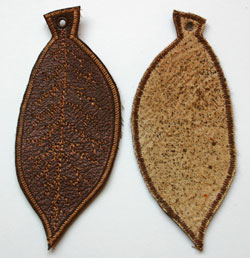
I’ve officially started work on my newest fabric journal for this year’s round robin. I thought I’d start out with the tags to get into the feel of the book.
To make the tags, I started by stamping a leaf stamp onto leather using copper Brilliance ink pads by Tsukineko and then heat set the ink with my heat gun. (Unfortunately, the stamping doesn’t show in the photo.) I stitched in the veins of the leaves using FME (free motion embroidery) and some rayon thread. Then fused the leather to the backing fabric.
The backing fabric is calico which was tea dyed (a left over from my last round robin book) and then spritzed with Ranger’s Adirondack Colourwash. I did a quick satin stitch around the edge of the leaf before cutting it down to size. To finish, I placed an eyelet in the stem.

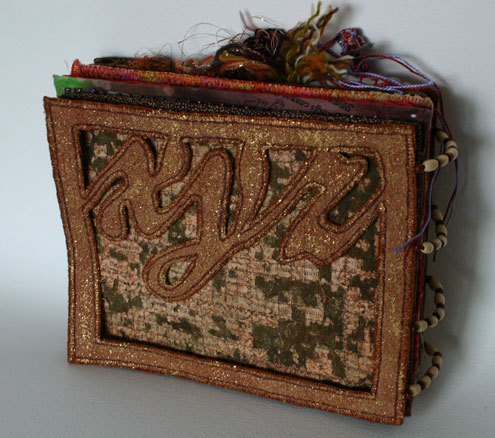
It’s done and I’m so happy. I finally got the last page and the back cover finished this morning, so I spent the rest of this afternoon binding the book together.
The book is stitched together with small wooden beads between the pages and then a decorative string of beads running from cover to cover. I originally wanted to do a variation on a coptic bound journal, but my covers were too hard to run the needle up the ‘spine’ so I opted for this binding method instead. I’m quite happy with it as the thickness of the little wooden beads make the spine and open edges sit at the exact same thickness — a sheer fluke rather than planning, but I’ll take it anyway.
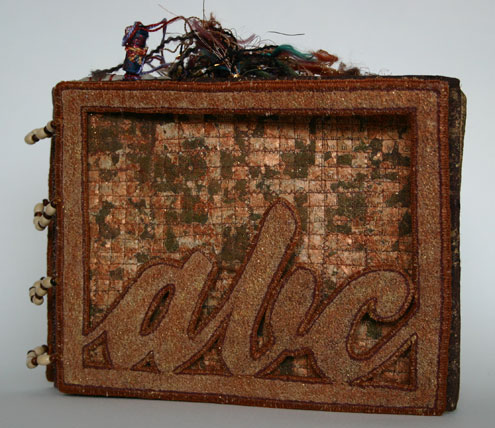
The next photo is the whole book together as seen from the front, showing the cover and undercover. The details of how I made the front cover can be found here. I’m amused by the difference in colour between the photos. The original photos were taken mid day in the summer when we have 20 hours of sunlight a day. The current set of photos were taken today in the dead of winter when we have 6 hours of sunlight and the sun doesn’t actually rise above the buildings. But I digress.
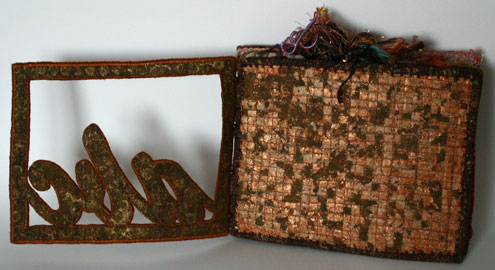
Next we have the first spread of the book which shows the back of the cover and the entire undercover. Details on how I printed the fabric on the back of the cover can be found here and details on how I did the undercover can be found here.
The sign-in page follows. The bookmarks are from left to right: Myself, Sylvia, Connie, Dianne, and Becky. Details on how I fashioned my own bookmark can be found here, while details on how I made the page itself can be found here.

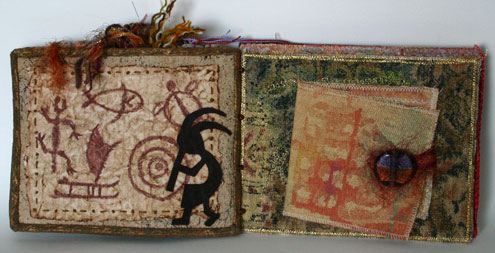
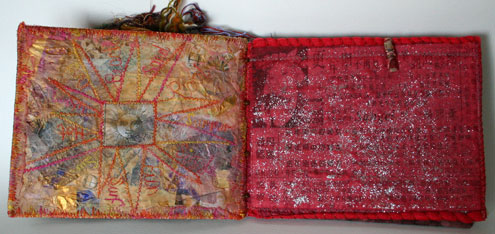
The third spread comprises my petroglyphs page (on the left), details of which can be found here and the front of Becky’s (on the right). The flap on Becky’s page opens and shows a stamped image of writing which is framed with trim with netting over top.
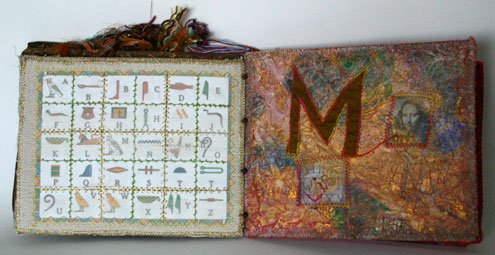
Fourth Spread: The left page is the back of Becky’s page showing a table of heiroglyphics. The table is covered in a sheer fabric and stitched with various threads and stitches. The right page is Dianne’s which is paper fabric made up of various script papers, covered in organza and with a secondary Mona Lisa theme (art being a form of communication in itself).
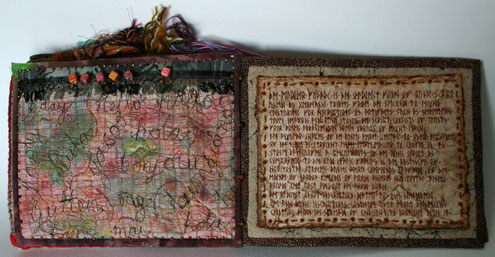
Fifth spread: The left page is the back of Dianne’s page which features a sun and words describing summer done in stitch. The right page is Sylvia’s and is a page of chinese characters and images over which is a layer of sheer glittered red organza. The page is adorned with a fabric bead.
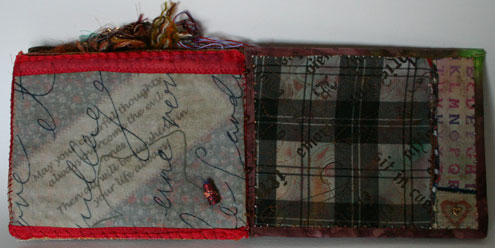
Sixth spread: The left page is the back of Sylvia’s page. She included a quote in each book she worked in. Mine reads “May your cheerful thoughts always overcome the evil one then all willbe sunshine in your life always”. This is covered in a sheer fabric with a script print and decorated with a fabric bead. The right page is Connie’s page which is a tartan with script and other stamped fabrics. The binding also has spript on it, with a bead treatment around the inside edge of the binding.
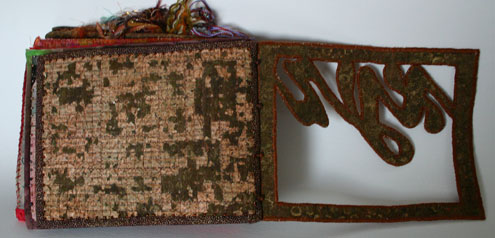
Seventh spread: The left page is the back of Connie’s page with ‘hello’ in various languages stitched onto the page, hello spelled out in alpha beads along the top and further beading along the inside edge of the binding. The right page is by myself and is a replica of the page I did for Connie’s book. The theme fit both books (mythology and written communication) and I really liked the idea. Details on how I did the Futhark page can be found here.
The following photo is the interior back cover comprising the back undercover and the inside of the back cover. These were done in the same manner as the front cover as mentioned above.
And the last photo is of the back of the bound book.
Hope you enjoyed the tour of my round robin book. I would like to say big thanks to the girls who worked on my book — Connie, Dianne, Becky and Sylvia. And thank you as well to Johoanna who organized this round robin. I really enjoyed it.
I was over on Dianne’s blog today and notice she’s received and bound her round robin book and posted the photos. Check out her Floral Fantasy Book.
Glad you like it Dianne. :)
I’m really excited. About a week ago I found out I was going to be able to do another fabric book round robin, this time with seven ladies in New Zealand and Australia. I’ve decided on the theme of trees and have a head full of ideas already. We post out our books on March 1st, so I have a few months to work on it. As usual, I’ll post photos as I go. :)