
Category: Embellishments
Articles in the Embellishments category
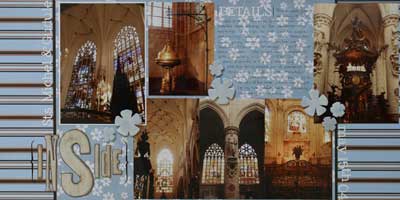
Just thought I’d share today’s layout. May I say again how much I love Chatterbox papers?? They are so versatile, and such great colours. Best of all they just co-ordinate so well. I really need to get the new collections. All in good time…
Beyond my love of Chatterbox, I’m really liking this making my own chipboard thing. It just adds such great dimension to a page, and I can have any shape or colour I choose. For these flowers, I follow these steps, but without the letter stamping, of course.
Oh, by the way, the photos are of the interior of Sts. Michel et Gudule church in Brussels. Beautiful building!!!
I recently posted an entry on how to make chipboard embellishments, and I think since that day making my own chipboard embellishments has become my new favourite thing (although i must admit they do look ‘richer’ IRL).
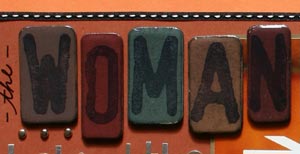
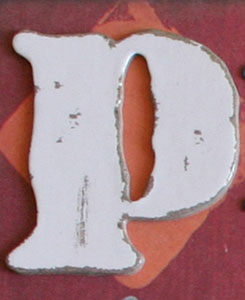
This is how I did my chipboard letters: I used Daler Rowney Grey Board, and cut it so the shape and size I wanted using my craft knife. I then rounded the corners with some scissors, and sanded all the edges with some fine grit sandpaper. I then applied a dark coat of acrylic paint. Once the paint was dry I painted over it with a slightly ligher colour of paint, and once that coat was dry I sanded the face again to give it a distressed look before stamping my letters (stamps are Ma Vinci’s Area 51, and are stamped with a black ink pad). After the ink dried, I coated the entire thing in Anita’s 3-D clear gloss finish for liquid embossing, and allowed it to dry over night before attaching them to my layout. This was so much fun, and I can’t wait to see what else I can come up with!!!
Since my last entry on chipboard embellishments, Allyson Bright has published a new article on ScrapJazz.com on how to take your chipboard embellishments to the next level. It’s well worth a read!
I hope these articles give you the incentive to try your hand at making your own chipboard embellishments. It’s so easy and fun to do!
I love chipboard embellishments. I have two sets of ‘Lil Davis Chipboard Letters, which I love to use, and I’d still like to get my hands on the various chipboard alphabets by Making Memories and Heidi Swapp. I like the idea of taking the raw chipboard letters and painting and sanding them to suit my layout.
However less intricate chipboard embellishments are easy to make yourself—and Allyson Bight’s article shows you how! I can think of lots of shapes I’d love to make, including flowers, bookplates, and tags for starters.
Now going a step beyond this, you can make your own chipboard alphabets. Scraptivity’s article details how to make chipboard alphabets, similar in theme to others on the market. What I love about this idea, is that I can use the plethora of alphabet stamps I already own, and co-ordinate the stamping on both the layout and chipboard!
A couple of additional things of note. First, they mention where to find chipboard, and they give some great ideas, but I’d also offer up the suggestion of trying Grey Board by Daler Rowney from your local art supply shop (it will most likely be in with the mount boards). It comes in A1 sheets (about 60×84cm or 23×33 inches or so), is pH neutral, inexpensive (about £1.40 or so in the UK) and it the same thickness as most of the chipboard stuff on the market (about 2mm thick). This will be a little harder to cut than thinner chipboard, but for basic shapes it shouldn’t be a problem if you use a Stanley knife, and this will give you a nice lumpy embellishment for your pages—- just like the real thing!
In the articles, they mention using UTEE (ultra thick embossing powder) to add a finish, however other options would be liquid embossing (such as Anita’s 3-D clear gloss finish or Diamond Glaze) or using a paint-on or spray-on acrylic varnish (available at most arts or crafts shops—- just make sure it is acrylic, and not ketone based!).
I can’t wait to start creating my own chipboard embellishments!!!
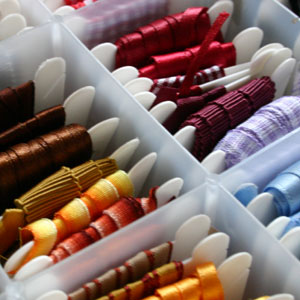
Like many scrappers, I LOVE ribbon. Since I love a lot of variety in my ribbon I only buy about 1 metre at a time… not to mention I’ve got a branch of the best ribbon store in the UK in my city—V.V.Rouleaux. I use an ordinary floss box and simply wind my ribbons around plastic floss cards, arranged by colour. Usually these types of boxes come with one compartment larger than all the rest, and I use this to put my ends that are just too small to put on cards. This method works really well because I can immediately see what I have, and I can easily store a lot of ribbon using this method.
I’ve seen quite of few other methods to store ribbon. The prettiest is keeping them in jars, arranged by colour. Allison Kimball even did a beautiful layout on her ribbon storage for the Creating Garden on 2peas. I will have to admit, that there is a certain allure in this method, given how beautiful it looks, however I think I would waste a lot of time looking for the right ribbon.
Another method for organizing small yardages of ribbon, albeit more expensive, is to use something like Cropper Hopper’s Embellishment Organizer Case. I hadn’t paid this method much attention until I saw this case in action when a member of 2peas posted it in her gallery. I love how neat and organized this looks.
Some people prefer buying ribbon by the roll, and this proves an entirely different organizational dilemma. Some people use a method of altering a photo box to hold their ribbon, which is great for small collections of ribbon, unless of course you alter quite a few boxes. Another way to organize a small collection of ribbon rolls is to put them on trouser hangers, preferably the multi-tier variety where the arms swing out, and then clip back into place. Simply load up every other rod with your rolls of ribbon, and you can cut as much as you need, as you need it. For larger collections, a multi-tier shelving unit (either over the door unit or mounted unit) might fit the bill, such as this unit by ClosetMaid.
Whatever method you choose, it should allow your ribbon to be viewable and easily accessible so you can spend you time scrapping rather than looking for ‘the perfect ribbon’.
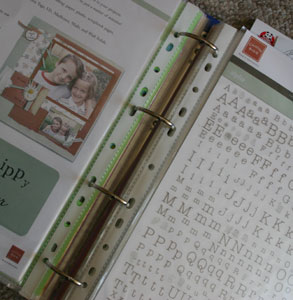
I have tons of letter stickers, and rub-ons, and to keep them organized I use a standard binder with some poly-pockets. Each sheet gets its own pocket, and I group them according to style and size, separating the major sections using subject dividers. I love using this method since I can just flip through a binder to see what I have and what I would like to use.
For non-alpha stickers and rub-ons, I group them by category. If you have a lot of themed embellishments, you could designate a binder for each major theme, such a ‘baby’, or ‘summer’ or ‘wedding’, etc.
The same sort of idea would work really well with die cuts and the like, although I hear from reliable sources that using page protectors for sports cards are the way to go for that type of thing. They usually have about 9 pockets per page, and fit in a standard binder.
Remember to label the outside of the binders with the products or themes they contain for easy reference.