
Category: General Scrapbooking
Articles in the General Scrapbooking category
One of the most common things I hear on scrapbook forums are questions asking about how to deal with with the large amount of travel photos. There are many different answers ranging from mini books to photo album scrapbooks, to single layout overviews of a holiday.
Personally, I enjoy my 8.5×11 inch scrapbook albums. I love making travel pages and I love looking back on them. I love the details, the overviews, and the stories. I don’t, however, make a plan as to how the album will be laid out. I tried that and I know it is not a process that works for me. Instead, I sort my photos by city, then subdivide that by site. From then, I scrapbook whatever calls to me.
Sometimes I’m perfectly happy to do a single or double page layout and create something totally unique. These are usually the layouts that get done first. Other times, I find myself with a mish-mash of photos that simply don’t work well design-wise. That’s when I turn to collages for my second page of a two page spread.
The idea is simple. I pull my feature photo(s) for the first page and work it like a single page layout. All the other remaining photos get cropped into a collage on the second page, in the same orientation as the first.
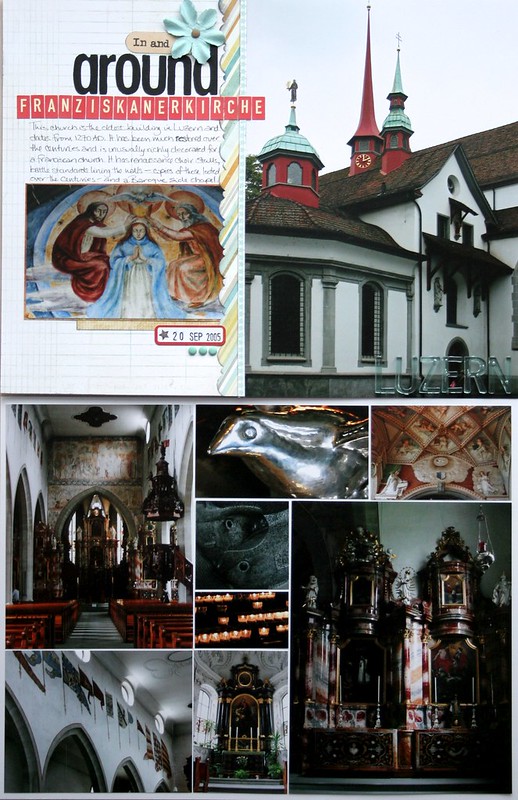
If I don’t have enough photos to fill an entire page, I can simply add in extra pattern paper or other decorative embellishment.
It is simple, easy, and effective. This scheme allows you to use many photos while still having fun with product and design. And more importantly, helps gets some of those harder to do layouts done and dusted.
One of my favourite ways of using up older papers in my stash is to use them as backgrounds. Any style of paper will work, whether it be bright or bold or subtle. In this case, I took some SEI paper from their ‘Such a Boy’ line circa 2005 and used it for the background of this layout:
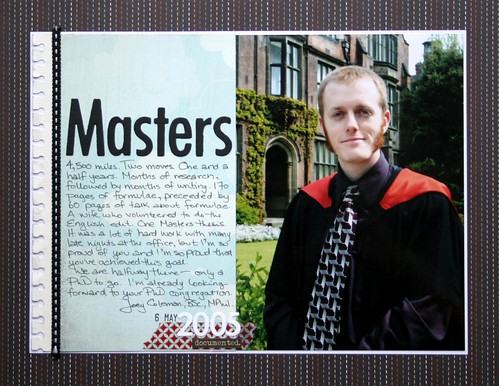
Everything else on the layout (other than the die cuts letters and date stamp) is new from 2012 purchases, and they bring everything up to date in terms of my current style whilst still using up some of that older paper that ‘must be useful for something’. The journalling was written in 2005, shortly after the Masters ceremony.
I’m particularly liking the sheet of ‘Word to Live By’ from Simple Stories which is part of their Documented collection. I’ve been cutting out individual words and phrases and adding them into my layouts. I love the effect.
I’ve been trying to put together a section in our albums about the town where my kids were born. Places we visited/loved, landmarks, etc that were part of our lives there. My son will never know Newcastle (except through our scrapbooks) unless he visits there, though my daughter might.
Before we moved, I made a list of photos I wanted to make sure I had. After printing (and in some cases reprinting in a smaller size) my photos, I organised them into my photo sleeves by groupings that would work for layouts. Some groups were about a single place (ie: the Castle), some by connection (ie: art), and then some that were just general photos.
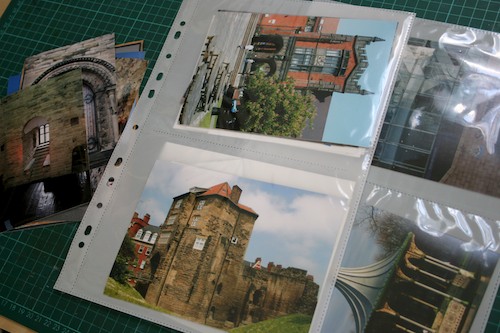
I’ve been slowly working through the pile, and I thought I’d share a sampling of the layouts I’ve done. In some cases I even went into my storage binders for additional photos, such as on this layout, where I pulled out a few group shots from various events at the university where my husband studied and worked.

On this layout I pulled photos from various visits (I love doing that):

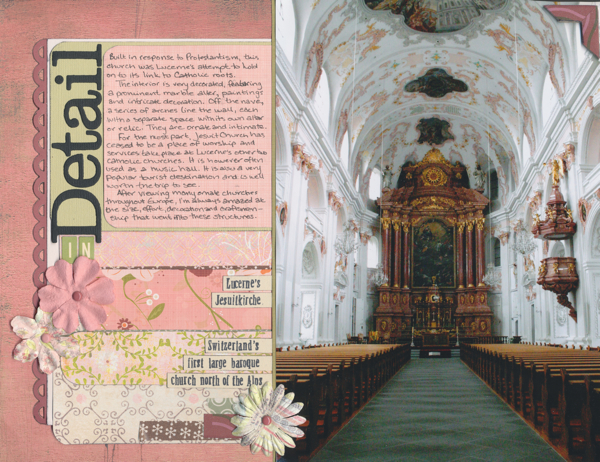
Some layouts contained multiple stories. Stories about the city. Stories about our loves and experiences in the city:

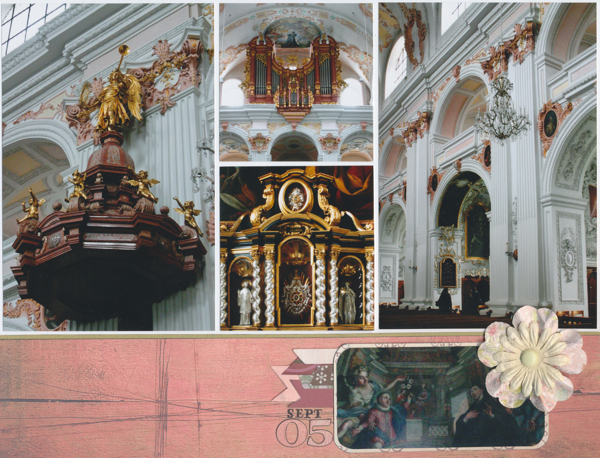
Some are simply about particular sites we simply love (and why).

Some layouts are groupings of photos within a district of the city. There are some points of interest I have no desire to make a layout about, and that’s where this type of compilation works really well as I can easily name the sites and leave it as that.

And other sites are too unique or memorable and need a bit more story.

I could have made a simple two page spread with a variety of photos and called it a day, but I thought my children would love to read about what made our favourite places special. We spent a good chunk of our lives there, and I think those stories are important.
If you are anything like me, you take a lot of photos. I love the digital age where is really doesn’t cost you anything to shoot a dozen (or hundred) photos. I learned so much about photography by doing this and thankfully can usually capture the shot I want in only a few photos now. However, I do find that I like to take lots of different types of photos, and the number of shots really adds up.
I thought I’d share my process of wading through all those images. I use Aperture, though any photo management software would do the job.
On Sunday, we took the family to a local art museum, ARoS. I took 197 photos on the day. The first thing I did when I got home (beyond grabbing a cup of tea) was to download everything into Aperture. I like to group photos by month, so Sunday’s photos went into the June 2012 folder (in which there was already 3 photos).
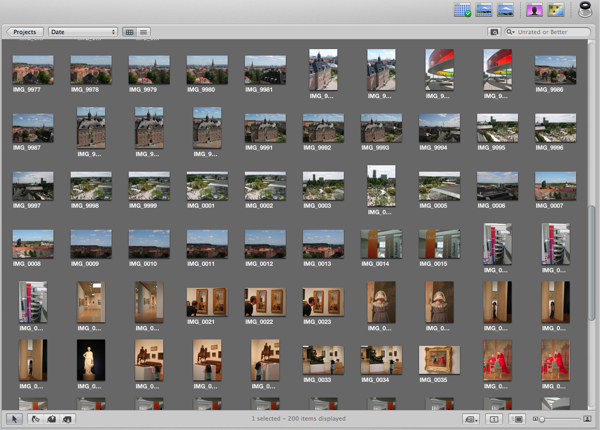
I take a quick first pass through the photos deleting anything that was blurred, didn’t work, or that I had an (obviously) better photo of. I’m down to 69 photos.
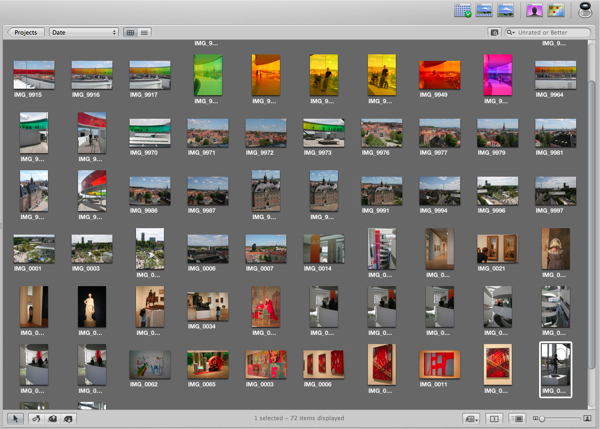
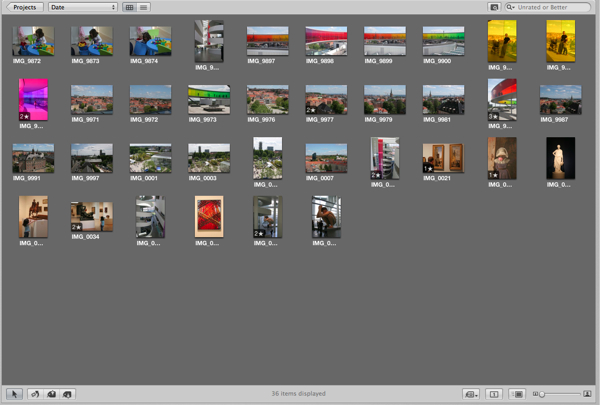
I take a closer look at the images and delete as many duplicates as possible, and ask myself whether I’d really use ‘x’ photo. After several years of scrapping, I know my style and I know what will get used. This second pass gets me down to 33 photos. Seems a bit high for a simple trip to an art museum, but since I took scenic views from the rooftop, I’m happy with that number.
I now go through and add star ratings to the photos. I use a 3 star system. My best photo(s) will get a 3 star rating, my good supporting photos get a 2 star, and I’ll also hand out some 1 stars to anything that I deem worthy in some respect for scrapbooking purposes. I don’t star all my photos. Some get kept simply because I deem them useful for other stories in the future, for instance the views of the city. These would be great in a layout/album about the city itself, but on their own I don’t deem them scrapworthy.
I tag all my photos. I have about 25 commonly used tags that include each person in our immediate family, places (ie, park, zoo, etc), and things (ie, nature, reading, sleeping, etc). I often use town names in the tag if it is somewhere we are likely to have multiple visits. This means that at some unknown date in the future, I can search ‘Århus’ and come up with a lovely set of photos that may help tell a future story. The search can be further refined by star ratings, particular people, etc.
After tagging and starring, I export whatever photos I want to print into my print folders for uploading to my favourite online printer, as well as anything I want to put up on my family blog. I then deem these photos done and they are moved into my ‘Current Quarter’ project folder within Aperture, and I’ll delete the monthly folder when it is empty. At the end of each quarter I tag all the photos in the ‘Current Quarter’ folder with that quarter’s tag (ie: 2012Q1) then move them out into a yearly project folder (ie: 2012). At this point I considered them archived within Aperture and my Current Quarter folder is empty and ready for the next quarter’s photos.
From those 197 photos I took at the art museum, this is what made the cut.
I’ll enlarge this photo:
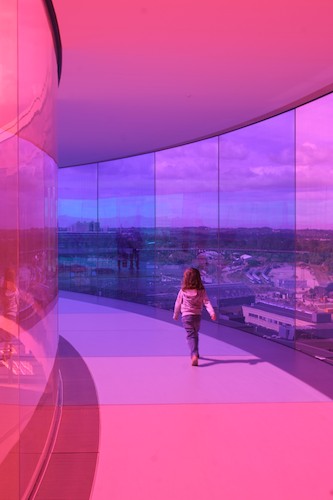
Reason: I love this photo. I love the graphic quality it has. I loved the rainbow panorama. I loved the view. I loved the colour. It also shows my daughter exploring the panorama, and it has lots of ‘empty’ space to play with whilst scrapbooking.
And print these seven as 3×4 sized photos:
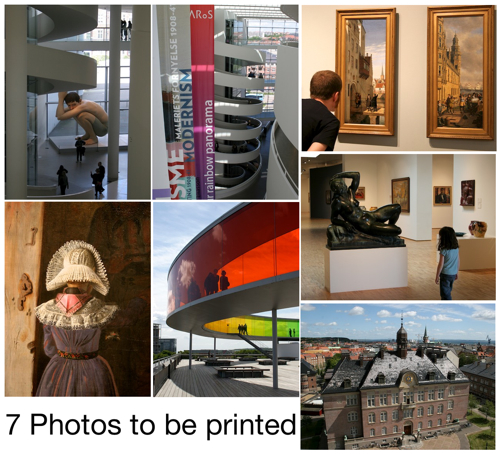
Reason: I like working with smaller photos as I like to have a visual display to give a firm foundation to my journalling whenever possible, and I like those photos to show different parts of the story. I love a visual story.
These eight photos show all the different points I want to highlight about ARoS. I have a view within the rainbow panorama, a photo of the rainbow panorama, the most meaningful scenic photo I took, a shot of the interior architecture of the gallery (I love architecture and it features prominently in my albums), a couple within the gallery that also contain family members, one of ‘The Boy’ sculpture that is synonymous with ARoS, and one of a detail of a painting. Eight photos that tell a fairly complete story, and will work with my style of scrapbooking.
I plan to print these soon and, if all goes well, work on this layout in the near future so you can see how it all came together.
I was the happy recipient of a trip to a nearby scrapbook shop for my birthday as a gift from my husband. I took the train down to Odder on a day when he was home to care for the children. Here is a look at what I bought:
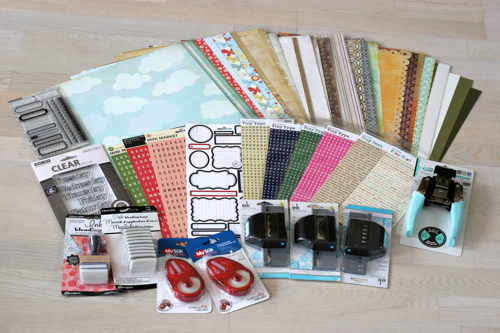
I don’t shop for scrappy stuff very often, so this was a huge splurge. I even got a few tools that had been on my wishlist for a long time, such as the Ranger ink blending tool and the Corner Chomper. I also got a few EK success edge punches, some adhesive refills, some clear stamps, a sheet of Basic Grey label stickers, a bunch of small alphas and text (love those!), 30 sheets of patterned paper and 8 sheets of cardstock.
I got a chance to play with some of my new stuff over the weekend. I did three layouts in chronological order, which is very unusual for me, however that is what I felt like scrapping. So I did.
About leaving Newcastle (I have no idea when I actually took this photo. I think it might have been on a trip to Canada):

About arriving in Denmark:

And about the efforts of getting settled when we first arrived:

The little story tab pulls out and contains a more complete story about our experience, but I also added a brief list of highights that featured numbers on the layout itself. The tab does stick out beyond the page. Given the orientation of my landscape layouts in the album, it’ll end up sticking out of the top of the page protector, which is just fine by me. (Or at least it will once I order more page protectors. I’m out.)
The story tab looks like this:

And the back:

Speaking of scrappy goodness, I’m also currently take the 31 things with Ali Edwards over at Big Picture Classes. I’m quite enjoying the class and have been doing tons of writing.
She has set up the class with the idea of making a 12×12 album that will contain the 31 stories and 31 photos that resulted from the prompts. Personally, I’m collecting the stories and will likely make stand alone layouts and integrate them into my current LOM system. I’m typing up all my prompts in a single text file, and ending each day with a ‘Thoughts’ section where I list other ideas of potential stories (or ways to expand parts of stories) that might also make great layouts.
I’m really enjoying the class and reading how other people are interpreting the prompts. I’ll admit to being a couple of prompts behind as I’ve had a few nights where I’m been so sore from excessive gardening that I was unable to type. I’ll catch up. It’s all good.
Although I did a ton of gardening over the weekend, I managed to pull together a few layouts for some of the challenges going on over at Big Picture Classes and Two Peas in a Bucket.
The first was a challenge to use 2 photos in a now and then comparative style layout. I chose a photo of me 16 years ago and a current photo and the journalling is a list of things I wanted to tell my younger self. I paired this with a colour challenge.

My second layout uses everyday candid photos taken at the playground over the course of several years (actually, the date should be ’11 not ’12) and the journalling talks about favourite places/things and how I’ve enjoyed watching my daughter develop. I paired this with a challenge to use chevrons (which I had to fashion myself as I don’t own any chevron paper).

The final layout is of a Hermitage in Warkworth. The journalling is in two parts. The journalling on the left tells about what we saw, liked, and some of the history of the site. The journalling on the left tells of how much my daughter enjoyed the boat ride to the hermitage. I paired this with a challenge to layer under a negative (in this case, a die cut W) shape.

The challenges over at 2peas are going on until next Sunday if you fancy having a go. I’m hoping I might get a few more done this week whenever I’m not gardening or prepping photos for Week in the Life.
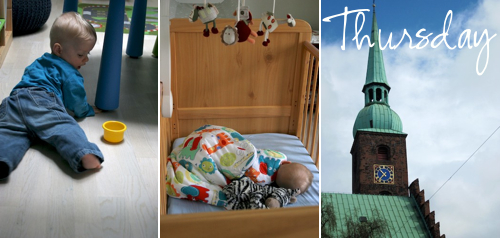
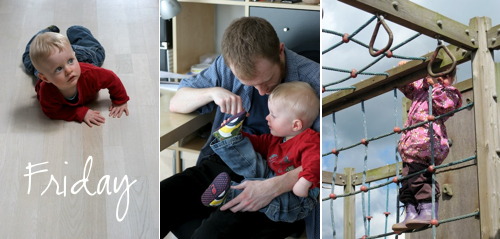
The documenting of Week In The Life officially ended last night, and now the real challenge (for me) begins. The actual making of the album.
I’m not very good with finite albums, I’ll freely admit that. I don’t really like making mini books. The fact that they are fun, small and can be fast are all great things about mini/small albums. What I have issues with is the finite nature of them. How everything needs to fit into a pre-defined space. I don’t scrap chronologically. I make layouts, I fill albums, and when an album gets filled I start a new one. Mini albums don’t work like that. And I won’t even start on how it drives me nuts when everything in an album coordinates. (Yes. I know. I have issues. I refuse to wear matching accessories, too.)
However, having stated all of that, I love the idea of WITL. And because of that I really want to make this work. Our family has seen so many changes in the last few years, and sometimes the everyday gets lost. People move, grow, and change. Taking the opportunity to document those little things can be significant.
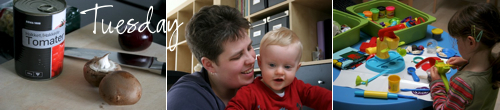
I ended my week with 404 photos after purging, or an average of 57 photos per day. I took a lot of photos of the interior of the house which are not day specific. I’m thinking that I’ll pull all of those photos and make a separate spread for them within WITL. It’ll be a nice way to look back and see what everything looked like and what things will change (or not change) during the duration of our stay.
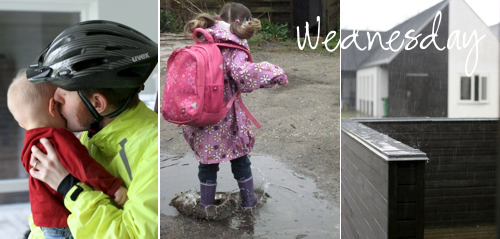
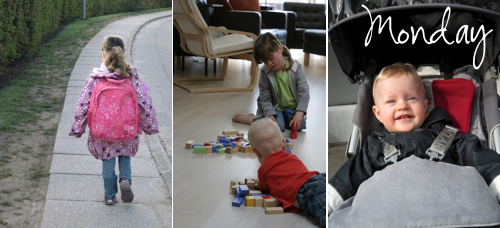
After removing the house photos, the average day has around 20 photos and that seems to be a magic number. Monday had the least at 15, and Friday has the most at 36. Apparently, I took a lot of photos on Friday. Having had a quick look at the photos, I might compensate for this amount of photos by adding in an extra page for that day.
I am planning to do this in 8.5×11 since I’m completely in love with that size. I don’t have an album yet, but I’ll likely stick with the American Crafts Modern albums which I use to house my other layouts. I’m dithering between picking a special colour for WITL, or using brown (which is the colour of our ‘Thing We Do’ section). I’m leaning towards the latter. No matter which I choose, I know that I’ll need to order more page protectors. I simply don’t have enough on hand.
I’m also planning on doing this as a traditional scrapbook. I don’t have the ability to print at home, and 8.5×11 isn’t exactly an easy size to come by in Europe. The closest I could come would be to print 8×10 photos of a digital page then mount it on card stock to bring it up to the full size. Traditional it is. However, since I am going to preplan my pages, I’m also going to take this opportunity to use some digital elements on my photos. I have a small collection on hand that I’ve downloaded or received at part of a class. In fact, I think the elements from Ali’s class ‘Yesterday and Today’ will work perfectly.
My big task now is to pick, edit, and upload whatever photos I want to have printed. I’m hoping to have them done in the next couple of days so I can have them back soon. Since we have a holiday on Friday I’m not holding my breath that I’ll get them before the weekend.

Speaking of the weekend, Saturday is National Scrapbook Day. Many sites will be holding special events and challenges that day and I plan to be hanging out at Big Picture Classes for their NSD Creative Crop. Whatever you are planning, I hope you have a great day. :)
I finished off a few more challenge layouts from Shimelle’s online crop last weekend.
Challenge 9 to complete a layout based on a past challenge. I chose a sketch off Shimelle’s blog.

The photo was taken a few years ago in Algonquin park and was a random leftover. I journalled about how I miss being outdoors (with examples) in rural Ontario.
Challenge 10 was to use a bold paper for the background (or part thereof… in other words, a background that makes a statement). There was a second part to the challenge which required using two photos. I missed that bit right up until I went to scan it, and snuck a second photo on at the last minute.

Photos of my kids. Journalling is about how they are both camera hogs and ham it up when I pull out the camera. The bold paper is old, but I love how it has all the same colours as my daughter’s t-shirt.
Challenge 15 was to use a rubbish photo. Whilst I was working on some of the other challenges I found this particular photo and knew this would be the one I’d use for this layout. The photo is grainy, out of focus and tinted slightly red (though not as badly as the scan depicts). I love this photo.

This is a photo of my Nan and reflects her personality perfectly. It’s one of those photos that just screams ‘that’s her’. Since is was just a general photo I decided to use it to describe about the type of person she is in terms of what she’s done in her life. She lead a very full life well into her 90s. I chose to use a quote at the bottom (something I almost never do) because I think it is extremely fitting.
Needless to say I didn’t complete all 16 challenges, however I think that 11 out of 16 isn’t bad. I did think about doing a few more, but in the end I’m happy with what I managed to accomplish.
And now to start something new…
This week I’ll be participating in Week in the Life as hosted by Ali Edwards. There is also a WITL community over at Big Picture Classes if you are interested.
The idea is to capture a single week of your life. The expected, the unexpected, the interesting, and the mundane. In essence, capture the everyday for a given week. This will be my first attempt at WITL and I haven’t quite figure out my final game plan for how I’ll bring it all together. This week (starting today), I’ll be gathering photos and words. Next week, I’ll put it all together… once I have a better sense of exactly what I have.
At least that’s the plan, if you can call it that. Right now, I’m having a hard time remembering to take the photos of the everyday (ironic, since I take so many everyday photos). I had several good opportunities today that I ended up missing due to either being rushed or simply being in the moment. I guess that’s what the journalling is for. :)
I admit it. I love a good challenge. I don’t like challenges that are overly constricting, though (like make a layout with 2 photos, black cardstock, 5 brads and some ribbon). I like broader challenges that allow you to bring a lot of yourself to the table. Challenges like scraplifting a page, using a certain item (in a general sense), and so forth.
Thanks to Shimelle’s weekend crop I managed quite a few challenges this week. She has 16 challenges total, of which I’ve now completed eight. Submissions are open until this coming weekend so you still have time to participate if you have the inkling.
Challenge number 1: Lift Jamie Warren’s layout.
Mine came out quite a bit different, but I still took a lot of inspiration from the layout including colour, title, single photo layout, and a few other minor details.

Challenge number 2: Design a layout using papers from three different collections.
I used Pink Paisley, October Afternoon, Chatterbox and Graphic 45.

Challenge number 3: Mix your style with someone else’s style and try something new.
I was inspired by Gluestickgirl and the way she often uses a top and/or bottom border or accent. This is something I never do. I usually add full borders or have all my stuff in the centre of the page, often in grids. I love how the resulting page turned out. It is still very much in my style, but also very much inspired by Gluestickgirl’s style.

Challenge number 4: Make a layout using yellow, grey, and one other colour.
This one was hard. I never use grey and rarely use yellow. I chose purple as my main colour.

Challenge number 5: Make a layout inspired by Wilna’s layout
And I pretty much just scraplifted the whole thing… except the scattered embellishments. I don’t have that many embellishments. (Comes from being a simple scrapper. And cheap.)

Challenge 6: Be inspired by a layout, but make a drastic change (example was to make a boy layout by being inspired by a girl page).
Again, I found this difficult as I don’t get inspired by themes. Just because it is pink and ruffly doesn’t mean it will inspire me to scrap pink and ruffly. I finally just bit the bullet and went for it. I was inspired by Moon Ko’s baby layout and made a layout about food. I even went so far as to use a bold patterned paper. Yes. I live on the edge.

Challenge 7: Use a pocket or envelope to house something worth keeping.
I knew exactly what I was going to do as soon as I read this challenge. I pulled some an old postcard, letter and note written by my nan and wrote about how difficult it is to read her writing.

Challenge 8: Use a stamp that you should use more often.
I pulled a stamp I bought in Canada but hadn’t used. (At least until I did the previous layout. I used a part of the stamp on that. It was sitting on my desk. It’s how I work.) Very little journalling, which is unusual, but in this case I thought fewer words got the point across just fine.

Earlier in the week I also did a few other challenges.
Glitter Girl Adventure 15: Use old and new product together on a page.
Which I thought was easy until I realised my newest paper was from 2009. I added in some washi tape, flower and letter stickers (all bought in 2012) to adhere to the challenge requirements.

And finally, the weekly challenge at Two Peas: Create a layout about the places you visit around your hometown.
We haven’t lived here long enough to have any favourite places, so I did a layout about our favourite places in Northeast England.


I may have been busy this week. However, I also learned a lot about myself during these endeavours. I prefer simple pages. I work better when I start with a story. (Even if I’m actually inspired by the photos. If I don’t have a story, I just can’t get the page to come together.) I’m not very good at scrapping with pink, but I’m trying. Limiting the choices of colour or to a specific product makes it much harder for me to put a layout together (that’s not to say I can’t scrap with product, just that it isn’t my inspiration). I tend to gravitate to using whatever happens to be on my desk.
There are eight more challenges for the crop. I may do them all, I may not. The one that requires printing is going to be problematic since I don’t have a printer. I guess that’s why it’s a challenge. :)

I love when print orders arrive. I try to send a print order out at the end of each quarter, but it doesn’t always happen that way. This was one of those times as I had 7 months worth of prints arrive, as well as some reprints of some older photos.
I generally print in 4 sizes. For very special photos I’ll print a 5×7 or 6×9 inch enlargement, but I don’t do that very often anymore. I will for some travel photos, and the odd ‘oh my, I adore that photo’ photo if I think that my layouts will benefit from the larger size.

Most of my prints arrive as a 4×6. My best photos are printed as a full 4×6, supporting photos are print as 4×3 (2 photos on a 4×6), and I also print some photos as 2×3 (4 photos on a 4×6) for photos I’d like to have but aren’t essential to a story or for layouts that are destined to have a lot of photos.
I’ve come to realise over the last year or two that I really like working with smaller photos. It is all about real-estate. I want the most impact in the least amount of space. I used to print my best photos as 5×7 and supporting photos as 4×6s, making a double page 12×12 spread (or two or three) to accommodate the photos. I eventually realised that all those layouts took up a lot of space whilst not necessarily saying a lot. I’ve size scaled down my scrapping, and I’m enjoying my albums much more as a result. More substance, less real estate. It’s something that is working for me.
I still have some prints that were sized for those 12×12 double page spreads, and they just don’t work with my current style. Some of them I’ll be able to crop, but some of them simply needed to be printed smaller to work. I’m hoping now that I’ve done that I’ll be able to get some of those photos into my scrapbook albums. My goal over the course of this year is to clear out all of my digital photos from 2008 or earlier from my photo storage binders. That still gives me 4 years worth of photos in my binders, plus all my non-digi photos and whatever photos I’ve stuffed into my category drawers (where I place non-event, non-story driven photos).

When I receive a print order, I put the prints into rough date order (this is much easier if I print every quarter as I should), group like photos together, and place them in my storage binders. I use Kenro photo pages that hold 4×6 photos in a lever arch file. I’m able to place in the odd 5×7 in there easily enough, though I do have some 6×8 photo pages that I often use for travel photos.


I love this photo binder system. It is part of Stacy Julian’s Library of Memories system which I took as a class at Big Picture Classes (though the class is now called Photo Freedom, as is her book which describes the same system). I can easily browse through photos and pull out whatever I’m inspired to scrap that day, and because I can easily see my photos, I’m more likely to be inspired by them.
And boy, have I been inspired this week. When I receive a print order I often feel overwhelmed by the sheer number of new photos, so I always scraplift my first layout. I pulled 3 photos I printed which helped support a story I had to tell and used this layout as my starting point.

After that, things just seemed to fall into place and I just kept making layouts. Some started with stories, some are recent photos, some are made using older photos I reprinted as a smaller size.
I did this layout as a challenge to use pattern paper to make your embellishments:


Happy scrapping. :)