
Category: Creative Stuff
Articles in the Creative Stuff category
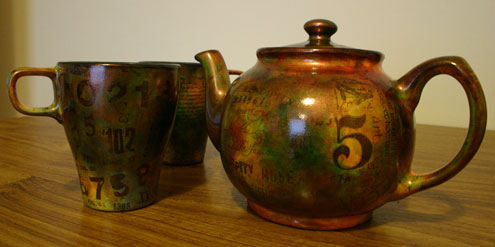
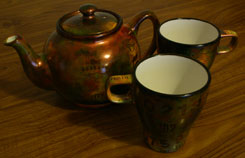
I was flipping through the Somerset Home publication and saw and saw Sarah Hodsdon’s gorgeous ‘Tea with DaVinci’ article, and knew immediately I had to make a tea set of our own.
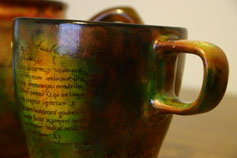
Our tea set comprises of 6 cups, two milk pourers (one marked ‘milk’ the other marked ‘soy’), a sugar bowl and a tea pot. Each cup has it’s own theme consisting of numbers, letter fragments, rulers, pens, mail art, and art muse. The tea pot has a combination of all the themes and the milk and sugar containers all have a botanical theme.
Even thought I used the same colours called for in Sarah’s article, my set came out really different and very earthy in colour…. very me. I love how it came out, and Joey seems quite pleased with it. We really do like our tea, and I’m hoping that this will mean we can set the tea set out in the lounge when we’re entertaining so that we Joey doesn’t have to keep running back and forth to the kitchen when our cups are empty.
Now I just need to quilt a tea cozy for it. :)

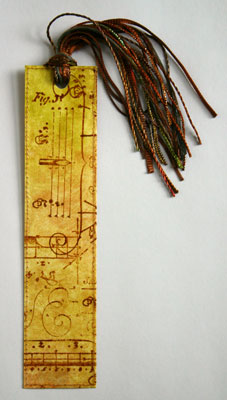
One of the stocking stuffers that I made Joey was a stamped bookmark. I saw a workshop by Kathy McCreedy in the winter 2006 issue of Cloth, Paper, Scissors magazine on creating bookmarks and other assorted items out of Tyvek and knew I had to give it a go.
This is how mine turned out. I love it. Especially with the beautiful hand-dyed fibres from Oliver Twists. Joey seems to like it. It’s currently holding place in his new Terry Pratchett book he’s devouring.
Lisa Vollrath has once again created a wonderful Christmas Countdown Calendar of image to use in your art. A new holiday image will be available for download everyday from the 1st to the 25th. Be sure to check them out, they are always wonderful.
Thanks for doing this, Lisa!!
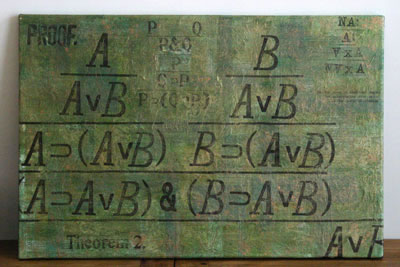
When Joey moved into his new office, he requested a painting for the large blank wall above his desk. Well it took many months of procrastination, but the canvas is finally finished. :)
It’s a mixed media piece of book pages, papers, tissues, gouache, acrylic, watercolour, ink and stamps (foam, rubber and homemade), and some glue for good measure. The formulae on the canvas are actually particular to the work that Joey does, just to add a personal touch to the piece. The piece has a bit of a texture to it, worked in through multiple layers of papers and it’s got a lovely golden-copper sheen to it, which unfortunately does not show in the photo.
The canvas measures 30×20-inches, without any visible staples, and the work wraps to the back of the canvas, which means as soon as I attach the cord to the back, he’ll be able to take it into work and hang it without any need of a frame.
Another WIP (work in progress) done. ;)
For this month’s same paper challenge on Scrap That Moment I decided to create a much needed item—that knitting journal I’ve been on about. I’m quite chuffed with this, and have made several entries in it already detailing swatches, guage and adjustments for my current knitting projects. :)
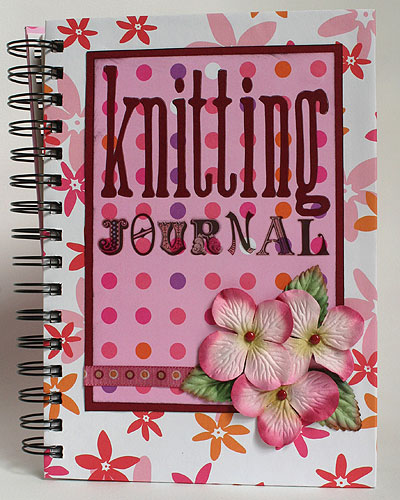
If you want to check out what the other girls did with the same paper, you might want to have a peek in the gallery.
While I was mooching around my supplies cupboard, I came across my art journal in my pile of WIPs (works in progress). This journal was created with no ‘sell by date’, there was never any pressure to work in it. I created it so that I could journal six pages in a day and then leave it for a few months, or I could write it in religiously.
I thought I’d document the round robin that we are doing, and I’m hoping to do a page in my journal for each page of the round robin I work through. Just seems appropriate somehow.
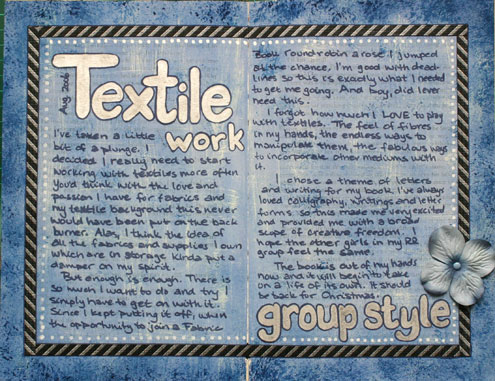
I’ve also noticed I’m on a bit of a blue kick. This page is blue. I’m knitting a sweater that is blue. The ATCs I’m working on are blue. I think it’s the weather….
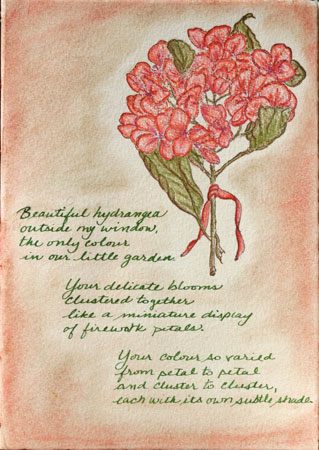
I’ve been wanting a proper sketchbook for a while, so I decided to make one myself. Although the content will be of a generally botanical nature, this book will hence forth be known as the ‘Tree Book’ since it has an image of a tree on the cover.
I always find the first page you do in a book is the hardest because you have that feeling of not wanting to mess it up. So I chose a page a little further along in the book that had a slight mark on it (a bit of excess paint from when I washed all the pages with a bit of colour) and decided to use a stamped image. I call it getting my feet wet…. and since this book will be a combination of stamped images, sketches and writings I figured I may as well start off with something on the easier side.
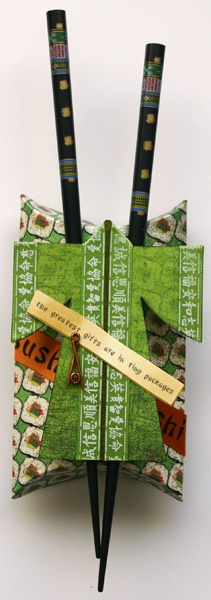
I had quite a lot of fun making this little gift box, and thought I would share it with you, including a downloadable template and instructions.
Ingredients:
- a variety of oriental-influenced papers (I used Far & Away )
- 1/4-inch and 5/8-inch ribbon (I used Far & Away )
- accents (I used Far & Away )
- template, downloadable in .pdf format here—JapGiftBox.pdf
- 150lb white cardstock
- Chalk or ink (I used Tim Holtz’s distress ink in ‘old paper’ and ‘black soot’)
- Chopsticks
- Double sided tape (I highly recommend Therm o web’s Strong Tape )
- Optional: Notch tool or 1/2-inch circle punch
You may wish to check out your local Asian markets, as many have wonderful elements such as coins and chopsticks for sale which make great additions to a favour box or other altered project.
Instructions
First, download and print out the template onto the white cardstock that I listed in the ingredients.
To make the Kimono:
1. Cut out the kimono template.
2. Glue the template to the reverse side of your pattern paper, and cut it out around the template. Repeat to cover the other side.
3. Decide which side of your kimono is up, and on that side draw a light pencil line vertically down the centre of the kimono and chalk or ink for about 1/8-inch on either side of that line. This will create a shadow that will add depth the kimono to give it a ‘faux’ inside. (I inked mine with my ‘old paper’ ink pad.)
4. Ink or chalk the edges of your kimono (I inked mine in black).
5. Run ribbon along either side of the centre line using the neck piece as a guide, leaving approximately an 1/8-inch gap (the triangular neck piece gives the illusion of a collar and keeps the ribbon taut).
6. Run your ribbon along the outside edge of the sleeves to finish off the edges. For my kimono I only used ribbon on the front side of the piece.
7. Set aside.
To make the box:
1. Cut out the box template and adhere the blank side of the template to the reverse side of the patterned paper. Trim the paper using the template as your guide.
2. Using an embossing stylus or a dried out ball point pen, trace along the dotted lines of the template (template is facing up, patterned paper is facing down).
3. Crease the lines you’ve just created as much as possible.
4. If you wish, you can use a 1/2-inch circle punch or a notch tool to cut out at the centre edge of each of the curved lines. It gives a lovely finished look and makes the box easier to open.
5. Ink all the edges of your box.
6. To assemble the box, lay down some double sided tape along the long small flap (the right-hand side of the template) on the patterned paper side.
7. Fold the box in half (along the crease line) and line up the edge of the box so that the flap lies to the inside of the box. Once you are happy with the placement, stick the flap in place securely.
8. Squish in the creased edges of the box to curve out the front and back panels and then fold the ends of the box in to close you gift box.
To assemble the piece:
1. To start, I taped the 5/8-inch ribbon diagonally toward the bottom of the box.
2. To add the chopsticks, I first marked where I wanted the chopsticks to lie and then used double sided tape wherever they touched the box.
3. Glue the kimono to the chopsticks in the same manner.
4. The Chinese fortune rub-on was rubbed onto a scrap piece of white cardstock, and then cut out. I lightly inked the edged with my ‘old paper’ ink pad. I used double sided tape to adhere the fortune and liquid glue to adhere the charm.
The kimono measures appoximate 3×4-inches. The finished box measures about 2.75×5 x 1-inch. Now you just need to fill your gift box with a small gift, vouchers or money and give it to someone special :)
The ‘Fine Print’: The Japanese-Style gift box piece was created for www.scrapthatmoment.com however the images, instructions and templates are copyrighted to me, Chriss Coleman. Feel free to use these templates and instructions for personal use. Please don’t post to .pdf and instruction to any online forums, however feel free to link folks back to this article. If you post your creations online, a mention or a link back to www.sheepspace.ca would be much appreciated…. it’s all just good karma. :)
Also, feel free to leave a comment with a link back to your creation. I’d love to see it. :)
Sue and I were playing around with Polymer clay yesterday. It’s a medium we’d both used before, but we thought we’d make a day of it and christen her new pasta machine and oven that were dedicated to polymer clay use.
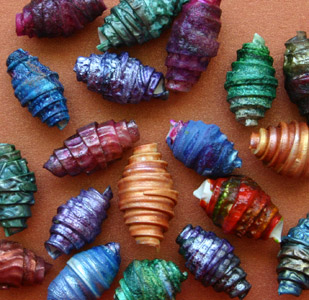
The inspiration for our first project came from the book Polymer Clay Surface Design Recipes: 100 Mixed-Media Techniques Plus Project Ideas by Ellen Marshall. If you want to use and decorate polyclay as you would textiles or paper, then this is definitely the book for you. One of the projects in the book was polymer clay beads, done in much the same was as paper or fabric beads are made. The base was a neutral colour clay and the colour was added using various agents suspended in shaving foam. The book recommends using dye, although we experimented with dye and metallic reinkers, acrylic paint and glass paint. The metallic reinkers seemed to give the best effects, but to give you an idea of the results, the copper coloured one near the middle was a re-inker, the red/green one to the right of it is glass paint, and the green/blue one at the very bottom in the centre under the copper one was adirondack acrylic paint. These were really fun to make, and we had a production line going on with Sue colouring the beads while I rolled them. I also found that some of our best best were the made from clay I had added texture to using one of several texture mats.
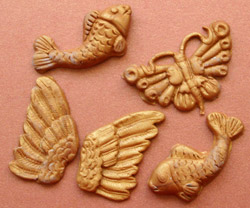
We also experimented with using clay in molds. We found the harder Fimo better for the moulds than the softer Sculpey, but no matter which we clay we used we had to be sure to use a little Talc Powder on the mould if we ever wanted to get it out. The metallic gold clay we made these moulds out of we some rather ancient stuff that Sue revitalized with some magic polyclay solution and some elbow grease. Some of the clay we used was 20 years old, and after a bit of work it worked as good as new.
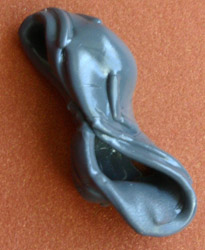
As with any good day of experiments, we had our share of disasters. It started with the item at the right. This used to be a slide mount. In one of the Expression magazines, they used polyclay on slide mounts, and mentioned to test the slide mount on its own in the oven before committing any to clay. After seeing our lump of molten plastic at the bottom of the oven, we decided to pass on the slide mount stuff. I took the former slide mount home and plan to use it somewhere in a project… mostly because Sue dared me, and quite frankly I’ll use just about anything especially if somebody dares me to use it.
Our last experiment started innocently enough. I just needed some stuff to use on some ATCs I’m working on. I rolled out some beautiful copper clay (about the same colour as the background I used for all the images.) and stamped some lovely images, carefully cutting out each one. We popped them into the oven (along with the moulded wings pictured above) and set the timer to 30 minutes. After a couple minutes we noticed a bit of light smoke coming from the cooker, and really took no notice. After about 5 minutes, there was clearly a fair amount of smoke coming from this little cooker, and we were discussing how much fumes come from the polyclay, and how it was so good we had decided to do this on a beautiful day when we could have the windows wide open. After 10 minutes there is billowing thick smoke and a stench filling the room. We decided that it might be a good idea to open the cooker door and see how they were doing.
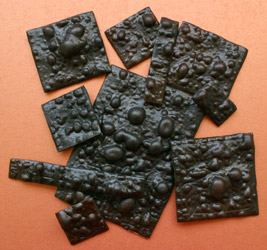
Okay folks, if you are curing your poly clay in the oven and start to see smoke coming out of the cooker it may be a good idea to actually open the door and see what is going on instead of chatting about toxic fumes and waiting until it is black billowing smoke and then asking ‘Do you think we should open the door and check on them?’. We pulled out the pan, and found a pan full of charred, bubbled, blackened bits of polyclay…. and a few wings that ‘made it’ for the simple reason that they were much thicker than the stamped images. Needless to say that Sue and I were in absolute histerics about the entire thing. Maybe it was the fact we’d just spend the afternoon making these charred bubbled bits. Maybe it was the fumes. Maybe it was the fact that I was wondering if I might be able to stitch through them, however, nobody in the house seemed to find it as funny as we did. What was even funnier was the fact that with 4 other people in the house, no one bothered to find out why the house was filling with a burnt plastic stench… they simply took it for granted that the smell was coming from whatever we were working on.
For the record: Yes, I saved those burnt and bubble pieces. No, I don’t plan on binning them. Yes, I do plan to use them. Quite frankly, I think they would look rather lovely once they are guilded. I’m still working on how to stitch through them.
We went out to the coast today where they hold a vendor’s market every sunday, and I had so much fun. These were a few of the finds I got today:
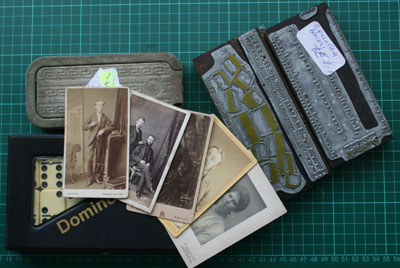
I got some dominoes, some rescued relatives, a roller razor, and some old metal (wood mounted) print blocks, as well as a few other odds and ends. I was SO happy about those print blocks. I’m not sure what I’m going to do with the roller razor, but it was too cool to leave behind, and at only £1 I simply couldn’t pass it up.
We managed to get a walk in along the coast before the clouds and rain rolled in. I even took off my shoes and walked in the sea—man it was cold! But I managed to grab a few shots with my camera while we were there, and generally had a fabulous day. I love living close to the sea. :)
Meanwhile, I’m working on a few odd projects that I’ll hopefully get uploaded this week. I’m also changing around some of the links on the sidebar. You may have noticed some changes already. My bookmarks are getting way too big, even though they are organized into folders, so I’m putting some of them on here for safe keeping and so other can enjoy them, too.
Have a creative day!