
Category: Tips & Tricks
Articles in the Tips & Tricks category
I’m still working on the lovely blue-green Evergreen batts, and they pretty much look the same as last time , except I’m up to 4 bobbins worth of singles. That means 2 more bobbins to go before I’m ready to ply.
Speaking of plying, on large projects I really like to rewind my bobbins. Sometimes I’ll store singles on toilet rolls, and sometimes I have enough bobbins that storage isn’t necessary, however, I do really prefer plying from rewound bobbins. Other than the fact that they look really pretty, my plying also comes out better due to the fact that the yarn is nicely distributed and does not have to follow the hills and valleys (and thus speed up or slow down) like they would if I hadn’t rewound my bobbins. If I had a Woolee Winder, this wouldn’t be as much of an issue. I don’t. I rewind.
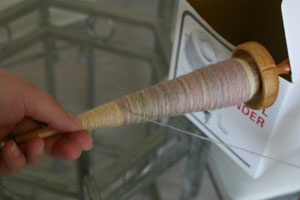
Here is what my bobbins look like after I’ve completed the single:

To set up for rewinding, I make a few adjustments on my wheel. After putting on an empty bobbin I hook both loops of my drive band over my bobbin, adjusting tension as necessary, then hook and elastic band over the tension screw and flyer. This keeps the flyer from moving whilst I’m rewinding.

I place my full bobbin on my lazy kate, and place that on the floor beside my wheel. I attach the single to my bobbin’s leader without threading the leader through the orifice. I’m only rewinding. I don’t want to add any extra twist. I start treadling the wheel and control the distribution of the singles with my left hand. Basically, I’m a human Woolee Winder.

And here is how my bobbins look after being rewound. No hills, no valleys, and gosh darn pretty, too.

There are many options when it comes to rewinding your singles, and this is what works for me on my Kromski Symphony. I don’t know if this will work on a non-double drive wheel as I’ve not tried it. I always ply on my Symphony. Your mileage (and technique) may vary depending on your wheel.
I have a secret to tell. I’ve never plied on a spindle. I wind my singles off my spindle and ply them on a wheel, so I thought I’d share part of that process.
First, we need a few supplies:
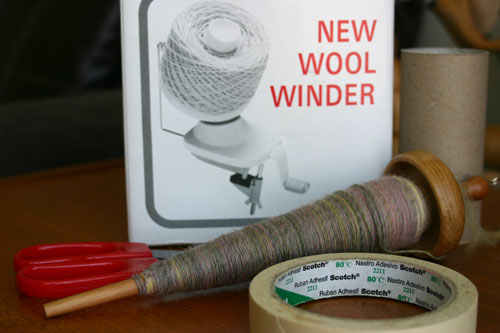
You’ll need a pair of scissors, some tape, a toilet roll liner, a ball/wool winder and your full spindle.
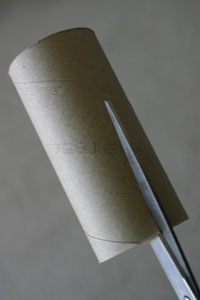
Take the liner and cut it open lengthwise:
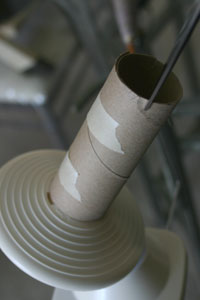
Set up your ball winder and tape the liner so that it fits on the wool winder. You’ll need to tape it on fairly snuggly so that it doesn’t fly off whilst winding but not so tight that you can’t get if off once you are done. Put two little notches at the top of the liner that are opposite each other to enable you to hold and secure the tail of your single:
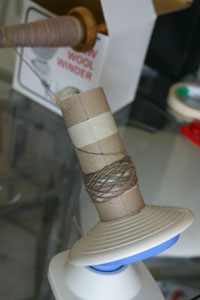
Thread your single through your wool guide and secure it to the liner and start winding your centre pull ball:
To hold my spindle I usually hold the end of the shaft with my hand and place the top of the spindle onto a non-abusive surface. I like the top of my ball winder box:
Once I’ve wound off a significant amount of singles I can usually just hand hold the spindle without any support.
Once my singles are wound I tend to label my liners so I know which order I need to ply them. This is useful when navajo plying or when working a larger project so singles can be plied together in a certain order.
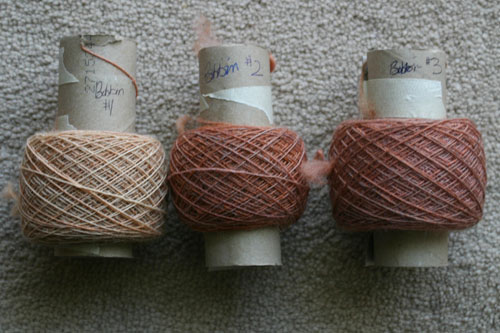
See those three bobbins? That’s the all of the Rice Pudding colourway I blogged about a couple of days ago. They are currently in the plying queue and I’m hoping to have some finished yarn to show next week once it’s been plied and set.
Jo asked how I did the Tyvek leaves without them distorting. The short answer is very carefully.
Here’s the long answer:
First, I stamped several extra leaves on the Tyvek so I could choose the best ones out of the bunch. After that it’s just all about keeping a careful eye on the Tyvek as it shrinks. Apply the iron (heat) to the back side of the Tyvek as it will want to shrink away from the heat, and I always use a piece of baking parchment as a ‘press cloth’ when dealing with Tyvek. Then place the iron over the Tyvek/parchment so that the iron is touching but not really weighing down on the Tyvek, trying to cover as much of the piece in one go as you can. Then just keep checking it to see if it has shrunk down to the texture/size you want it to be. The key is to check it every second or two so that the Tyvek doesn’t try to shrivel up and become crispy. Once the bulk of the Tyvek has shrunk you can go in an touch up other areas with the tip of the iron or a mini-iron.
Hopefully that makes sense to you, Jo! The secret is to just let it shrink slowly and not try to rush it. :)
The other day I posted my leaf tags which were made of leather, and Dianne asked what the leather was like to sew on…. I thought I’d answer the question here.
Leather is easy to work with. I think of it as working with thick paper because, unlike fabric, if you pierce the leather with a needle you have a permanent hole. Leather comes in various weights, from stuff that is very stiff to stuff that is far softer, in the case of my tags I was using a piece of leather that was a medium thickness with a fairly soft hand. You need to use proper thread and needles for your weight of leather.
Most haberdasheries should carry leather machine needles. They are easy to tell apart because they have a diamond shaped tip. If you are working with soft leathers you can probably get away with using a denim needle (as I did, because our haberdasheries don’t carry leather machine needles). When it comes to threads, use a good strong thread like an upholstery thread if you are doing seams. Since I wasn’t seaming, I used a rayon embroidery thread. Sew as normal, but don’t use pins. If you need something to keep the leather in place while you stitch, try using a glue stick, double sided tape or a temporary spray adhesive, just keep them out of the path of the needle so you don’t gum up your machine. Personally, I like using bulldog clips or papercilps as I don’t need to remove the adhesive after sewing.
This was the first time I’d ever done free machine embroidery (FME) on leather, and I was very pleased with how it turned out. The stiffness of the leather allowed me to easy move a small piece around under the foot without needing an embroidery hoop or stabilzer. I did a few samples before starting on the tags proper, but in all I found it very easy to work.
One thing I will mention is the edge stitching. I tried two samples of edging. The first, I cut the leaf shape first then sewed the edging. The second, I sewed in a leaf shape then cut around the edge. The latter seemed to work far better than the former, and I got a much nicer and more even edge. I also like the definition the sliver of leather on the outside of the stitching gave to the overall appearance.
If you are looking to try working with leather, try going to a leatherworker first. They often have lots of scrap bits of leather that they will sell you at a fraction of the price. If you happen to live in the northeast of England and are the near Newcastle-upon-Tyne area on a Sunday, I highly suggest going to the craft market on the Armstrong Bridge. There’s a lovely chap there whe sells his scrap leathers for whatever you think they are worth to you. Have a project in mind, as he often asks what you’ll be doing with your pieces and will always give some helpful hints. :)
My mate Sue was telling me this the other day, and I thought I would pass it on.
Please unplug your heat guns when they aren’t in use.
Recently there was a crafter down south who, like most crafters, kept her heat gun plugged in and ready for use. One day while she was away one of her pets accidentally switched the heat gun on, which ultimately started a fire. Her entire craft room was gutted.
So for the sake of safety, please unplug your heat tools when they are not in use. It’s easy for a pet or child to accidentally turn one one, for it to drop and turn on, or for something to drop onto it and turn it on. I’d hate for anyone to lose their craft room, their house, or lives due to an accident with a heat gun.
I’ll be posting a few more layouts and such as soon as my allergies die down. I really hope that’s soon.
Although I don’t use my heat gun a lot… except for melting and burning things… but my friend Sue gave me a neat little tip, which I’ve been using for a while and works so well I thought I’d pass it on.
Creating a dedicating ‘heating area’:
What you’ll need:
- an old glossy magazine
- some aluminium foil (enough to cover the magazine on both sides)
- a clipboard slightly bigger than the magazine
Directions:
- Cover the magazine with the foil, shiny side out. Use a bit of tape on the backside if you need.
- Clip the covered magazine onto the clipboard.
- Find something to heat emboss or grab some shrink plastic.
Right, so why have you just created this? It gives you a dedicated space for heating, but more than that it will make it easier to use your heat gun. The principle is fairly simple, the foil reflects the heat back and heats the underside of the piece, which means you’ll be able to emboss or shrink your piece quicker and more effectively. Not only that, but because heat will be coming from both directions your paper, and to some effect your shrink plastic, will curl less. The clipboard simply gives you a ‘cool area’ to touch, as you won’t want to touch the foil because it does get quite hot.
If you use one of those self-healing mats, having a dedicated heating surface will also save your mat, as embossing on the self-healing mats will actually warp them.
I’ve been working on some fun altered items lately and as a result of some of the techniques I’ve been working with some really sticky products. I have a small pair of non-stick scissors that I usually use for ‘sticky stuff’, but for these projects really needed to use a good, sharp and long pair of scissors. So I’ve been using my beloved big non-stick scissors, but even these have been gumming up.
In comes the Versamark. If you rub Versamark over the cutting edge of your scissors it keeps the scissors from gumming up, and I must admit it works brilliantly! I’ve never really had to use this before since I always use non-stick scissors, but even my prized scissors couldn’t stand up the the gluey messes I was cutting through. Versamark to the rescue. :)
If you are cutting through any type of gluey mess, or even if it’s just cutting double sided tape, try running a Versamark pad along the blade. The difference is amazing.
With the advent of die cut machines and computer titles, the use of hand cut lettering isn’t as prominent as years past, however, I think they still have there place. They simply have a classic look, and can be done in any type of font you wish, and I would like to share a few tips I have learned.
- 1. Use one of those craft knives with the break-off blades. They are made by a variety of companies, and are much the same, however I do like the kind that has a lock on the blade so that it doesn’t accidentally move while you are cutting. You can use an x-acto or scalpel, but I like how easy it is to simply break off a blade when I need a sharper edge.
- 2. Always use a sharp blade. I will often break the blade tip off after about 6 letters if I’m cutting paper, or about 3 letters if I’m cutting cardstock. The sharper you blade is, the better the cut, the easier it is to cut, and the less likely you are to cut yourself. On the latter note, the duller the blade the harder you will need to press and so therefore if you accidentally slip while cutting you will most likely injure yourself worse than if the blade had been sharp.
- 3. Use a glass cutting mat. I simply use piece of glass from a cheap photo frame I bought at Ikea, but any piece of glass will do. I find that it is easier to cut (especially on curves) if I’m cutting on glass, and that my blade stays sharper than if I were to use a self-healing mat. I used a self-healing mat for years, but the instant I tried using a glass mat I never went back.
- 4. Use your own handwriting or a computer font. Using your own handwriting is always fun, and Carrie Owens posted a wonderful example of how she does her beautiful hand-cute block letters. If you wish to use computer fonts, there are two ways to go about this. First is to print directly onto the paper or cardstock you are cutting. You’ll need to Mirror Image (reverse) your text horizontally in whatever word processor you are using, and then print on the backside of the paper/cardstock, this way you’ll be able to simply cut around the letters, but the ink doesn’t show on the right side of the paper. If you don’t want to print directly on the cardstock (for instance, if it’s too think to go through the printer), then print out your letters onto regular paper, and then place your printed sheet over your cardstock with a sheet of graphite paper in between. Trace the letters, then cut them. I recommend graphite paper because it isn’t as messy as carbon paper, and the lines can easily be erased with a good rubber.
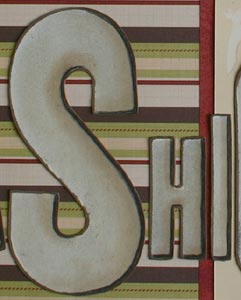
- 5. Use rubber or foam stamps. This is one of my favourite things to do. I simply stamp out my title on a piece of cardstock, then cut them out leaving a little border of the cardstock showing. This technique really allows the letters to ‘pop’ off of the page
I hope these tips will encourage you to try hand cut letters, or even try them again.
I always hate getting fingerprints on my photographs, but it’s pretty much unavoidable (without wearing gloves). To cut down on this, there are a few options. Firstly, if you have the option of having you prints done with a matt or lustre finish, fingerprints will show less. The other option is to use a lens cloth (a microfibre cloth, sold in all photostores). Simply wipe your photos with your lens cloth as soon as you notice any prints, and once you finish a layout. Works like a charm. :)