
Category: Textiles
Articles in the Textiles category
A while ago I was browsing around on Pinterest and came across a lovely butterfly mobile made of felt. It piqued my interest and I pinned it for future reference.

The creator, Laura Howard, blogged a tutorial which includes a how-to on the constuction as well as a printable template for the butterfly pattern. I picked up some felt, wool roving, and needle felting equipment from the local textiles shop as well as an embroidery hoop to use for the ring at the top.
I used washi tape (Japanese masking tape) to cover the wooden embroidery hoop. I had originally done alternating stripes of pink and purple washi tape but decided in the end to go for all purple. I also found that my felt was rather floppy. I ended up getting some sparkle spray paint that added both stiffness and happy sparkle.

I made my own felt beads using the roving and needle felting equipment (and a few plasters along the way). I deviated from the original tutorial by using 5 strands of butterflies and using heavy sewing thread for the strands. I pulled the thread through each felt bead three times to secure them, and used a simple running stitch to attach the butterflies.

As in her tutorial, I made the threads extra long, attached them to the hoop then continued them up and attached them together and formed a loop for hanging. I also added a couple felt beads to the leftover thread after making the loop. It just felt more complete to me.

Thing 1 is absolutely delighted with her new mobile, and so am I. It adds lovely colour and dimension to her room.
I finally remembered to take a photo of this (ironic since I’m taking daily photos).
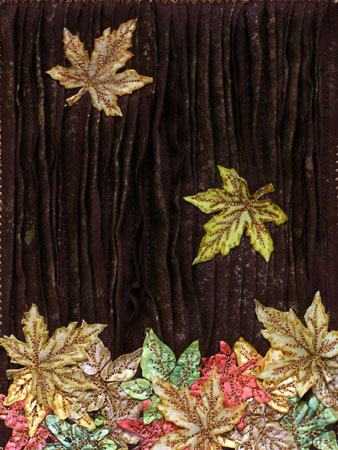
This is my first page for a friend’s fabric book the theme of which is autumn. I had a lot of fun with it. The background is a brown poly-cooton sheeting that I sewed to a felt and Timtex backing randomly pleating as I went. The fabric was then sponged with fabric paints and some of the pleats were cut open. The tyvek leaves I posted about the other day were sewn on using free-motion embroidery to look like fallen leaves. The falling leaves were made by stamping onto Timtex with Staz-on, painting in colour with highly diluted fabric paints and stitched on with free-motion embroidery.
I’m quite happy with how this page turned out. The second page requires a gazillion french knots, so it may take a wee bit longer to get that finished.
Jo asked how I did the Tyvek leaves without them distorting. The short answer is very carefully.
Here’s the long answer:
First, I stamped several extra leaves on the Tyvek so I could choose the best ones out of the bunch. After that it’s just all about keeping a careful eye on the Tyvek as it shrinks. Apply the iron (heat) to the back side of the Tyvek as it will want to shrink away from the heat, and I always use a piece of baking parchment as a ‘press cloth’ when dealing with Tyvek. Then place the iron over the Tyvek/parchment so that the iron is touching but not really weighing down on the Tyvek, trying to cover as much of the piece in one go as you can. Then just keep checking it to see if it has shrunk down to the texture/size you want it to be. The key is to check it every second or two so that the Tyvek doesn’t try to shrivel up and become crispy. Once the bulk of the Tyvek has shrunk you can go in an touch up other areas with the tip of the iron or a mini-iron.
Hopefully that makes sense to you, Jo! The secret is to just let it shrink slowly and not try to rush it. :)
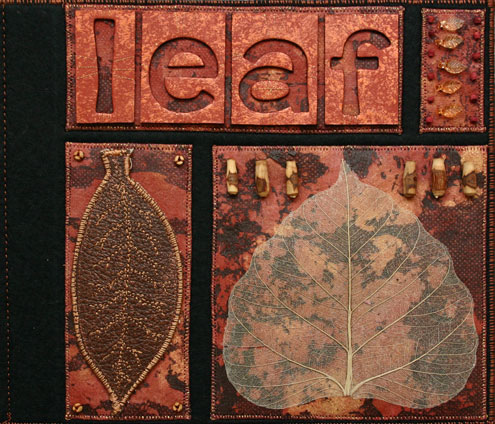
I wanted to have some fun with the opening page of my tree book, so I divided everything up into quadrants (that and the baby wipes I was using were only so big and it took several to cover the area of the background so this prevented having to seam the baby wipes). The base fabric (black) is felt, while the background fabric for each of the rectangles was made of the coloured baby wipes left over from when I painted the Tyvek leaf page. I simply adhered the baby wipes to the felt using bondaweb then on top of that I fused some dye dryer sheets which self-adhere with iron heat.
The title is made using some chipboard letters (Scenic Route) out of my scrap supply stash which were sponged with acrylic paint, lightly adhered with some double-sided tape to keep them in place while I stitched them down with some gold thread.
The leaf is one of my left-overs from sign-in tags which I simply sewed on by machine, while the skeleton leaf is adhered with bondaweb (still hoping that the leaf makes it through the RR intact, although I have spares if needed). I also added a few acrylic and wooden beads that I felt worked with the theme and with the design.
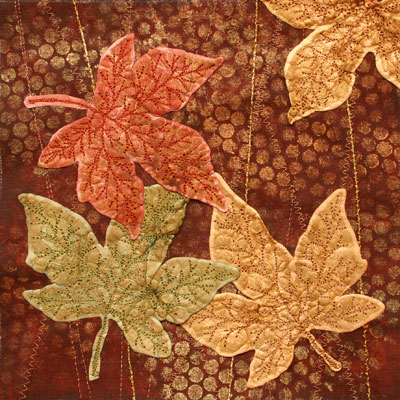
This was one of the page I made for my Tree Book and will end up being the second page of the book. The base fabric is a cheap brown poly/cotton piece of sheeting which was painted using acrylic paint sponged on with baby wipes (a technique I love since I then get to use the coloured and dried baby wipes as a fabric, too) first in an Indian Red that was simply sponged on, then in copper and gold which was sponged through some punchinella to create an interesting background. I then couched on a few metallic threads to tie the whole background piece together.
The leaves are made of Tyvek which I first coloured with dye ink, stamped with Staz-On, heated (with an iron on wool and using a piece of parchment to protect the iron) from the reverse to shrink and add texture and finally coloured with a bit more dye ink to enhance the textural qualities. I used free motion embroidery to stitch the leaves down following the leaf veins of the stamped image as a rough guide. I really like how the FME turned out and plan to experiment further with stitching Tyvek in the future.
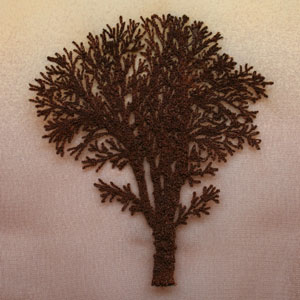
This is the centrepiece for the cover I created for my 2007 round robin fabric book (theme of trees). When I designed the book I knew I wouldn’t be actually constructing the cover until the book returned home, but I thought I could at least get the main image done and dusted.
I used a commercially available tree stamp (from Creative Expressions) to stamp on some water soluable stabalizer to use as a stitching guide then FME’d over the top of the stamped image onto some ombre chiffon. I really tried to layer the stiching to build up the image and I ended up using the bobbin side of the piece as the top because it had a better textural effect. I’m really happy with the way this turned out. :)
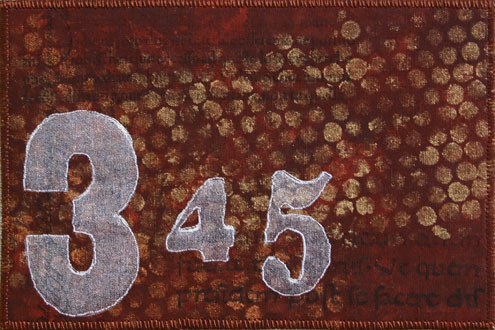
I wanted to play around with creating backgrounds on this card. I took some plain brown sheeting and sponged it with Indian Red acrylic paint. Loved the effect, as the background took on a whole new appearance with the paint. It just made it more, well, interesting.
The second step was to use some of my metallic Pebeo Setacolour shimmer paints through some sequin waste. As I was trying to build up a background, I used my darkest colours first, then proceeded to lighter colours. In this instance, I sponged copper paint through the sequin waste first, then repositioned the sequin waste and sponge gold paint through it. I really liked both the effect and the colours together so I’m thinking of making more of this fabric for other projects.
To finish the postcards I added a bit of stamping. The latin stamps are rubber stamps with Fabrico ink, while the number stamps are foam stamps used with setacolour paints. I did a bit of free motion embroidery around the numbers for some extra definition before finishing up my postcard.
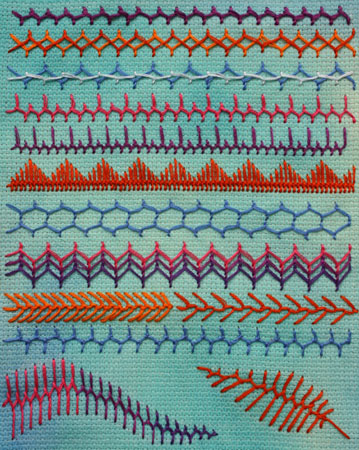
This is my entry for Cretan stitch for the Take a Stitch Tuesday challenge. It was lots of fun, but nothing overly inventive. I am really enjoying seeing what others stitch up.
Most of my sample lines came straight from Sharon’s challenge post on Cretan stitch, but I also saw quite a number of participants stitching leaves, so I thought I’d add one, too.
Once again I’ve done my sample on some handpainted Aida cloth. Aida cloth is just so easy to stitch, so I think I’m going to continue using it for anything that requires a straight line for the sampler and use regular cloth for when I do my more experiment samples. All of the sample lines are done with 3 strands of embroidery floss… I decided I need more mileage out of my floss if I’m going to be able to continue doing my samples through the year.
The other day I posted my leaf tags which were made of leather, and Dianne asked what the leather was like to sew on…. I thought I’d answer the question here.
Leather is easy to work with. I think of it as working with thick paper because, unlike fabric, if you pierce the leather with a needle you have a permanent hole. Leather comes in various weights, from stuff that is very stiff to stuff that is far softer, in the case of my tags I was using a piece of leather that was a medium thickness with a fairly soft hand. You need to use proper thread and needles for your weight of leather.
Most haberdasheries should carry leather machine needles. They are easy to tell apart because they have a diamond shaped tip. If you are working with soft leathers you can probably get away with using a denim needle (as I did, because our haberdasheries don’t carry leather machine needles). When it comes to threads, use a good strong thread like an upholstery thread if you are doing seams. Since I wasn’t seaming, I used a rayon embroidery thread. Sew as normal, but don’t use pins. If you need something to keep the leather in place while you stitch, try using a glue stick, double sided tape or a temporary spray adhesive, just keep them out of the path of the needle so you don’t gum up your machine. Personally, I like using bulldog clips or papercilps as I don’t need to remove the adhesive after sewing.
This was the first time I’d ever done free machine embroidery (FME) on leather, and I was very pleased with how it turned out. The stiffness of the leather allowed me to easy move a small piece around under the foot without needing an embroidery hoop or stabilzer. I did a few samples before starting on the tags proper, but in all I found it very easy to work.
One thing I will mention is the edge stitching. I tried two samples of edging. The first, I cut the leaf shape first then sewed the edging. The second, I sewed in a leaf shape then cut around the edge. The latter seemed to work far better than the former, and I got a much nicer and more even edge. I also like the definition the sliver of leather on the outside of the stitching gave to the overall appearance.
If you are looking to try working with leather, try going to a leatherworker first. They often have lots of scrap bits of leather that they will sell you at a fraction of the price. If you happen to live in the northeast of England and are the near Newcastle-upon-Tyne area on a Sunday, I highly suggest going to the craft market on the Armstrong Bridge. There’s a lovely chap there whe sells his scrap leathers for whatever you think they are worth to you. Have a project in mind, as he often asks what you’ll be doing with your pieces and will always give some helpful hints. :)
This time in red!
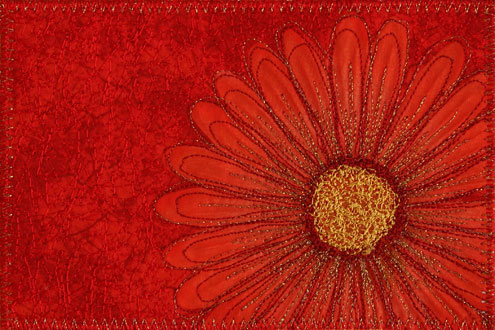
Love this one even more than the first.