
I had quite a lot of fun making this little gift box, and thought I would share it with you, including a downloadable template and instructions.
Ingredients:
- a variety of oriental-influenced papers (I used Far & Away )
- 1/4-inch and 5/8-inch ribbon (I used Far & Away )
- accents (I used Far & Away )
- template, downloadable in .pdf format here—JapGiftBox.pdf
- 150lb white cardstock
- Chalk or ink (I used Tim Holtz’s distress ink in ‘old paper’ and ‘black soot’)
- Chopsticks
- Double sided tape (I highly recommend Therm o web’s Strong Tape )
- Optional: Notch tool or 1/2-inch circle punch
You may wish to check out your local Asian markets, as many have wonderful elements such as coins and chopsticks for sale which make great additions to a favour box or other altered project.
Instructions
First, download and print out the template onto the white cardstock that I listed in the ingredients.
To make the Kimono:
1. Cut out the kimono template.
2. Glue the template to the reverse side of your pattern paper, and cut it out around the template. Repeat to cover the other side.
3. Decide which side of your kimono is up, and on that side draw a light pencil line vertically down the centre of the kimono and chalk or ink for about 1/8-inch on either side of that line. This will create a shadow that will add depth the kimono to give it a ‘faux’ inside. (I inked mine with my ‘old paper’ ink pad.)
4. Ink or chalk the edges of your kimono (I inked mine in black).
5. Run ribbon along either side of the centre line using the neck piece as a guide, leaving approximately an 1/8-inch gap (the triangular neck piece gives the illusion of a collar and keeps the ribbon taut).
6. Run your ribbon along the outside edge of the sleeves to finish off the edges. For my kimono I only used ribbon on the front side of the piece.
7. Set aside.
To make the box:
1. Cut out the box template and adhere the blank side of the template to the reverse side of the patterned paper. Trim the paper using the template as your guide.
2. Using an embossing stylus or a dried out ball point pen, trace along the dotted lines of the template (template is facing up, patterned paper is facing down).
3. Crease the lines you’ve just created as much as possible.
4. If you wish, you can use a 1/2-inch circle punch or a notch tool to cut out at the centre edge of each of the curved lines. It gives a lovely finished look and makes the box easier to open.
5. Ink all the edges of your box.
6. To assemble the box, lay down some double sided tape along the long small flap (the right-hand side of the template) on the patterned paper side.
7. Fold the box in half (along the crease line) and line up the edge of the box so that the flap lies to the inside of the box. Once you are happy with the placement, stick the flap in place securely.
8. Squish in the creased edges of the box to curve out the front and back panels and then fold the ends of the box in to close you gift box.
To assemble the piece:
1. To start, I taped the 5/8-inch ribbon diagonally toward the bottom of the box.
2. To add the chopsticks, I first marked where I wanted the chopsticks to lie and then used double sided tape wherever they touched the box.
3. Glue the kimono to the chopsticks in the same manner.
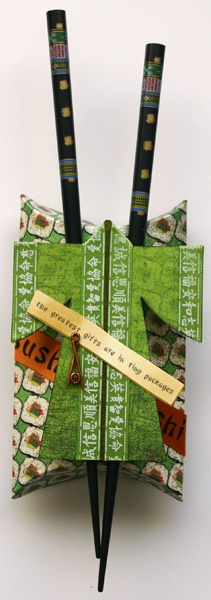
4. The Chinese fortune rub-on was rubbed onto a scrap piece of white cardstock, and then cut out. I lightly inked the edged with my ‘old paper’ ink pad. I used double sided tape to adhere the fortune and liquid glue to adhere the charm.
The kimono measures appoximate 3×4-inches. The finished box measures about 2.75×5 x 1-inch. Now you just need to fill your gift box with a small gift, vouchers or money and give it to someone special :)
The ‘Fine Print’: The Japanese-Style gift box piece was created for www.scrapthatmoment.com however the images, instructions and templates are copyrighted to me, Chriss Coleman. Feel free to use these templates and instructions for personal use. Please don’t post to .pdf and instruction to any online forums, however feel free to link folks back to this article. If you post your creations online, a mention or a link back to www.sheepspace.ca would be much appreciated…. it’s all just good karma. :)
Also, feel free to leave a comment with a link back to your creation. I’d love to see it. :)
Comments
Also, want to thank you for including me in your inpirations. :)
— Angela Rockett · 14 July 2006, 14:42 · #