
My Sign-In is a two-page spread, with both pages the same except the left page has a title and 2 pockets, while the right page simply has 3 pockets.
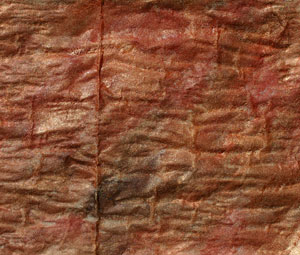
To start, I painted some Bondaweb (paper side down) with acrylic paints (burnt umber, indian red and metallic copper) using diagonal brush strokes. Once the paint was dried, I flatten out the bondaweb (keeping the backing paper in place) and put it on a piece of black felt with the Bondaweb paper side up and began ironing the piece from the middle flattening out the fusing as I progressed to the edges.
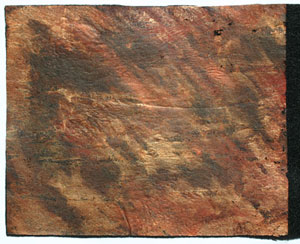
Don’t worry about and cracks or lines that appear from the Bondaweb transfer as it only adds to the texture of the piece, however do consider the colour of the felt as it does change the effect and look of the piece as it will show through in any cracks and open areas as well as enhance the colour of the paints.
Now the fun begins. :) Using a variety of rubber stamps and a copper Brilliance inkpad, I covered both pages with stampsed images. Do becareful as you stamp as Brilliance is a pigment ink and therefore takes quite a while to dry so becareful not to smudge the stamping. For these pages I used stamps featuring latin text, french script, oriental text, numbers, and alphabets. I tried to cover nearly the entire page without overlapping the images.
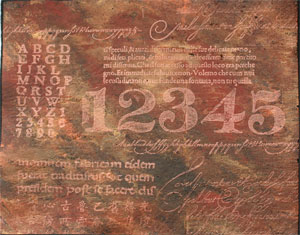
Once the images are stamped, grab a heat gun and blast the entire page being sure to be constantly moving the gun. If you are using acrylic felt, as I did, it will melt under the heat gun which will create slight holes in the bondaweb. Be sure not to leave the heat gun in a single spot too long or the felt will melt through and create a hole in the page. The idea is simply to distress the paint layer, not to create lace (at least for this project) as well as to set the ink. :)
With the ink now touch dry, lay a piece of baking parchment over the piece and iron to ensure the ink is fully set. Be sure to use the parchment otherwise the Bondaweb will adhere to the iron or press cloth.
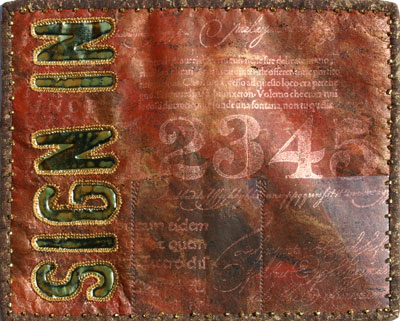
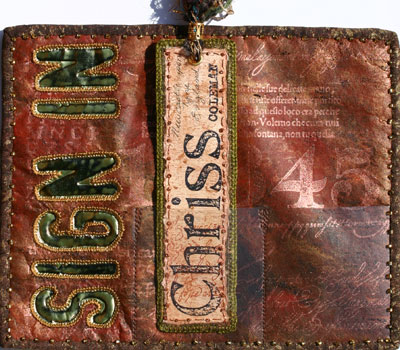
For the title I stamped on gold embossing foil with black Staz-On ink. With a spare pair of scissors (not your best set, please) cut the foil leaving a bit of a margin (about 1/8 to 3/16-inch), tacked the letters to the page with a bit of double-sided tape, and stiched around each of the letters. If you come up through the fabric and down through the metal you will find it easier to stitch and you won’t get accidental holes in the foil.
With the letters stitched, I used a fine embossing stylus and traced around the ouside of the inked edge of the stamped image as it created nice definition and depth, and generally gave a nice finishing touch.
I cut some transparency to fit, and stiched it down to the fabric, creating little pockets as I went. The stitching at the top of the pocket is reinforced with a little inverted triangle. The transparency generally goes to the edge of the page so that its edge is enclosed in the binding.
To finish off the page I backed with the previous/next page and machine basted around the entire piece. Normally I would have used Bondaweb to fuse the pages, however I was worried about discolouring the foil and messing up the painted finish somehow.
I used some lovely brown cotton eyelet to make the binding, cutting from the solid strips rather than the bits with openwork. I then stamped the entire strip with a script stamp and black Versacraft ink, over which I stamped a large bold ‘love’ stamp with copper Brilliance ink, and then stippled metallic gold setacolour over the entire thing. None of the stamping is legible, however the idea was to build up a depth of colour more than anything. Be sure to give the binding a quick blast with the heat gun to get the inks and paints to a touch-dry state, then iron (using baking parchment as a press cloth) to fix. Fold the edges into the middle or use a bias tape folder to create the binding.
After handstiching the binding to both sides, I did a quick beaded running stitch along the ditch. Always remember to knot the thread once in a while just in case the thread breaks, so that in the worst case scenario you’ll lose a few beads rather than the whole lot.
Here’s how the piece looks with my bookmark in place.
Comments
— Susan · 25 July 2006, 03:48 · #
— Anna Sigga · 26 July 2006, 11:51 · #
— Cara Bresette-Yates · 30 July 2006, 04:04 · #