
Category: Organization
Articles in the Organization category
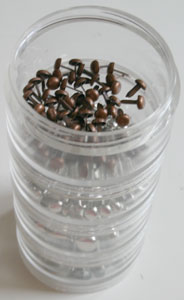
Organizing embellishments is always a challenge. I have three ways of organizing my embellishments. For small embellishments (like brads) which I use on most layouts, I love using bead towers because they are stackable and don’t take up much room. This means that I can store them right next to my work space, and they are within easy reach whenever I need them.
Other small embellishments get stored in a floss box, just like my ribbon. I have a box for alphabets, and one for flowers, etc. You could also sort these by theme if you wanted. I love floss boxes for these things, because they are translucent (so I can easily see what is in the box), and each item gets its own compartment. I simply label each box as to its general contents and they get stacked on the shelf next to my scrap desk, so I can easily pull them out when I need them.
With letter (alpha) embellishments, I always used to keep each different type in its own compartment. However, this meant that everytime I needed a letter I had to got through the entire compartment to find that one letter. I’ve begun dividing up these accents alphabetically, so all the As are in one compartment, all the Bs the next, and so on. This way I know what styles I have in each letter, and they are easier to find. This is also useful if I like to mix and match letter styles, as well as indicating what letters you are running low on.
Large embellishments, such a chipboard stuff and other generally bulky accents get stored in little drawer units (you can usually get inexpensive drawer units at most DIY shops). I’ve thought about putting all my embellishments into this system, but I don’t find it’s as easy to find small stuff in them. Besides, if you are using drawers with those little plastic dividers, I find that a lot of thin embellishments try to slide under the dividers and get mixed up with their neighbours.
The main thing to remember when organizing your lumpies is to make sure you keep the stuff you use all the time close at hand, and to keep everything in a system that makes sense to YOU.
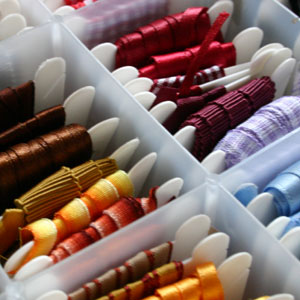
Like many scrappers, I LOVE ribbon. Since I love a lot of variety in my ribbon I only buy about 1 metre at a time… not to mention I’ve got a branch of the best ribbon store in the UK in my city—V.V.Rouleaux. I use an ordinary floss box and simply wind my ribbons around plastic floss cards, arranged by colour. Usually these types of boxes come with one compartment larger than all the rest, and I use this to put my ends that are just too small to put on cards. This method works really well because I can immediately see what I have, and I can easily store a lot of ribbon using this method.
I’ve seen quite of few other methods to store ribbon. The prettiest is keeping them in jars, arranged by colour. Allison Kimball even did a beautiful layout on her ribbon storage for the Creating Garden on 2peas. I will have to admit, that there is a certain allure in this method, given how beautiful it looks, however I think I would waste a lot of time looking for the right ribbon.
Another method for organizing small yardages of ribbon, albeit more expensive, is to use something like Cropper Hopper’s Embellishment Organizer Case. I hadn’t paid this method much attention until I saw this case in action when a member of 2peas posted it in her gallery. I love how neat and organized this looks.
Some people prefer buying ribbon by the roll, and this proves an entirely different organizational dilemma. Some people use a method of altering a photo box to hold their ribbon, which is great for small collections of ribbon, unless of course you alter quite a few boxes. Another way to organize a small collection of ribbon rolls is to put them on trouser hangers, preferably the multi-tier variety where the arms swing out, and then clip back into place. Simply load up every other rod with your rolls of ribbon, and you can cut as much as you need, as you need it. For larger collections, a multi-tier shelving unit (either over the door unit or mounted unit) might fit the bill, such as this unit by ClosetMaid.
Whatever method you choose, it should allow your ribbon to be viewable and easily accessible so you can spend you time scrapping rather than looking for ‘the perfect ribbon’.
And the inspiration and motivation I think I need to accomplish it!!! I’m going to complete an album before the end of the year!!! I’ve tried to pick an attainable goal, so I chose to complete my Belgium album. It’s only 48 pages, and I’ve already completed 14 of the pages (soon to be 16 as soon as I glue the title down on the layout sitting on my desk). This is a very realistic goal, as I only need to scrap 32 more pages (or so)... if I only scrap layouts for this album, I should be done by September, but I don’t want to put that kind of pressure on myself. I like the variety when I skip from one album to another, and will continue doing so, however when my efforts are spread over 14 or so albums (I’ve lost count) it means that albums don’t actually get completed. Even if every second layout I do is for my Belgium album, then I will complete it before the end of the year.
I’ve also joined a Yahoo! group called Scrapper’s Challenge. It’s mostly about organizing and being productive about your scrapping time, with a layout challenges thrown in for good measure. It’s set up a lot like the Flylady Method, in which you get organized in 15 minute spurts. You literally set your timer and clean and organize as fast as you can (and not just make piles, but really put things away.) And you know what, it works!! I’ve come up with some great ideas, and looking forward to implementing them in my scraproom.
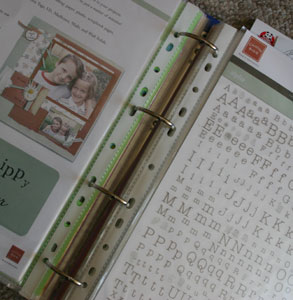
I have tons of letter stickers, and rub-ons, and to keep them organized I use a standard binder with some poly-pockets. Each sheet gets its own pocket, and I group them according to style and size, separating the major sections using subject dividers. I love using this method since I can just flip through a binder to see what I have and what I would like to use.
For non-alpha stickers and rub-ons, I group them by category. If you have a lot of themed embellishments, you could designate a binder for each major theme, such a ‘baby’, or ‘summer’ or ‘wedding’, etc.
The same sort of idea would work really well with die cuts and the like, although I hear from reliable sources that using page protectors for sports cards are the way to go for that type of thing. They usually have about 9 pockets per page, and fit in a standard binder.
Remember to label the outside of the binders with the products or themes they contain for easy reference.
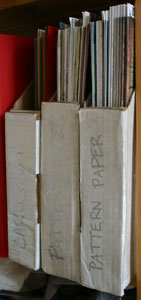
I truely believe that vertical paper storage is the way to go. I have yet to see a system for organizing paper horizontally that I like. Most horizontal systems have a lot of wasted space, and then there’s the fact that you need to dig through the pile to get your paper—- and the paper you want will always be under everything else. Some people find that this system works for them, but I find vertical storage easier, more convenient, and more compact, which means I have space for more supplies. :)
There are a lot of products available for the organized scrapper (or those that wish to attain that state). I used something similar to the Cropper Hopper Vertical Paper Holder for about 9 months or so, except that I made my own.
How to Make a Vertical 12×12 Paper Holder:It’s quite simple, really. I took some of the pizza boxes that I get everytime I order supplies over the internet. Since I don’t have an LSS, I have quite a few of these kicking around. I simply remove one of the sides of the pizza box, and cut off one of the corners. Then I tape the whole thing together and load it up with paper. Simple, economical, and environmentally friendly, since I’m not binning the box (we don’t have facilities for recycling cardboard in our area). If I was really energetic, I could even decorate the boxes. I’m not so I didn’t.
I really like the system, and it’s great for holding full (or nigh full) sheets of pattern paper and cardstock. It’s not so great at organizing the scraps, and I have a lot of scraps (and I do use them!) To this point, I have been using a Cropper Hopper 12×12 Expandable File for those little bits and pieces. If I were only using the scraps to make the odd tag or gift album or card, then this system would be perfect for me. Unfortunately I use my scraps a lot, and I would prefer a system where I can keep the full sheets and the scraps together. Since I work on a Design Team, I would also like to be able to keeps them sorted by manufacturer.
I’m going to try a hanging file system for my 12×12 paper. Cynthia Townley Ewer shows how to make your own using standard legal-size file folders. I simply need to find a way to hang the file folders, without going to the expense of buying a cart… it’s not that I’m “that cheap”, I’d just prefer to spend my hard earned money on scrap supplies. Besides, I would much prefer a type of system I can incorporate into my existing shelving. I will post the results once they are achieved.
I can just hear it…. Your mission, should you choose to accept, is to bring your scraproom under control and keep it that way!!! This is something I’ve generally worked on and off for a while, but have never actually finished. Well, now is the time. I can’t find things, I’m doing dances to avoid stepping on the piles on the floor, and I want my room to become more inviting. Besides, we are going to be moving in the autumn, and I’ll need to get the room in order for showings, and if I’m already organized, it’ll make the transition and set up in our new flat that much easier.
I don’t expect this to happen overnight because the mess didn’t occur overnight (although it does feel like that sometimes). Although I won’t be letting my organization take over my life, I need to get this into control before the mess starts to control me. In between other things, I’ll be posting any little tips and tricks I come across, including ideas that I have tried, and what works for me and what doesn’t.
So let’s start here. The easiest way to organize is to collect everything that you use for scrapping, and sort them out into proper categories (I really don’t want to use the word piles, but that’s what they are).
- Pile 1—- paper and carstock.
- Pile 2—- embellishments.
- Pile 3—- tools of the trade.
- Pile 4—- layouts (finished or in progress).
- Pile 5—- the donation pile.
- Pile 6—- the bin.
Once your stash is divided into these piles, it’s easier to see what you have and what you need in terms of storage, and buy boxes or storage units to fit your needs, and organize in a way that the stuff you use on a constant basis is within easy reach of your scrapping table. The next thing is to only keep what you are going to use. If it’s no longer your style, and you don’t forsee using it then get rid of it. Donate the stuff you don’t want to local charities such as kids clubs, hospices, etc.
So get going and start getting organized!!!
This final part on organizing photos will deal with the actual prints themselves. Like many scrappers, I have a lot of photos. In fact, I’m quite sure that I have more photos than I could even scrap in my lifetime… and I don’t even have kids, yet. So how do we go about organizing them. I have found two options.
- 1. Organizing by event and theme.
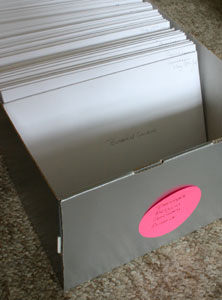
For photos, especially travel photos, I organize them as soon as I get them home. I divide them by event or by city. If I have a lot of photos from one city, then I will often subdivide it so each site gets it’s own envelope. On the outside of the envelope I put all the relevant details, include names (people and places) and dates. I will often also jot down small notes of the events and place those notes inside the envelope for use on later journalling. These then get filed in boxes, usually in chronological order. For the photos I have, this works well for me.
You can also do the same thing with photo boxes, using index cards to divide your major events/dates.
- 2. Using a photo album to organize.
For those people with children/families, this is a great option. When you get your photos back from the lab, simply place the photos in a traditional (but safe) photo album. You can always jot down journalling notes and place them behind the photos. This nice thing about this method is that your family and friends can see your photos, even if they haven’t been scrapped yet, and you just take the photos out as you wish to scrap them.
No matter what method you choose, I think the most important thing is to make sure that the name of the event/place/people and the date appear with your photo, whether it be on the back of the photo, or on an adjacent journalling card. This way, even if the photos never get scrapped, future generations will know what the photo is about.
The other day, I was talking about organizing libraries of original photos. Today, it’s about the good photos—the photos I print.
- 1. Editing a Bit at a Time—I keep a folder of photos that need to be edited on my desktop at all times. This way if I have the inspiration and the time, I can quickly edit a batch. I usually edit one event at a time so I can keep track of the photos, and almost ‘preplan’ the layout in my head. I know how my style works. 1-page layouts will have 1-3 photos (using 1 or 2 7×5s) and 2-page layouts will have 7 or so photos (using 2 or 3 7×5s), so I tend to keep this in mind when I do my editing. Let your personal style dictate how you select your photos. I usually pull far more photos than I will actually print, but I find it easier to select the ‘finals’ in PhotoShop because I can see large versions side by side.
- 2. Classifying Photos—When I edit them (which can be as simple as just cropping them), I save them with their original image name, and a size suffix. Each size I regularily print has a letter code. 6×4 = a, 7×5 = b, 9×6 = c, 10×8 = d, 12×10 = e. Therefore if my original file was IMG_9876.jpg and was cropped to 7×5, then it’s new name is IMG_9876b.jpg. This means I know which photo is the original, should I ever need to dig it out of the archives. This also means I know what size I plan to print it.
- 3. Archiving the Good Photos—Once the photos are edited, I make a single folder for that event (I make a folder for each event, but you could do this by month, as well). All the edited photos and any .psd files I want to keep go into this folder (I only keep .psd files for photos I’ve done a fair amount of editing to, not everyone of them). I burn these folders of ‘Printed Photos’ to CDs in batches, generally in chronological order. By doing so, it means that I have an extra back up of all my good photos, should anything happen to my library archives. (This saved my hide once, so I think it’s good practice. I may have lost 25,000 photos when my backups went belly up, but I still had all my GOOD photos archived separately.)
- 4. Holding for Print—I then copy the edited photos into a “To Print” folder on my desktop. This folder has a seperate folder within it for each of the sizes I regularly print. I separate the photos into their respective folders by size (using the size suffix makes this nice and easy). Once a month or so, I will take my photos to the photo lab to be printed, although this system could work just as well if you just printed what you needed when you wanted them. Personally, however, I take upwards of 40,000 photos a year, and have several hundred photos printed a month, so I find taking them to the lab easier and more cost effective. Once printed, I simply delete them off my desktop.
I get asked quite often how to deal with masses of digital photos, and I thought I’d post my thoughts here. I use a 6.3mp camera, and take thousands of photos a month, so keeping my photos manageable is a necessity. For my photo organization i use iPhoto 4.0, a Mac product. (I’d like to upgrade to iPhoto 5.0, but haven’t done so yet.)
- 1. Keep Manageable Sized Photo Libraries—First, I separate my photos into digital libraries when I download them. You can always reorganize them later, but it’s easiest to do this from the start. I divide my photos by event (or part thereof), with no more than 500MB or so of data per album, for the simple reason that this is then easily burnable to a CD. I use 516MB CF cards for this reason. One card equals one CD, more or less. Depending on how many photos you take and the size of each photo file, a CD will hold anything from one (or part of one) event to several months of photos. If you fall into the latter category, then group as many months as you can (in order) onto a single CD without splitting any months. This will make it easier to catalogue your images.
- 2. Create A Naming System—You’ll need to create a naming system for your libraries that works for you. Personally, my libraries tend to look like this: iPhoto Library (2005-06 04 Bamburgh Castle) In short it’s an iPhoto Library, from 2005, from June, it’s the 4th CD that month, and the photos were taken at Bamburgh Castle. We started numbering them this way so that they will appear in order on the computer (especially important if you’ve got several years worth of photos sitting on your server). The CD number became useful when I found that i had more than one CD from the same location, and the description of what the photos are is invaluable if you are trying to find something in a hurry.
- 3. Separate Your Good Photos—If your photo management software allows, it’s always a good idea to create a separate album within the library for your “good” photos. These are the photo I plan to print. Although it’s not necessary to separate them, but I find it useful if I need to go back and find an original again. It doesn’t take long to set this up, and it has saved me a lot of valuable time in the past, so I think it’s a good idea.
- 4. Don’t Forget To Delete Your Rubbish—I usually do this at the camera stage, but there are always those photos that make it onto the computer that just don’t make the cut. Unless they are “one of a kind special moments and it’s the only photo you have of it” kind of photos—delete them. They aren’t worth the space.
- 5. Back Them Up OFTEN!!—I highly suggest as soon as you download you photos you make some sort of backup, whether it be on a CD-RW, another computer or server, or whatever… as long as you have some sort of temporary backup while you work on your photos. I know that sometimes I can get busy and certain libraries can sit there for months untouched, so this gives me some peace of mind that my photos are still safe. Once my library has been sorted, and I’ve separated my good photos and deleted my rubbish, I burn two final copies of that library. One stays at home, within easy reach, should I need it. The other we keep at the office. Keeping a copy off-premise, means that if something happens to your home, be it fire or robbery or whatever, you’ll still have a copy of your photos.