
Category: Stamping
Articles in the Stamping category
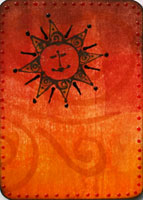
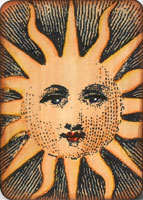
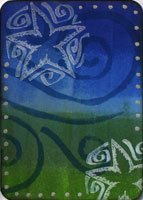
We had a theme of Celestial images that were rubber stamped, and these are the cards…. they went postal last week. :)
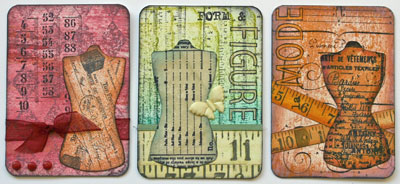
I couldn’t help but sign up for this swap. With my background in textiles and a love for vintage items, this swap was simply calling my name. These go postal on Monday. :)
This’ll be the last of my ATCs until I finish off my Fabric Book RR…. unless of course I have some time to kill while my fabric dries. ;)
I made these for a current swap and they are going postal on Monday. I had so much fun with these, especially since my rubber stamps are so much better organized now!
The backgrounds are all done with rainbow dye ink pads, in this case I used Adirondack Inkpads and then blended the colours with a baby wipe. These were all done on regular white cardstock.
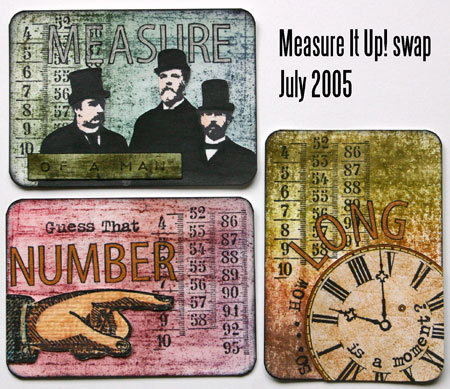
If you are interested the ruler stamp and gents stamps are both Paper Artsy, the clock stamp is available through Stampingtons and the pointing hand is Ma Vinci.
This is a method I’ve been using for several years… since foam stamps became popular with scrapbookers. It’s the easiest and most convenient method I’ve found.
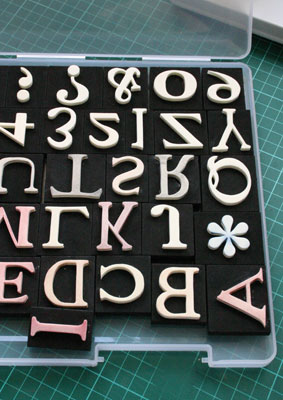
First thing, get rid of the box the foam stamps came in… they are just not a good design when it comes to storage because you end up spending more time trying to get all the stamps back in the package than it’s worth.
Next, you need to get yourself some document boxes. Rumour has it that Target carries these boxes in America. In the UK, check out the Tiger Brand A4 Slim box. If you google it you’ll come up with lots of stockists, but Stationery Box and Staples both carry them. They are the perfect size as you can lay a single layer of foam stamps inside without them slipping around.
When I get a set, I usually like to mark the letter on the back of the stamp with a paint pen, this way I know if I have the stamp upside down or right side up without thinking too much. For those letters that have an upside down/backward equal (think b,d,p,q) I’ll also put a dot above the letter to indicate the top.
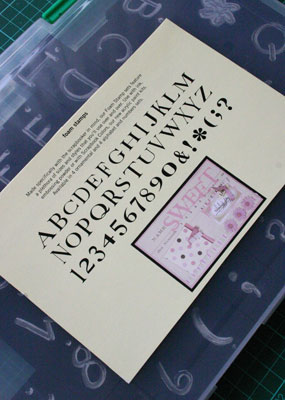
I also like to cut the sample lettering off the package and tape that to the back of the document box for reference. Then it’s just a matter of putting them on the shelves. I prefer laying them on their spines, and I run a strip of Dymo tape with the name of the stamp on the outside edge.
What I love about this is how easy it is to get my stamps out, but even better, how easy they are to put away. The latter is important because if it’s difficult to put away, it will become a pile in my studio!!
If you are an avid Ma Vinci fan like I am, you might want to know that the website address of her shop has changed. You can now find it at:
http://reliquary.cyberstampers.com/
Robin asked everybody on her list to pass the word…. :)
My mate Sue was telling me this the other day, and I thought I would pass it on.
Please unplug your heat guns when they aren’t in use.
Recently there was a crafter down south who, like most crafters, kept her heat gun plugged in and ready for use. One day while she was away one of her pets accidentally switched the heat gun on, which ultimately started a fire. Her entire craft room was gutted.
So for the sake of safety, please unplug your heat tools when they are not in use. It’s easy for a pet or child to accidentally turn one one, for it to drop and turn on, or for something to drop onto it and turn it on. I’d hate for anyone to lose their craft room, their house, or lives due to an accident with a heat gun.
I’ll be posting a few more layouts and such as soon as my allergies die down. I really hope that’s soon.
Although I don’t use my heat gun a lot… except for melting and burning things… but my friend Sue gave me a neat little tip, which I’ve been using for a while and works so well I thought I’d pass it on.
Creating a dedicating ‘heating area’:
What you’ll need:
- an old glossy magazine
- some aluminium foil (enough to cover the magazine on both sides)
- a clipboard slightly bigger than the magazine
Directions:
- Cover the magazine with the foil, shiny side out. Use a bit of tape on the backside if you need.
- Clip the covered magazine onto the clipboard.
- Find something to heat emboss or grab some shrink plastic.
Right, so why have you just created this? It gives you a dedicated space for heating, but more than that it will make it easier to use your heat gun. The principle is fairly simple, the foil reflects the heat back and heats the underside of the piece, which means you’ll be able to emboss or shrink your piece quicker and more effectively. Not only that, but because heat will be coming from both directions your paper, and to some effect your shrink plastic, will curl less. The clipboard simply gives you a ‘cool area’ to touch, as you won’t want to touch the foil because it does get quite hot.
If you use one of those self-healing mats, having a dedicated heating surface will also save your mat, as embossing on the self-healing mats will actually warp them.
I just received my email notification of this event, and thought I’d pass it on in. The Cyberstampers convention starts tonight at 10pm Eastern Standard Time (that’s 3am GMT) and runs through until Wednesday (February 1st). There are classes, socials and special offers at the various vendors the whole week, so if you are into stamping, you may wish to check this out.
The link to the Cyberstampers convention will not be active until it officially starts this evening, but do check it out if you have the chance.
One of my favourite scrapping tools is rubber stamps. I usually tend to buy unmounted stamps because they are less expensive and don’t take up as much storage room.
Using them is quite easy. Lindsay Teague’s article takes you through the basics of unmounteds. She mentions in her article that she uses Kai scissors which is quite common among stampers. However, almost any scissor will do as long as they are very sharp and can cut fine detail. Beyond that, I look for scissors with a non-stick coating, which is especially important if you are cutting through anything sticky, like EZ-mount.
Here are a few of my favourite unmounted rubber stamp companies. Please note, I have absolutely no affliation with any of these companies. I just like their stamps. ;)
- Ma Vinci
- Purple Onion
- Elusive Images (UK)
- Stampers Anonymous
- The Stamp Man (UK)
- Time to Stamp
- Leave Memories
Of course, now that your collections of stamps is growing, you’ll need to be able to conveniently store them. Sherrill Ghilardi Pierre wrote an article for Scrapjazz.com on several different storage methods for unmounteds which included a link to Libby Weifenbach’s post on using CD jewel cases, which I personally love. If you like these ideas, definately check out Sunday International as well as Andrea Steed’s review on their products. You may also wish to check out Ma Vinci’s Mounting Tips & Links as she gives some great links to stockists various mounting methods, including acrylic and wood blocks and vinyl cling film (as an alternative to EZ-Mount).
Some companies offer super-tiny unmounted rubber stamps. I personally love the alpha minis as they are great for captions or journalling. However, many of the methods mentioned above would not be suitable for such tiny areas of rubber. There are two methods that I have found to be useful.
The first option is great if you own a Magnetic Stamp, such as that by Making Memories. Simply adhere a strip of magnetic tape to the back of the rubber, and then cut out your letters or images. It is very important to adhere the magnet before you cut, as it’s much easier to cut both layers together. I don’t suggest using your best scissors to cut these, as the magnet strip may damage or dull your blades. You should be able to find magnetic tape by the roll at most craft shops.
The second option is the one I use. It takes up a little more space, but it works for me. I simply cut out the lettes of images, and glue them to a short piece of dowel. On the opposite end of the dowel, I write the letter and put a little dot at the top. The little dot allows me to quickly know whether or not I’ve got the stamp upside-down, and allows me to figure out whether it’s a d, b, p, q, etc. I store my dowel-mounted stamps in short glass jars, which are labelled as to their company and font.
As a final note, if you like the idea of unmounted stamps, but have a large collection of mounted stamps, it is quite easy to make them into unmounteds. Simply pop the stamp into the microwave for about 5 to 10 seconds to loosen the glue, then peel the stamp off its block. Be sure to clean of any adhesive gunk with a product like Un-Do, as those little balls of glue residue will cause your rubber to stamp unevenly.
Happy Stamping!
One of my favourite things to do in my scrapbooks is stamp. I love it. I mainly use alphabet stamps to create titles and journalling, but stamping is a great way to create accents, as well. Over the last few years, I’ve found tons of great sites on stamping, and I thought I’d share them with you over the course of the next few weeks, starting with inks and related mediums.
Jennifer Sizemore wrote a great article on Scrapjazz.com on Stamping in Scrapbooks, where she went through many of the basics of ink and techniques. It’s well worth a look through, especially if you are new to the stamping world. Although not included, one of my favourite brands of ink pads to use are the Distress Ink by Tim Holtz, because they have wonderfully large raised pad, they are re-inkable, safe for photos, workable, and I just love the colours. Tim Holtz offers some tips on using Distress Ink on his site—be sure to check out his gallery while you are there too!!
In the grand scheme of things, I have tried a lot of ink pads. The most important thing to me is that the ink pads have a removable lid, and a raise ink pad. Both of these attributes make direct-to-paper application much easier, such as when you are inking the edges of paper, or simply smearing the ink pad across the page to create a background.
Last year a professional stamper passed on a bit of info that I found quite interesting. Generally speaking, ink pads with clear lids tend to be pigment inks which are suitable for use with embossing powders, while those with opaque lids tend to be other forms of ink, such as dye-based, which are not suitable for use with embossing powders. I remember immediately going home to check all my stamp pads, and sure enough, she was right. However, I must admit that I generally use Tsukineko embossing ink with coloured embossing powder. You can, however, use clear embossing powder with coloured ink to create similar effects, which is great if you already own a lot of different colours of ink, and are just starting to get into embossing.
Another medium which is in the lime light at the moment is acrylic paint. It’s available either in the craft section, or you can buy artists’ acrylic at your local art shop. They both do the same job, however the craft acrylics are much more diluted (and ready to apply) and more costly in the long run. This is a great medium for use with foam stamps, because it’s easy to apply, easy to clean, and gives an opaque effect that sits on the paper (where as inks tend to settle into the paper). I’ve tried acrylics with rubber stamps, and it does work, however they can be a little slippery to stamp, and acrylic paint isn’t as easy to clean off rubber.
A couple more things before I close for today. To keep your inkpads at their best, store them upside down. This way, all the ink will be spread evenly at the top of the ink pad when you want to stamp. Also, when you are inking your stamp, place your stamp on your table image side up and dab your ink pad onto the image. There are several advantages to doing it this way. First, you can see what areas of your stamp need to be inked. Second, it allows you to be able to use any size ink pad on any size stamp. And finally, you simply don’t need to press at hard to get full coverage, which means less ink will be spread into the negative areas of your stamp, the stamp will be easier to clean, and you will waste less ink.
I hope you’ve found this information helpful, and that it encourages you to try stamping, or even try it again. For more info on the layout featured for this article, check it out in my gallery