
I recently posted an entry on how to make chipboard embellishments, and I think since that day making my own chipboard embellishments has become my new favourite thing (although i must admit they do look ‘richer’ IRL).
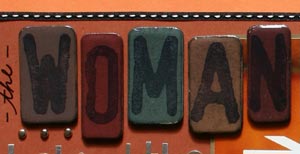
This is how I did my chipboard letters: I used Daler Rowney Grey Board, and cut it so the shape and size I wanted using my craft knife. I then rounded the corners with some scissors, and sanded all the edges with some fine grit sandpaper. I then applied a dark coat of acrylic paint. Once the paint was dry I painted over it with a slightly ligher colour of paint, and once that coat was dry I sanded the face again to give it a distressed look before stamping my letters (stamps are Ma Vinci’s Area 51, and are stamped with a black ink pad). After the ink dried, I coated the entire thing in Anita’s 3-D clear gloss finish for liquid embossing, and allowed it to dry over night before attaching them to my layout. This was so much fun, and I can’t wait to see what else I can come up with!!!
Since my last entry on chipboard embellishments, Allyson Bright has published a new article on ScrapJazz.com on how to take your chipboard embellishments to the next level. It’s well worth a read!
I hope these articles give you the incentive to try your hand at making your own chipboard embellishments. It’s so easy and fun to do!