
Category: Knitting
Articles in the Knitting category
Crocosmia Pie is officially off the needles and blocked. It’s lush. I’m so in love with this shawl.

I finished the knitting on February 2nd and blocked it straight away. I couldn’t wait. Unblocked, it measured 46 inches (or 117cm) across.

And it looked like a giant round cake of ramen.

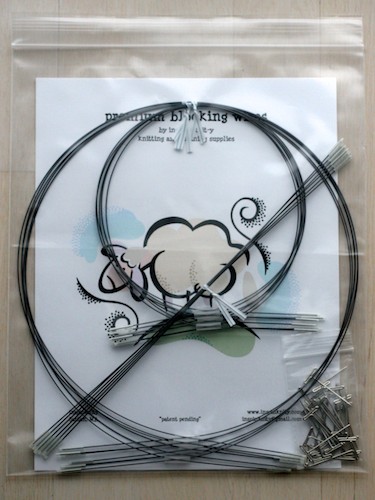
I used my Inspinknity blocking wires to do the job. I heard about the from The Knitgirllls podcast, and they looked like nice wires so I gave them a try. I love them. They are brilliant. I have one of the standard fingering weight sets and had no problems blocking out my shawl. I ended up using all of my 36” wires plus one 24” wires to block out this shawl, which means even with a shawl of 67 inches (170 cm) in diameter whilst blocking, I still had more than enough wires to go around.
The only thing I lacked was enough T-pins, though pins can be easily had. I do think I’ll probably break down and buy a set of Inspinknity super long blocking wires at some point since they’ll make the job of blocking large shawls even easier. After using this set, I’m more than happy to buy the addition set to expand the possibilities. I’m a very happy customer.
The thing I like best is there are no bulky tube to store since everything fits nicely into a grip-loc bag, which fits nicely on my desk-side shelf.
Since I love seeing the evolution of a project, I’m going to give a brief recap. It started out as two innocent braids of fibre from the Wildcraft November 2010 club shipment. Crocosmia colourway dyed onto an oatmeal BFL/silk blend.

Which became my travelling/guild project on my Louet Victoria. 2,000 metres of handspun laceweight singles.

Which became a 64 inch (160cm) in diameter Pi shawl.

I adore this shawl. It is soft and lush, warm and light, and big and snuggly. I’m so pleased with the end results.
The details:
Cast on: December 25th, 2011
Cast off: February 2nd, 2012
Pattern: Pi Shawl by Elizabeth Zimmermann in the Knitter’s Almanac; Concentric eyelet version.
Fibre: Wildcraft Nov 2010 club fibre, BFL/silk, Crocosmia colourway, 200g
Yarn: Handspun laceweight singles, 2000m
Needles: 3.5mm Addi Lace Clicks
My Ravelry project page.
It is now the first of February and guess what is still on the needles?

Yup, I’m still cooking up a Crocosmia Pie. However, I’ve now got only 200 or so live stitches left. That translates to a mere 6000 more stitches left before I can graft the garter border.
The jury is still out as to whether or not the yarn will last that long…
I decided to conquer a second project for the Silk Hankie Along. I received these lovely hankies (and a set of orange hankies) from Sue and Sophie as a birthday gift. Sue dyed them herself.

I found the silk a bit hard to deal when knitting the unspun mittens because of the state of my hands (think sandpaper), so I decided I’d try and spin these hankies. I attenuated the silk just as I did last time, then spun them on my wheel at a 10:1 ratio. Once the single were spun, I made a centre pull ball using my ballwinder, and plied the singles back on themselves creating a 2ply yarn.

I got 69 metres of DK weight yarn. Here it is all caked up and ready to be knit:

I knew that 69 metres wouldn’t be enough for a pair of mittens, but that was okay since I wanted stripey mittens anyway. I paired it up some 100% wool:

I used the wool for the cuffs, using the mitten pattern that lives in my head.

The mittens fit wonderfully, and I find that because the silk has been spun it is less likely to catch on my sandpaper hands. I also adore how the colours worked together. I love these mittens.

The details:
Cast on: January 25th, 2012
Cast off: January 26th, 2012
Pattern: from my head
Yarn: Toppull 100% wool from Sandnes Garn
Fibre: Silk mawata squares dyed by Sues Crafts
Needles: 3.25mm needles for the cuff, 3.5mm needles for the rest
My cruiser mittens are done!

I wanted a fitted mitten, so followed the pattern for the small sized mittens, and other than using a smaller needle for the cuff, I only deviated thrice. The first was to use a two stranded tubular cast on for the cuff (excellent video demonstration can be found here ).
The second was to help alleviate the ‘dog ears’ at the top of the mitten. I simply passed the first stitch of each side over the second, and the last stitch of each side with the penultimate stitch, before using the Kitchener stitch to close the top. To be fair, I prefer a rounded mitten. If I did it again, I’d sub that in instead.
Speaking of the top of the mitten, I continued the cable into the decrease section. I found that the decrease section of the mittens became a bit pouffy without the cable. I simply started the decreases on round two of the cable chart.
Here is a look at the yarn and fibre:


The details:
Cast on: January 17th, 2012
Cast off: January 24th, 2012
Pattern: Cruiser
Yarn: My handspun. 3ply DK weight Lincoln longwool.
Fibre: Dyed by Sue’s Crafts, currently available at the Knit Studio
A couple notes on the pattern. Firstly, it isn’t charted. Then again, it isn’t a difficult cable and really doesn’t need to be charted. Secondly, were I to do it again, I’d likely use a sore thumb (where the thumb gussets cause the thumb to stick out to the side). This pattern basically uses an afterthought thumb, and unlike norwegian style mittens there are no increases to the thumb hole. I found the palm of the hand to be a bit tight and the cuff too loose, but I didn’t want to go up a size as the finger section would have been oversized. A sore thumb would have solved this dilema. Then again, I have wide palms and small fingers. However, they still fit well and I’m looking forward to seeing how they wear.
Progress on my pi shawl is going about as slow as molasses in a Canada in January. At 1152 stitches per round, it was slow going for a while, especially as I made a few minor errors that required some tinking back or dropping down a few (or 18) rounds.
That isn’t to say I’m not enjoying it. I am. It is lovely nighttime knitting that I can do whilst watching M*A*S*H.
I’ve just started the edging. I’ve chosen to go for the knitted on garter stitch edging. I’m using a 15 stitch row for the edging, with two rows per stitch, at 1152 stitches. That’s a lot of edging stitches.

I really wanted to keep the edge all in red. I’ve been hoarding red to the side just for this reason. In the 1152 stitch rounds I needed 3 sections of the gold to make a decent colour section. I broke the yarn at each colour change so I could continue on in the gold whilst simultaneously hoarding the red for the border. It worked out perfectly.
Or it’ll work out perfectly as long as I don’t run out of yarn. I calculated the amount of yarn I needed and gave myself a 10% margin of error. Let’s hope my yarn agrees with my math. :)
If all goes well, I’m hoping to have this shawl off the needles by the end of the month. I’m hoping all goes well. I can’t wait to see this blocked.
The mawata mittens are finished!

I’m really pleased with how they turned out. I still had a wee bit of silk left over which I’ve spun on my spindle, but the mittens did eat up most of that bundle of silk. If I wanted to do an all silk mitten with long cuffs (as I usually like), I think I’d start with 50g of silk. I know that I ended up using more silk than might have been necessary as I like a firm fabric and thus likely knitted a heavier strand of silk using smaller needles, but I like the feel of the finished fabric.
The pattern is just a basic mitten pattern out of my head that was knit to fit, with short fingers and long thumbs, and they fit perfectly. My only complaint about them is the unspun silk in conjunction with my hands. My hands are very dry. They are always dry. However, we’ve recently moved from a very damp climate to a drier climate and my skin hasn’t quite adjusted yet. As a result my hands literally stick to the inside of the mittens.
I’ll put away my mittens for this year. I suspect this is a temporary issue and I can delight in wearing lovely silk mittens next year. It isn’t like we have any snow anyway. :)
~ Previous entry for this project and information on knitting with silk hankies can be found here. ~
Over on the Wildcraft Woollies forum on Ravelry we are having a silk hankie along. Anything goes, as long as there are silk hankies involved.
My experience with hankies is limited to a little bit of dabbling, but not much real practical experience. For my first project I’m using 30g of Silk Mawata squares from Wildcraft and I thought I’d share how I’m doing it.

Aren’t they gorgeous? I’m in love with the colour.
For my first project I’ve planned to do a set of mittens using the unspun silk. It is a simple technique, with the hardest part being a trip to the manicurist. Silk, in most forms, likes to catch on anything, and this is especially true with the hankies.
The first step is to separate out the hankies. Looking along the edge of the silk, you’ll see the edges of the squares and the idea is to try and pull a square (or a couple squares) off the pile.

A square(s) pulled off:

There are several ways to attenuate the silk. I prefer poking a hole in the centre and pulling it out in a loop:

Here is my loop, only pulled enough to make it roughly even:

If I wanted aran weight yarn, I’d stop here. If I wanted something thinner, I’d keep drafting. Here it is all drafted out:

I then break my loop. I do this as the last step as it allows me to either pick a particular spot, like a colour change, or a thin area to break it.

One word of warning, the silk is deceptive. It’ll knit up to a much finer gauge than you may think. If I pull the silk taught, you’ll see the difference between how it will knit and how it looks at rest.

My final step before knitting is to roll the silk on to a toilet roll liner. This step is optional. You could make little nests out of the silk instead, or you can draft as you knit. It is up to you. I wanted to knit with a continuous strand of yarn, so I wound it on to the rolls. At the join, I simply lay one end of silk over the other and twist is slightly to hold it together before wrapping the rest of the silk on.

I decided to use a wool-based yarn for my cuffs for two reasons. One, I was worried about running out of silk, and two, I wanted a cuff with some elasticity. I’m using a camel and merino blend from Onion Knit. This stuff is a gloriously soft single and perfect for that sensitive bit of skin on the inside of the wrists.

I also decided to use two ‘strands’ of the unspun silk. I ended up drafting out my first bit of silk too much, but I’m really glad that I did. I’ve found that I’m getting a much more consistent gauge with two strands, much like what happens when you ply yarn when spinning.

I’m really loving how the mittens are working up and how the colours are coming through even though I’m not giving much thought or effort to keep them from muddying together.

And those are the basics. I’ve started knitting my second mitten already and will be back to show the final results as soon as they are finished.
After finishing the Hippocampus mittens and thinking my stranding could be better, I decided to do another pair of mittens with the leftover Kauni and try out the Philosopher’s Wool techinique for stranding. It’s basically similar to regular stranding, except that you don’t go more than one stitch in either colour without catching the other colour. In regular stranding I’d usually lock my floating yarn (the yarn not in use) every 5th stitch.

This endeavour was a trial. I wanted to try out a new technique, I wanted to try the yarn at a different gauge, and I wanted to try out a mitten with a different stitch count. I was not concerned about the final size or how the colours worked together. Essentially, this was about knitting practice and discovery.
If you look inside the mittens you can see the difference between the length of the floats in regular stranding (left) and the Philosopher’s Wool Method (right). The Philosopher’s Wool Method looks and feels almost woven:

These mittens gave me a really good feel for this technique. In the areas where the floats would be longer, I think the result is much better. However, I noticed that there was a certain area on the palm of the mitten where my non-dominate yarn (green) is too loose and pops out. In this case, because of the pattern, it looks okay, but it is obviously something I need to work on.

I also need to loosen up in the first 5 rounds of the thumb. There is a noticeable change in tension on the face of the thumb, though funnily enough, not on the inner side.
I think this was a great experiment and well worth doing. I’ve learned a great deal from doing it, including that if I were to do it all over again I’d go up to a 2.5mm needle. That would be the same size needle I used on the Hippocampus mittens and thought was too loose. It’s amazing how a simple change of technique can alter one’s tension.
In the end, the mittens don’t fit. The width is about right (though I couldn’t go any smaller), but the length of the fingers and the thumb are about four rounds too short. Also, I would like an extra six rounds between the start of the thumb gusset and the thumb hole. Since this pattern was designed for a heavier weight yarn, I’m not surprised at this outcome. A pattern for a fingering weight yarn would have accommodated this as it is simply a matter of a difference in row gauge.
I did really enjoy working this pattern. I’d suggest that a familiarity with a selbu-style mitten would be useful as the pattern is not long on verbiage, but all stitches in the mitten are charted. For the most part, it is a simple matter of knowing how to deal with the thumb hole and what decreases to use where at the top of the thumb and fingers.
The details:
Cast on: January 6th, 2012
Cast off: January 10th, 2012
Pattern: Rigmor’s Selbu Mittens (free Ravelry download)
Yarn: Kauni Effektgarn 8/2
Needles: 2.25mm
Mods: other that using a lighter weight yarn, none.
I have a tradition of casting on something for myself every year on Christmas day, and this Christmas was no exception. I’ve been wanting to knit a Pi shawl out of handspun for a while and had the yarn to do it.

I’m using the basic Pi shawl with eyelets in Elizabeth Zimmermann’s Knitter’s Almanac, with the eyelets every 6th row. And I’m using the new Addi Lace Clicks (interchangeable needles) my hubby gave me for Christmas. Handspun. Knitting in the round. New needles. Lightweight. It’s heaven.
The original fibre was from the November 2010 Wildcraft fibre club in the theme Crocosmia. It was a beautiful Oatmeal BFL and Tussah silk.
I finished spinning it in April of 2011, with the intent of it becoming a Pi shawl. Spun as a single on my Louet Victoria, it was my travelling project for guild meetings. Needless to say, it travelled for a while as the fibre resulted in over 2,000 metres of yarn.

This evening I’ll hit the 1152 stitches per round mark, and I’m only about halfway through my yardage. I guess that means I still have a bit more time to think about what edging I’d like to use. For now, I’ll continue to enjoy the zen-like nature of this project.
Over on the Stranded group on Ravelry we are having a KAL for the Hippocampus or the Selbuvott or not patterns. Both are patterns featuring a sea horse, and both from the same designer. It started on Boxing Day, but it is still going strong so it isn’t too late to join. I started mine on New Year’s Day.
Although I originally choose some lovely sock yarns out of my stash, I soon discovered they were not going to work for the pattern. I got some lovely Kauni Effektgarn 8/2 instead. I got mine at Net Garn on Banegårdsgade in Århus.

I’ve been wanting to work with Kauni for a long time, and I wasn’t disappointed. The Effektgarn is a 2ply yarn with long colour repeats. It is a ‘sticky’ yarn and thus perfect for colourwork. I really enjoyed working with it. In fact, I enjoyed it so much I’m thinking I might spin myself up some 2ply yarns specifically for colourwork projects.
I wanted to try to get my mittens to match as closely as possible (a bit of a feat since the colour repeats aren’t necessarily the same length), so I wound my yarn into four centre pull balls, two that started with purple, two that started with yellow.

I modified the pattern to have a ribbed cuff instead of a feather and fan cuff, but otherwise followed the pattern. I used the needles as per the small size, but included the extra rows below the thumb hole as per the medium size as I need the extra length in that area.

I’m pleased with the final results, though I feel as though the stranding could be much improved, and the mittens are a bit big. However, they will felt with wear, and I can always try felting them by hand if needed.

I really love how the two gradients work together. I think it gives it an amazing depth of colour.
The details:
Cast on: January 1st, 2012
Cast off: January 5th, 2012
Pattern: Hippocampus by Torirot Designs
Yarn: Kauni Effektgarn 8/2 in EQ (Rainbow)
Needles: 2.5mm (Personally, I’d use a 2.25mm next time. Your tension will vary.)
My project page on Ravelry: Deep Sea Diving
As a final note, if you are interested in knitting mittens, January is NaKniMitMo! That’s National Knit a Mitten Month. Join the group. Make some mittens. I have several more pairs of mitten that I’m planning to knit this month. Fortunately, I’m also in need of mittens. It all works out. :)