
Category: Textiles
Articles in the Textiles category
I was feeling inspired by a piece Dianne did as a journal quilt and I knew I just had to try it myself. I dragged out the Fall 2006 issue of Quilting Arts Magazine to read the original article. And this is what became of it:
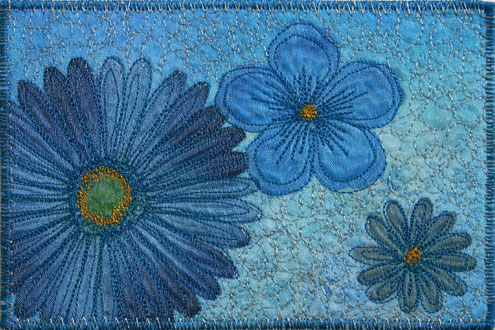
I like how it turned out. I’m thinking of making a rainbow of FME’d flower postcards. Speaking of fabric postcards, I’m in a fabric postcard swap at the moment so you’ll probably be seeing quite a few in the next few weeks. I’m going to try to take the opportunity to use the postcards to catch up on the Textile Tuesday challenge as well. We’ll see how long it lasts. I finalized all the designs for my newest RR fabric book on the commute home last night and I’m absolutely itching to get started, but I’m trying to be a good girl and finish off the postcards first. It’s a tough job.
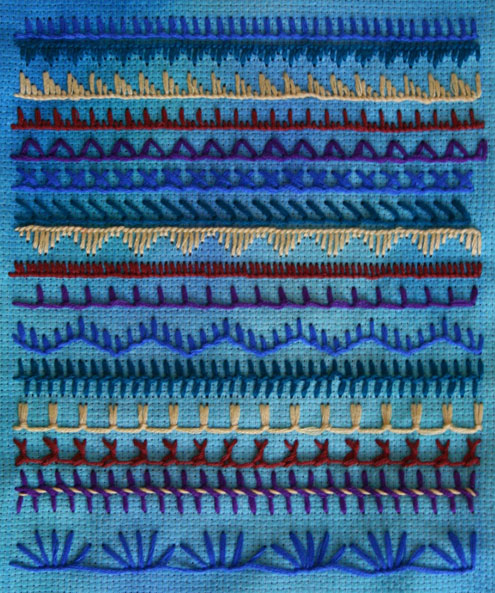
This is my sampler for last week’s Take a Stitch Tuesday challenge. I took a few of the stitch patterns off the samplers of other participants… nothing really new or exciting, but I want to make sure I get most of the basics in my stitch book done every week. I’m thinking of keeping this challenge going into next year and revisiting the stitches to expand my book.
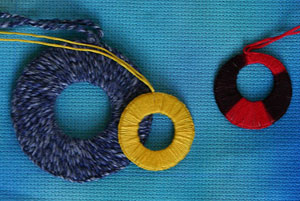
On Textile Explorations Susan did these really neat floss wrapped rings that used button hole stitch. I thought they were fabulous, so I tried my hand at a few. Of course, I also forgot how big a 10 cent piece is and mine are a wee bit bigger. The big blue one can actually fit a £2 coin through it’s hole. I’ll have to try this again with smaller forms.

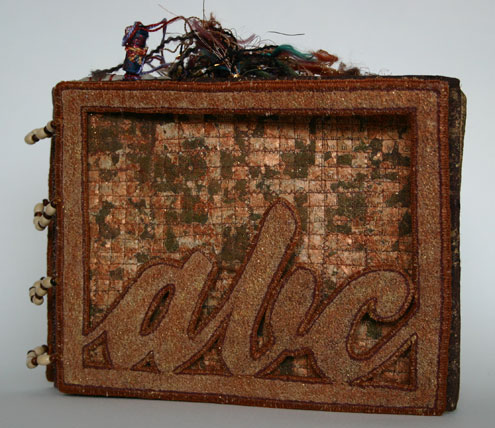
It’s done and I’m so happy. I finally got the last page and the back cover finished this morning, so I spent the rest of this afternoon binding the book together.
The book is stitched together with small wooden beads between the pages and then a decorative string of beads running from cover to cover. I originally wanted to do a variation on a coptic bound journal, but my covers were too hard to run the needle up the ‘spine’ so I opted for this binding method instead. I’m quite happy with it as the thickness of the little wooden beads make the spine and open edges sit at the exact same thickness — a sheer fluke rather than planning, but I’ll take it anyway.
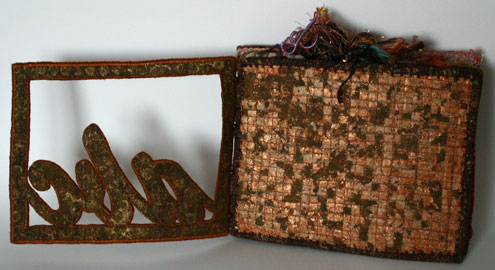
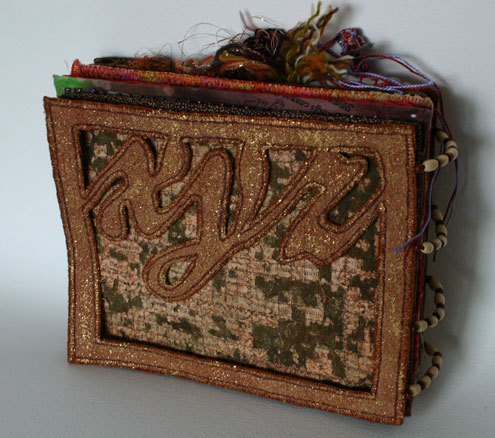
The next photo is the whole book together as seen from the front, showing the cover and undercover. The details of how I made the front cover can be found here. I’m amused by the difference in colour between the photos. The original photos were taken mid day in the summer when we have 20 hours of sunlight a day. The current set of photos were taken today in the dead of winter when we have 6 hours of sunlight and the sun doesn’t actually rise above the buildings. But I digress.
Next we have the first spread of the book which shows the back of the cover and the entire undercover. Details on how I printed the fabric on the back of the cover can be found here and details on how I did the undercover can be found here.
The sign-in page follows. The bookmarks are from left to right: Myself, Sylvia, Connie, Dianne, and Becky. Details on how I fashioned my own bookmark can be found here, while details on how I made the page itself can be found here.

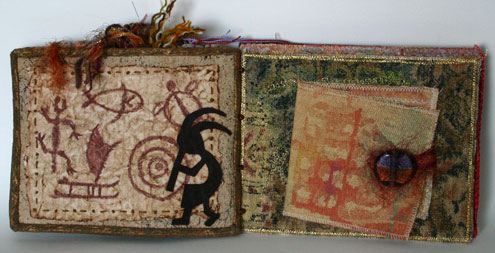
The third spread comprises my petroglyphs page (on the left), details of which can be found here and the front of Becky’s (on the right). The flap on Becky’s page opens and shows a stamped image of writing which is framed with trim with netting over top.
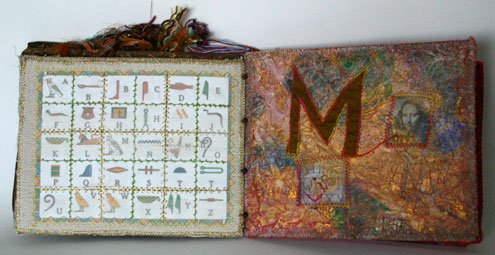
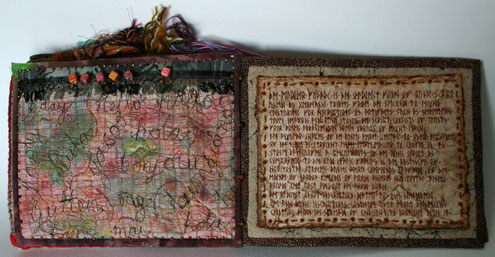
Fourth Spread: The left page is the back of Becky’s page showing a table of heiroglyphics. The table is covered in a sheer fabric and stitched with various threads and stitches. The right page is Dianne’s which is paper fabric made up of various script papers, covered in organza and with a secondary Mona Lisa theme (art being a form of communication in itself).
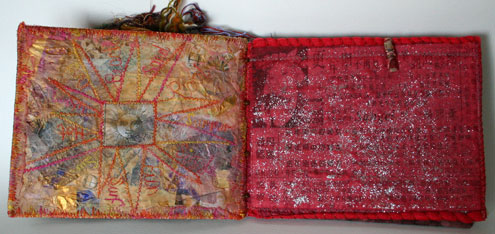
Fifth spread: The left page is the back of Dianne’s page which features a sun and words describing summer done in stitch. The right page is Sylvia’s and is a page of chinese characters and images over which is a layer of sheer glittered red organza. The page is adorned with a fabric bead.
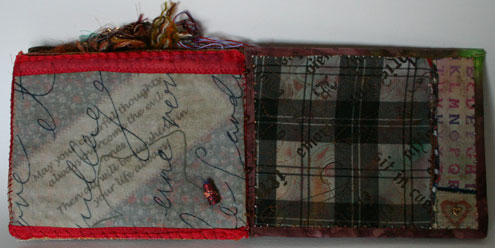
Sixth spread: The left page is the back of Sylvia’s page. She included a quote in each book she worked in. Mine reads “May your cheerful thoughts always overcome the evil one then all willbe sunshine in your life always”. This is covered in a sheer fabric with a script print and decorated with a fabric bead. The right page is Connie’s page which is a tartan with script and other stamped fabrics. The binding also has spript on it, with a bead treatment around the inside edge of the binding.
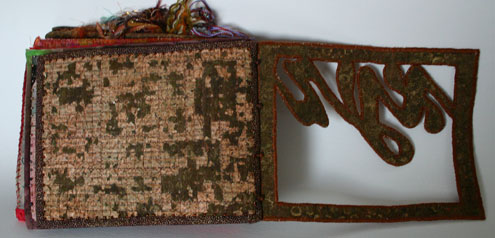
Seventh spread: The left page is the back of Connie’s page with ‘hello’ in various languages stitched onto the page, hello spelled out in alpha beads along the top and further beading along the inside edge of the binding. The right page is by myself and is a replica of the page I did for Connie’s book. The theme fit both books (mythology and written communication) and I really liked the idea. Details on how I did the Futhark page can be found here.
The following photo is the interior back cover comprising the back undercover and the inside of the back cover. These were done in the same manner as the front cover as mentioned above.
And the last photo is of the back of the bound book.
Hope you enjoyed the tour of my round robin book. I would like to say big thanks to the girls who worked on my book — Connie, Dianne, Becky and Sylvia. And thank you as well to Johoanna who organized this round robin. I really enjoyed it.
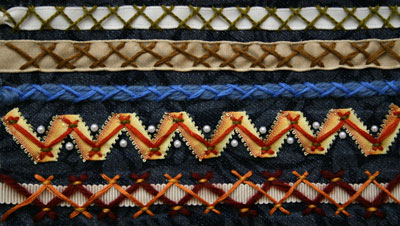
This week’s stitch for Take a Stitch Tuesday was herringbone. Here are a few of my samples:
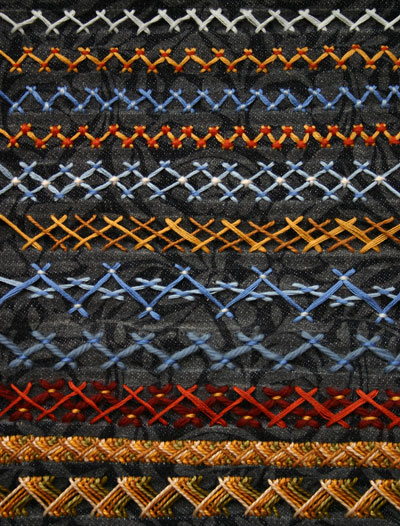
This was the simplest of the pages I stitched, as I tried to see what I could do with no more than the basic stitch. I started out with the basic herringbone, then add some horizontal and/or vertical stitches were the threads crossed. I did the same with the double herringbone however I played a bit with size and weight of thread. I must say, I love the banding one gets when you just keep layering the herringbone stitch. It’s very effective and I think I’ll be using that idea more often.
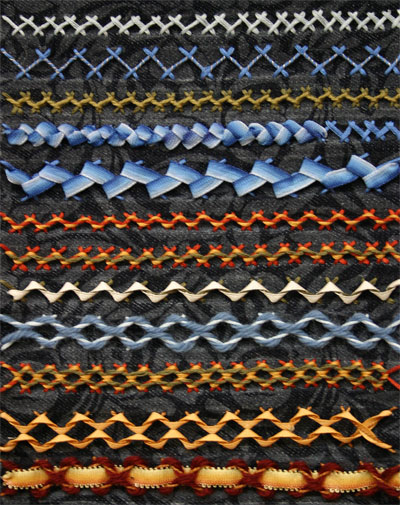
On the next sample I wanted to explore the various ways in which weaving could be used in conjunction with this stitch. The top most sample is plain herringbone, the second is whipped with metallic thread. Third is double herringbone version 2. The fourth and fifth samples are woven using the same ribbon but on one the herringbone in only 1/4-inch wide while the other is 1/2-inch. Number six, seven, and eight all explore wrapping the thread/ribbon around the stitches, although number seven has an extra layer using double herringbone. The last four samples on this cloth all use double herringbone version 1 which were then woven with a second (or third) colour. I love the last one with the ribbon woven through. :)
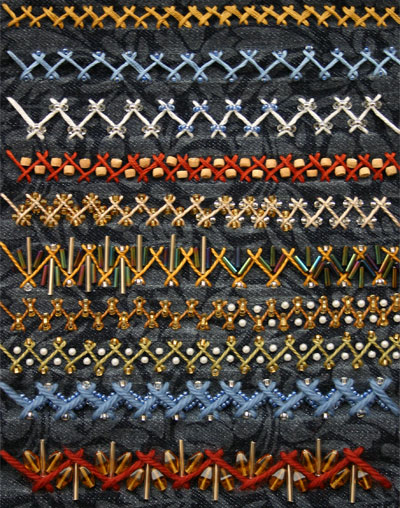
On the third sample I wanted to explore what could be done with beads (and only beads). This sample took the longest, but was also the most fun. To save on space I put several similar explorations on a single line, such as on the fifth, sixth and seventh sample lines of this page.
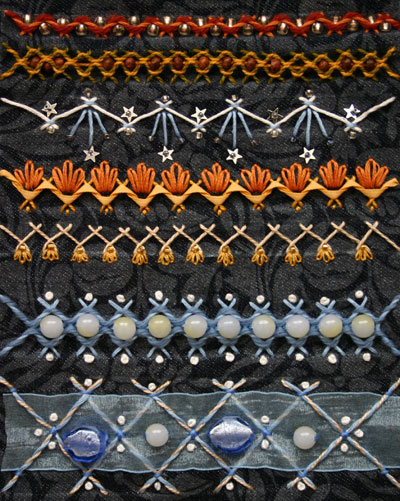
On my fourth sample, I wanted to explore the effect of combining various techniques (weaving, beading, and extra stitching). These were really quite fun to do as the various techniques gave such dimension to each other. I will admit, by the end of this sample I was growing quite tired and decided ‘lets see what a HUGE herringbone would look like’.
This sample remains incomplete as I wish to add to it in the future as time permits, but it is a basic exploration of couching and stitching down objects. I’m quite keen on the 3rd line of this sample which was actually a suggestion of my husband. Sometimes to find something interesting you merely need to turn the world on its head and ask a non-sewing geek.
There are quite a few other explorations I didn’t have a chance to try, but I am making notes in my book as a ‘to do’ list for the future. That includes Chevron stitch which I just pretended didn’t exist.
Thanks for the challenge, Sharon! I’m looking forward to next week’s stitch, although I doubt I’ll get as much done. If nothing else I’ve got a head full of ideas of what I’d like to put into my stitch book. And really, that’s the point.
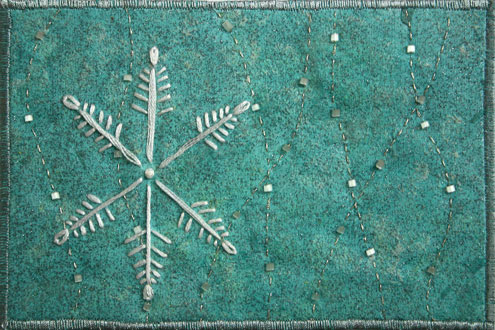
I actually started working on this when the challenge was issued a few weeks ago, but with trying to get last minute Christmas gifts done I only just got it finished up.
The theme was memory and I started working on this while watching the movie ‘White Christmas’, so I’m sure you can figure out the connection.
The postcard is made with 100% cotton sheeting. The background is painted using Pebeo Touch paints, and then I used some stitching and beads to create the feeling of falling snow.
This was really quick, simple and fun… even if it did take me two weeks to find the time to finish the piece. I need to work on the subsequent challenges now….
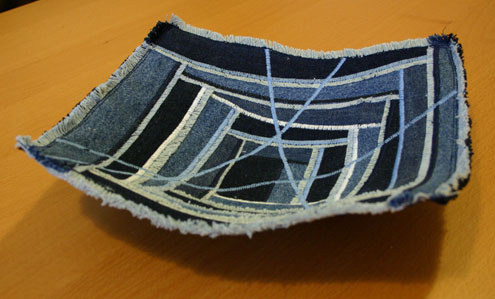
In the Fall 2006 issue of Quilting Arts magazine I saw the article on Fabrication Collaboration which included quilt artist Desiree Vaughn and some photos of these gorgeous fabric bowls she’d made.
Unfortunately, the article didn’t go into how she made them, but I figured I could create something similar with some heavy interfacing and some shaping. The fabric itself was rescued from several pairs of old jeans, which were stitched down with a zig zag stitch done with topstitching thread. I left a bit of a selvage visible so that I could fray the edges of the denim as I went.
Joey’s been asking me to make a fruit bowl for ages, so I’m hoping this will fit the bill. The bowl comfortably holds about 6 to 8 apples so I think the size will be just about right.
For the last while I’ve been really wanting to do some free-motion embroidery. I love the look, and I’ve done it on a few different pieces, but always with some aggrevation. I didn’t have a FME foot and so I simply stretched out the fabric with my hands and went at it without a foot on the machine.
The problem: without a proper FME foot, I had a hard time keeping the stitches even and my threads keep breaking every few minutes.
The solution:
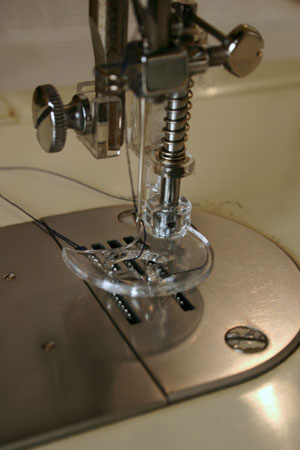
The big foot.
First I went to my local sewing shop to see about buying a FME foot, but she quickly informed me that FME were not available in high (long) shank styles. I left. And I went onto ebay, where I found several FME foot attachments in the high shank style.
After reviewing several threads and articles on the web, I noticed many people recommending the Big Foot FME foot as the best available, so that’s the one we bought.
Well, it arrived today. :)
This is actually supposed to be a Christmas present, and Joey will at some point nick the big foot and wrap it to put in my stocking. But since he’s in London right now, I took the opportunity to check the foot out and make sure it was in perfect working order.
I love this thing — it makes FME so easy to do. Here’s a sample I did really quickly:
This is going to make things so much easier, and I’ll be much less likely to sewing through my finger. :)
I was over on Dianne’s blog today and notice she’s received and bound her round robin book and posted the photos. Check out her Floral Fantasy Book.
Glad you like it Dianne. :)
It’s our last round, and I’m eagerly awaiting all the books to make it home. The final round led me to work in Connie’s book in the theme of mythology. I was really unsure about what I wanted to do at first, but this is what I came up with.
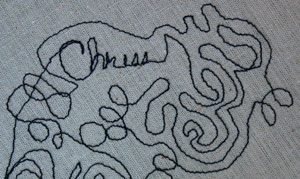
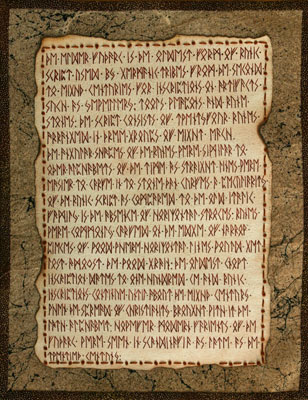
The first page I wanted to drawn on the link between Norse mythology and the Futhark script. The basis of the design is the Codex Runicus but written in Elder Futhark. The writing itself actually recounts a short history of the Futhark.
I had a lot of fun with this page. The parchment part was made using watercolour paper that had been given a wash of Vandyke Brown, and a layer of auburn watercolour crayons. Once dry, I burnt the edges with a match (then soaked the edges to ensure the edges had actually stopped burning) and layed down the text. The text itself is written using a cheap hooded fountain pen with our new FPN Galileo Manuscript Brown ink from the Fountain Pen Network (there are perks to have a husband who collects and restores founatin pens).
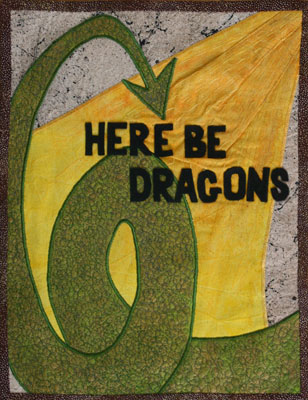
The second page I wanted to bring in a mythological creature but I didn’t want to get to detailed otherwise Connie would never get her book back before Christmas. I decided to streamline the entire thing and only include the dragon’s tail and a breath of fire. The icing on the cake came when we were discussing my husbands lack of (broad) knowledge when it comes to English geography. He said he knew everything he needed to know and drew in the air the outline of Britain and stated ‘England’. Then he scribbled around the island and stated ‘Here be dragons’. It was simply too perfect. :)
I textured the dragon with a bit of free-motion embroidery, added some running stitches to the fire to give it direction, and added the felt letters.
All the fabrics for these pages were made from handdyed/painted muslin (calico) using a combination of tea dyeing, metallic opaque setacolour, setacolour soleil, adirondack colourwash and webbing spray.
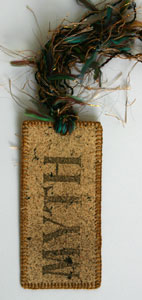
Finally, I made a sign-in tag from some of the left over bits because I thought that would tie everything together nicely. :)
I hope you like it Connie! I had fun working in your book.
This is a challenge for 2007 hosted by Sharon of In A Minute Ago which encourages people to explore the possibilities of various stitches. I’m really excited about this challenge as I’ve wanted to create some sort of personal stitch dictionary for ages. I’m hoping this challenge will give me a shove in the right direction.
The challenge starts on January 2nd, 2007, so if you are interested check out Sharon’s challenge article on her blog. for full details and be sure to leave a comment to let her know you are planning to play. :)